SoftSpy installation guide
Introduction
This page provides installation instructions for the following products:
- SoftSpy for Model 204, Version 7, Release 5.0 or Release 4.0
- MUSE for Model 204, Version 7, Release 5.0 or Release 4.0
Version 7 Release 5.0 of these products supports Model 204 Version 7 Release 5.0 and Model 204 Version 7 Release 4.0.
Version 7 Release 4.0 of these products supports Model 204 Version 7 Release 4.0.
SoftSpy provides debugging features to help you develop, test, and maintain User Language applications. Add-on features include interactive debugging, performance tuning, quality assurance testing, and error audit options.
MUSE is a multi-use facility based on the Model 204 USE command.
Installation of SoftSpy should be done by the organization responsible for the installation and maintenance of Model 204. When performing the installation, you should have a copy of the Rocket Model 204 installation guide for your operating system. You should review all relevant sections of these pages before proceeding with the installation.
When you have completed the installation instructions detailed in this document, SoftSpy and MUSE will be installed. To install SoftSpy and MUSE in additional ONLINE or BATCH204 jobs, refer to Additional Installations.
Overview of Installation
SoftSpy consists of Model 204 nucleus extensions and Model 204 User Language procedures. The SoftSpy installation process installs the User Language procedures, and it modifies your Model 204 systems to make SoftSpy available for use.
This installation guide is organized into sections that provide instructions for each operating system, followed by sections that provide instructions common to all operating systems.
The operating-system-specific topics (z/OS, z/VM, or z/VSE) describe:
- Prerequisite Model 204 installation steps
- Allocation of SoftSpy files
- Required DD/DLBL/FILEDEF statements for SoftSpy files
Common installation sections are:
SoftSpy and Model 204 version 7.4
It is recommended that you install the SoftSpy version 7.5 SPYPROC file, because it is more robust than the 7.4 version.
The SoftSpy SOUL code (SPYPROC file) for 7.5 is compatible with Model 204 versions 7.4 and 7.5.
- If you are currently running SoftSpy version 7.4 with Model 204 version 7.4, you can upgrade to SoftSpy 7.5 by downloading the SPYPROC file. (See the section "Downloading and installing SoftSpy 7.5 files" for your operating system later on this page.)
- If you are installing SoftSpy for the first time with Model 204 version 7.4, you must install the SoftSpy object as described in SoftSpy version 7.4 installation files before downloading the 7.5 SPYPROC file.
Installation on IBM z/OS
This section describes the SoftSpy installation steps that are specific to the IBM z/OS operating system.
Complete the z/OS-specific part of the installation process before performing the installation steps in the following sections, which apply to all operating system environments:
- Update CCAIN
- Online Installation Steps
- Verify the Installation
Prerequisite: Installing Model 204
Before installing this version of SoftSpy, you must have completed these Model 204 installation steps:
- Install Model 204 nucleus
- Install Dictionary/204
For details about Model 204 version 7.5 and later, see Model 204 installation on IBM z/OS.
For details about Model 204 version 7.4, see the Rocket Model 204 Installation Guide for IBM z/OS, version 7.4.
Notes:
- When you link-edit the Model 204 nucleus, ensure that the SSPY and MUSE text decks/CSECTs are linked in.
- If you are running Model 204 version 7.4 and you have never installed SoftSpy before, you must install SoftSpy version 7.4 before upgrading to SoftSpy version 7.5.
Backing up data
If you are upgrading from a previous version of SoftSpy, it is strongly recommended that you make a backup copy of your existing SPYPROC and SPYDATA files before proceeding. The upgrade process modifies these files, so a backup copy is required if you need to revert to the previous version.
Downloading and installing SoftSpy 7.5 files on z/OS
Note: You must have either a Rocket M204 user ID or a Sirius user ID to download the installation files.
To install the SoftSpy 7.5 files:
- If you have not previously installed SoftSpy, modify and submit the SPYALOC JCL job. This job allocates the Model 204 SoftSpy data sets SPYPROC, SPYDATA, and SPYTEMP. The following table shows space requirements for these data sets:
Database Name Number of 6184-byte pages SPYPROC 1000 SPYDATA 160 SPYTEMP 112 - If you have existing SPYPROC and SPYDATA files from a previous version, back them up.
- SPYPROC, the SoftSpy procedure file, is distributed as a standard Model 204 Dump file (a sequential file). Download SPYPROC, in binary form, from the SOUL files download page to a workstation file.
- Upload the file from your workstation to your z/OS system.
- RESTORE the file into the SPYPROC file.
z/OS installation next steps
The steps in this section apply to both SoftSpy 7.4 and SoftSpy 7.5 installation on z/OS systems.
Once you have uploaded the files into the allocated data sets and converted them to z/OS standard format, continue the installation as follows.
- Modify the ONLINE startup JCL.
- If you are installing SoftSpy for the first time, add DD statements for the SPYDUMP, SPYPROC, SPYDATA, and SPYTEMP data sets to your ONLINE startup JCL.
Following are samples of these statements:
//SPYDUMP DD DSN=SYSM.M204.Vrrr.SPYPROC.DUMP,DISP=SHR //SPYPROC DD DSN=SYSM.M204.Vrrr.SPYPROC.M204,DISP=SHR //SPYDATA DD DSN=SYSM.M204.SPYDATA.M204,DISP=SHR //SPYTEMP DD DSN=SYSM.M204.SPYTEMP.M204,DISP=SHR
where rrr is the current release level, such as 750 or 740.
For SoftSpy version 7.4, you will also need to add a DD statement for the ITSAUTH data set:
- If you are upgrading from a previous version of SoftSpy, you only need to add DD statements for SPYDUMP and SPYPROC. The DD statements for SPYDATA, SPYTEMP, and ITSAUTH should already be present.
//ITSAUTH DD DSN=SYSM.M204.ITSAUTH.M204,DISP=SHR
Notes: The SPYDUMP DD is only necessary to perform the installation and can be removed afterward.
For 7.5, the ITSAUTH DD can be removed. - If you are installing SoftSpy for the first time, add DD statements for the SPYDUMP, SPYPROC, SPYDATA, and SPYTEMP data sets to your ONLINE startup JCL.
- Make sure that the SYSOPT (system options) X'04' bit is off. This setting indicates that Model 204 data definition commands can only be executed from within the File Management Facility of Dictionary/204. (This facility is not used to create and format the SPYDATA and SPYTEMP files and their fields as documented in Online installation steps.) Normal SoftSpy operation is not affected by the SYSOPT X'04' bit setting.
- Continue the installation as described in Updating CCAIN.
Installation on IBM z/VM
This section describes the SoftSpy installation steps that are specific to the z/VM operating system.
Complete this part of the installation process before performing the installation steps in these sections, which apply to all operating system environments:
- Updating CCAIN
- Online Installation Steps
- Verify the Installation
Prerequisite: Installing Model 204
Before installing this version of SoftSpy, you must have completed these Model 204 installation steps:
- Install the Model 204 nucleus.
- Install Dictionary/204.
For details about Model 204 version 7.5, contact Technical Support.
For details about Model 204 version 7.4, see the Rocket Model 204 Installation Guide for IBM z/VM, version 7.4
Notes:
- When you link-edit the Model 204 nucleus, ensure that the SSPY and MUSE text decks/CSECTs are linked in.
- If you are running Model 204 version 7.4 and you have never installed SoftSpy before, you must install SoftSpy version 7.4 before upgrading to SoftSpy version 7.5.
Backing up data
If you are upgrading from a previous version of SoftSpy, it is strongly recommended that you make a backup copy of your existing SPYPROC and SPYDATA files before proceeding. The upgrade process modifies these files, so a backup copy is required if you need to revert to the previous version.
Downloading and installing SoftSpy 7.5 files on z/VM
Note: You must have either a Rocket M204 user ID or a Sirius user ID to download the installation files.
To install the SoftSpy version 7.5 files:
- If you have existing SPYPROC and SPYDATA files from a previous version, back them up.
- SPYPROC, the SoftSpy procedure file, is distributed as a standard Model 204 Dump file (a sequential file). Download SPYPROC, in binary form, from the SOUL files download page to a workstation file.
- Upload the file from your workstation to your z/VM system.
- RESTORE the file into the SPYPROC file.
z/VM installation next steps
The steps in this section apply to both SoftSpy 7.4 and SoftSpy 7.5 installation on z/VM systems.
- Run M204GEN to generate modules and saved segments, as you did when installing the Model 204 nucleus. For information, syntax, and rules for M204GEN, see the “M204GEN Command” section in the Rocket Model 204 Installation Guide for IBM z/VM, version 7.4.
- Reapply all early warnings. For information, see the “Applying early warnings” section in the Rocket Model 204 Installation Guide for IBM z/VM, version 7.4.
- If the SPYPROC, SPYTEMP, and SPYDATA database files will reside on an OS format disk, allocate them at this time. If you are upgrading from a previous version of SoftSpy, you only need to allocate the SPYPROC database file.
- SSPYFDEF is an exec that defines SoftSpy database files. SSPYFDEF resides on the MAINT204 193 disk. Edit SSPYFDEF to conform to your disk naming and file placement conventions. The following table shows space requirements:
- To allocate SoftSpy files on OS format disks, type:
EXEC SSPYFDEF ALOCSSPY
Database Name Number of 6184 byte pages Number of blocks on FBA devices SPYPROC 1000 12500 SPYDATA 160 2133 SPYTEMP 112 1500 - 7.4 only: If the ITSAUTH data set will reside on an OS format minidisk, allocate it at this time.
ITSAUTH is a sequential file that contains authorization data and must be allocated to any job that uses SoftSpy with a DD name of ITSAUTH. ITSAUTH is 1 track in size and consists of fixed length 256 byte records. If the ITSAUTH stream will be on a CMS mini-disk, it does not have to be preallocated. On an OS format minidisk, allocate 8 blocks on FBA devices.
- Modify the ONLINE Startup EXEC. Note: ITSAUTH applies to version 7.4 only.
- If you are installing SoftSpy for the first time, add FILEDEFs for the SPYDUMP, SPYPROC, SPYDATA, SPYTEMP, and ITSAUTH data sets to your
ONLINE startup JCL. Samples of these FILEDEFs are:
FILEDEF SPYPROC DISK SPYPROC DBVrrr filemode FILEDEF SPYDUMP DISK SPYPROC DUMP * FILEDEF SPYDATA DISK SPYDATA DATABASE filemode FILEDEF SPYTEMP DISK SPYTEMP DATABASE filemode FILEDEF ITSAUTH DISK ITSAUTH DATA filemode
where rrr is the current release level, such as 750 or 740.
If the SoftSpy files are on OS format disks, use FILEDEFs of the following format:
FILEDEF SPYPROC filemode DSN SPYPROC DBVrrr M204 FILEDEF SPYDUMP DISK SPYPROC DUMP * FILEDEF SPYDATA filemode DSN SPYDATA M204 FILEDEF SPYTEMP filemode DSN SPYTEMP M204 FILEDEF ITSAUTH filemode DSN ITSAUTH DATA
where rrr is the current release level, such as 750 or 740.
- The installation process placed SPYDUMP on the MAINT204 200 disk. Use this dump of SPYPROC for the restore during the installation process.
- If you are upgrading from a previous version of SoftSpy, you only need to add FILEDEFs for SPYDUMP and SPYPROC. The FILEDEFs for SPYDATA, SPYTEMP, and ITSAUTH should already be present.
Note: The SPYDUMP FILEDEF is only necessary to perform the installation and can be removed afterward.
- If you are installing SoftSpy for the first time, add FILEDEFs for the SPYDUMP, SPYPROC, SPYDATA, SPYTEMP, and ITSAUTH data sets to your
ONLINE startup JCL. Samples of these FILEDEFs are:
- Make sure that the SYSOPT (system options) X'04' bit is off.
- Continue the installation as described in Updating CCAIN.
This setting indicates that Model 204 data definition commands can only be executed from within the File Management Facility of Dictionary/204. (This facility is not used to create and format the SPYDATA and SPYTEMP files and their fields as documented in Online installation steps.) Normal SoftSpy operation is not affected by the SYSOPT X'04' bit setting.
Installation on IBM z/VSE
This section describes the SoftSpy installation steps that are specific to the z/VSE operating system.
Complete this part of the installation process before performing the installation steps in the following sections, which apply to all operating system environments:
- Updating CCAIN
- Online Installation Steps
- Verify the Installation
Prerequisite: Installing Model 204
Before installing this version of SoftSpy, you must have completed these Model 204 installation steps:
- Install Model 204 nucleus
- Install Dictionary/204
For details about Model 204 version 7.5, see Model 204 installation on IBM z/VSE.
For details about Model 204 version 7.4, refer to the Rocket Model 204 Installation Guide for IBM z/VSE, version 7.4
Notes:
- When you link-edit the Model 204 nucleus, ensure that the SSPY and MUSE text decks/CSECTs are linked in.
- If you are running Model 204 version 7.4 and you have never installed SoftSpy before, you must install SoftSpy version 7.4 before upgrading to SoftSpy version 7.5.
Backing up data
If you are upgrading from a previous version of SoftSpy, it is strongly recommended that you make a backup copy of your existing SPYPROC and SPYDATA files before proceeding. The upgrade process modifies these files, so a backup copy is required if you need to revert to the previous version.
Downloading and installing SoftSpy 7.5 files on z/VSE
This section describes how to download and modify the SoftSpy version 7.5 installation files.
Note: You must have either a Rocket M204 user ID or a Sirius user ID to download the installation files.
- If you have not previously installed SoftSpy, modify and submit the SPYALOC JCL job. This job allocates the Model 204 SoftSpy data sets SPYPROC, SPYDATA, and SPYTEMP.
- If you have existing SPYPROC and SPYDATA files from a previous version, back them up.
- SPYPROC, the SoftSpy procedure file, is distributed as a standard Model 204 Dump file (a sequential file). Download SPYPROC, in binary form, from the SOUL files download page to a workstation file.
- Upload the file from your workstation to your z/VSE system.
- RESTORE the file into the SPYPROC file.
For detailed instructions, see Downloading and restoring SOUL files.
- Use the information in SPYPROC to determine size requirements for the dump file.
Rocket Software provides an optional sample batch job, FTPSSPY, to assist in this transfer. FTPSSPY, cataloged in the JCL library in step 4, defines the file names and data set names used in subsequent installation jobs. If you choose to use FTPSSPY, modify this job as noted in its comments and submit it.
Note: If you make changes to the names in FTPSSPY, you must use those names for all subsequent installation jobs; otherwise those jobs will fail. - Modify and submit LINKONLN and LINKB204 to relink your BATCH204 and ONLINE phases.
- Complete the installation process as described in the following section.
z/VSE installation next steps
The steps in this section apply to both SoftSpy 7.4 and SoftSpy 7.5 installation on z/VSE systems.
- Allocate the SoftSpy databases and ITSAUTH data set. Note: ITSAUTH applies to version 7.4 only.
- If upgrading from a prior version of SoftSpy, execute the SPYRINST job from the JCL library. This job will allocate the new SPYPROC file.
- If performing a SoftSpy installation for the first time, execute the SPYINST job from the JCL library. This job will allocate SPYPROC, SPYDATA, SPYTEMP, and ITSAUTH files.
Database Name Number of 6184 byte pages Number of blocks on FBA devices SPYPROC 1000 12500 SPYDATA 160 2133 SPYTEMP 112 1500 - Modify ONLINE Startup JCL.
- If you are installing SoftSpy for the first time, add DLBL, EXTENT and ASSGN statements for the SPYDUMP, SPYPROC, SPYDATA, SPYTEMP, and ITSAUTH data sets to your ONLINE startup JCL. Following are samples of these statements:
// DLBL SPYPROC,'M204.SPYPROC',,DA // EXTENT SYS021,volser // ASSGN SYS021,DISK,VOL=volser,SHR // DLBL SPYDATA,'M204.SPYDATA',,DA // EXTENT SYS021,volser // ASSGN SYS021,DISK,VOL=volser,SHR // DLBL SPYTEMP,'M204.SPYTEMP',,DA // EXTENT SYS021,volser // ASSGN SYS021,DISK,VOL=volser,SHR // DLBL SPYDUMP,'M204.SPYPROC.DUMP',,DA // EXTENT SYS021,volser // ASSGN SYS021,DISK,VOL=volser,SHR // DLBL ITSAUTH,'M204.ITSAUTH',,SD // EXTENT SYS021,volser // ASSGN SYS021,DISK,VOL=volser,SHR
- If you are upgrading from a previous version of SoftSpy, then you only need to add DLBL, EXTENT and ASSGN statements for SPYDUMP and SPYPROC. The DLBL, EXTENT and ASSGN statements for SPYDATA, SPYTEMP, and ITSAUTH should already be present.
Note: The SPYDUMP DD is only necessary to perform the installation and can be removed afterward.
- If you are installing SoftSpy for the first time, add DLBL, EXTENT and ASSGN statements for the SPYDUMP, SPYPROC, SPYDATA, SPYTEMP, and ITSAUTH data sets to your ONLINE startup JCL. Following are samples of these statements:
- Make sure that the SYSOPT (system options) X'04' bit is off.
The SYSOPT X'04' bit setting indicates that Model 204 data definition commands can only be executed from within the File Management Facility of Dictionary/204. (This facility is not used to create and format the SPYDATA and SPYTEMP files and their fields as documented in Online installation steps.) Normal SoftSpy operation is not affected by the SYSOPT X'04' bit setting. - Continue the installation as described in "Updating CCAIN".
Updating CCAIN
This section describes the changes required to the CCAIN input stream to install and use SoftSpy. Depending on your situation, the following changes might be needed, as described in this section:
- Adding IODEV=55 threads
- Adjusting the NUSERS parameter
- Ensuring that a large enough server is available
- Adjusting the LENQTBL parameter
- Adjusting the SPCORE parameter for SoftSpy operation
- Adjusting the SPCORE parameter for MUSE operation
Adding IODEV=55 threads
Every concurrent end user SoftSpy session requires a separate SoftSpy server thread. Each IODEV=55 statement that you add to the CCAIN input stream will create a distinct SoftSpy server thread. The following example illustrates the lines to be added to the CCAIN stream to create three SoftSpy servers.
IODEV=55,AUTOSYS=C'',LIBUFF=255,LOBUFF=255,NORQS=5 IODEV=55,AUTOSYS=C'',LIBUFF=255,LOBUFF=255,NORQS=5 IODEV=55,AUTOSYS=C'',LIBUFF=255,LOBUFF=255,NORQS=5
The settings shown for the AUTOSYS and NORQS parameter are required for SoftSpy to work properly. The settings shown for LIBUFF and LOBUFF are necessary to minimize SoftSpy server table usage.
In order to use SoftSpy from a particular full screen thread, the size of the output page buffer (LOUTPB) must match the size of the output page buffer of an available SoftSpy server thread. If you use different values for LOUTPB for different full screen threads, then you should create SoftSpy servers for each distinct value of LOUTPB.
Adjusting the NUSERS parameter
The NUSERS parameter needs to be increased by the number of IODEV=55 threads you have added to run SoftSpy servers. An increase in the NUSERS parameter might require a change to the size of the server data set. See Creating server data sets (CCASERVR) for a complete discussion of server data sets.
Ensuring that a large enough server is available
SoftSpy servers normally use a Model 204 SERVSIZE of 280,000. However, there are cases where a larger server is required. This is because certain server tables whose sizes cannot be reset by SoftSpy contribute to overall server size requirements. If the sum of the size of RTBL, LOUTPB, and LFTBL exceeds 8,000 then a larger server will be required. The server size requirement is increased beyond 280,000 by the amount that the specified sum exceeds 8,000. Make sure that at least one in-core server is large enough to support this requirement.
Information about setting LOUTPB is contained in Adding IODEV=55 threads. SoftSpy automatically sets LFTBL to NGROUP*4 for each of the IODEV=55 threads. The size of RTBL depends on the values of the NGROUP, NFILES, and NRMTFILE parameters. The size of RTBL is usually the most important influence on increased server size requirements.
If the parallel query option of Model 204 is being used then the size of RTBL is:
( NGROUP + 12 ) * ( NFILES + NRMTFILE + 3 ) + NRMTFILE + 1
Otherwise, the size of RTBL is:
( NGROUP + 12 ) * ( NFILES + 3 )
In either case, the size of RTBL is rounded up to the next higher multiple of eight.
Adjusting the LENQTBL parameter
When SoftSpy servers are run, the LENQTBL parameter might need to be increased. The size of the enqueue table is based on the product of NUSERS and LENQTBL. When NUSERS is small, the value of LENQTBL might need to be set to at least 500.
Adjusting the SPCORE parameter for SoftSpy operation
The SPCORE parameter specifies the amount of storage to be set aside above and below the 16Mb line for operating system and run-time dynamic storage requests. The value of this parameter might need to be increased to accommodate the run-time requirements of SoftSpy. The storage required can be calculated with the formulas:

where n is the number of threads running a SoftSpy Server, and LOUTPBi is the size of the output page buffer for the given server thread.
The additional SPCORE requirement is a. The value derived for b represents the amount of storage that is allocated above the 16M line and does not impact SPCORE.
To maintain the number of disk buffers, an increase in MVS region size, CMS virtual machine size, or VSE partition size might be necessary. If increasing the region size is not viable, you can reduce either the number of disk buffers or the number of in-memory servers.
Adjusting the SPCORE parameter for MUSE operation
When MUSE is in use, additional storage is required. Although SPCORE is not affected, region (or virtual machine) size could be impacted.
The amount of storage needed for MUSE is computed by summing the storage requirements of each simultaneous user of MUSE. For each user, the amount of storage needed by MUSE is:
muse_storage = header_storage + max_muse_streams * ( header_storage + 1088 )
where
header_storage = 110 + ( MAXHDR + MAXTRL ) * ( HTLEN + 5 )
and max_muse_streams is the maximum number of MUSE output streams (created by MUSE OPEN(C) or USE) that will be open at any given time. For example, if
max_muse_streams = 2
MAXHDR = MAXTRL = 5
HTLEN = 132
then
header_storage = 110 + ( 5 + 5 ) * ( 132 + 5 ) = 1480
muse_storage = 1480 + 2 * ( 1480 + 1088 ) = 6616
Online installation steps
This section describes SoftSpy installation steps that are performed online from within Model 204.
Requirement: These steps must be performed using a Model 204 ONLINE that includes the SPYDUMP, SPYPROC, SPYDATA, SPYTEMP, and ITSAUTH data sets described in the installation section for each operating system.
Prerequisite: The CCAIN input stream for the ONLINE must have been updated as described in Updating CCAIN.
Perform the following steps, as described in this section:
- Log on to Model 204.
- Stop the SoftSpy subsystem.
- Create and restore the SPYPROC file.
- Run the INSTALL.SOFTSPY procedure.
- Set passwords for the SPYPROC and SPYDATA files
- Set the authorized product configuration.
Logging on to Model 204
Log on to Model 204 using an account with system manager privileges.
LOGON accountname password
Temporarily removing IODEV=55 threads
If SoftSpy has been previously installed, comment out the IODEV=55 threads and reduce NUSERS by the number of threads that were commented out.
Add these threads back in and change NUSERS accordingly before attempting to run SOFTSPY.
Stopping the SoftSpy subsystem
If SoftSpy has been previously installed, all use of SoftSpy must be terminated before you proceed. To terminate SoftSpy, issue the Model 204 command:
STOP SUBSYSTEM SOFTSPY
Creating and restoring the SPYPROC file
Create and restore the SPYPROC file using the commands below:
CREATE FILE SPYPROC END OPEN FILE SPYPROC IN SPYPROC INITIALIZE RESTORE 128 FROM SPYDUMP
Running the INSTALL.SOFTSPY procedure
The creation of the SoftSpy subsystem and the formatting of SPYTEMP and SPYDATA is performed by the INSTALL.SOFTSPY procedure.
- To begin the process, enter the following commands:
OPEN SPYPROC INCLUDE INSTALL.SOFTSPY
This procedure will prompt you for the information it needs to create the subsystem and to initialize or upgrade the SPYDATA file. -
The following prompt appears:
$$Is SOFTSPY currently installed on this ONLINE (Y/N)?
- If SoftSpy has previously been installed, and you want to perform an upgrade style installation of the new version, respond Y. This will cause access control lists and macros from the previous version contained in the SPYDATA file to be preserved.
- Otherwise, respond N.
-
If you are performing an upgrade style installation, the following prompt appears:
$$Enter READ password for SPYDATA:
Enter a read password (one with at least X'8041' privdef privileges) for the SPYDATA file. If the SPYDATA file cannot be opened with read access using the specified password, the installation process will terminate with an error message. - The following prompt appears:
$$Enter READ/WRITE password for CCASYS:
Enter a read/write password (one with at least X'00C1' privdef privileges) for the CCASYS file. This allows the procedure to perform all required subsystem management for the SoftSpy subsystem. If the CCASYS file cannot be opened with read/write access, the installation process will terminate with an error message. - If a subsystem with the name SOFTSPY is defined that is not the SoftSpy subsystem, the following prompt appears:
$$A subsystem named SOFTSPY already exists. Replace (Y/N)?
- If you want to replace the existing SoftSpy subsystem with the new SoftSpy subsystem, respond Y.
- If not, respond N. A response of N will terminate the installation process.
- The following prompt appears:
$$Enter an Administrator User ID. Press <ENTER> when finished.
Enter the Model 204 account of anyone who is to be given Model 204 ADMIN SCLASS privileges for the SoftSpy subsystem. Users added will supplement those added by previous installations of SoftSpy. The users in this SCLASS will be able to use the SoftSpy EDIT CONFIG command. For more information, see EDIT CONFIG.
Subsequent changes to the list of users with ADMIN privileges for the subsystem must be made using the Model 204 Subsystem Management Facility. See Subsystem Administration screen for more information.
The user id will be checked for compliance with Model 204 conventions but will not be validated for existence in the CCASTAT file. The User ID prompt will appear repeatedly until you respond by pressing the Enter key without entering a User ID. The Model 204 account of the user who is running this procedure is included in the list automatically. - If you are performing an upgrade style installation, you might receive the prompt:
Macro macro_identifier already exists. 1. Replace with NEW version. 2. Discard NEW version. 3. Rename NEW version. 4. Rename OLD version. $$Please choose an option:
This prompt is issued when a SoftSpy macro being installed has the same name as an existing macro and the new macro is different from the existing macro.
- Enter 1 if you want the new version to replace the existing version.
- Enter 2 if you want to discard the new version.
- Enter 3 to save the new version under a different name.
- Enter 4 to rename the existing macro and save the new version with the name displayed.
An invalid response will cause the prompt to be redisplayed.
The following prompt appears:$$Please enter new name or press <ENTER> to accept: "macro_identifier_BAK"
If you select option 3 or 4, you will be prompted for a new name for the new or old version of the macro, respectively. You can respond with any valid SoftSpy macro name or press ENTER to accept the suggested name macro_identifier_BAK. If macro_identifier_BAK exists, the suggested name will have additional _BAK strings appended to it until a unique name can be presented.
Set Passwords for the SPYPROC and SPYDATA Files
The SPYPROC, SPYDATA, and SPYTEMP files are set to private at the end of the successful execution of the INSTALL.SOFTSPY procedure. A read password for the SPYDATA file will be required to install future upgrades to SoftSpy, and a procedure execution password for the SPYPROC file will be required if you need to reinitialize the SPYTEMP file. It is recommended that you assign passwords for these files. The Model 204 LOGCTL command is used to add passwords to CCASTAT, as shown in the following example:
LOGCTL A :SPYDATA READ,X'8441' <ENTER> LOGCTL A :SPYPROC EXECUTE,X'8021' <ENTER>
In the above example, the password READ is
assigned as the read password for the SPYDATA file, and the password
EXECUTE is assigned as the procedure execution password for the
SPYPROC file. The <ENTER> notation indicates that the command expects
further input, and the enter key is pressed to take the default. See LOGCTL command: Modifying file entries in the password table for a complete discussion of the LOGCTL syntax and parameters.
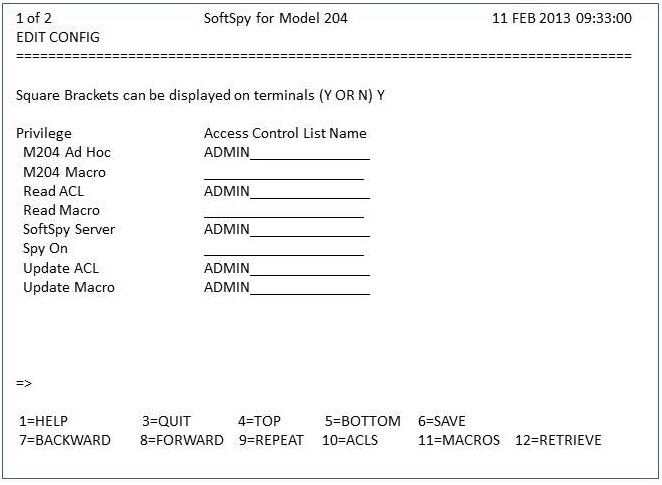
Set the Authorized Product Configuration
- Enter the following command to invoke the SoftSpy configuration editor:
SPY EDIT CONFIG
The editor displays a screen similar to the following figure.
EDIT CONFIG Definition Screen
Press the FORWARD PF key (PF8) to display the authorization entry screen.
This screen is used to authorize your use of SoftSpy.
EDIT CONFIG Authorization Entry Screen
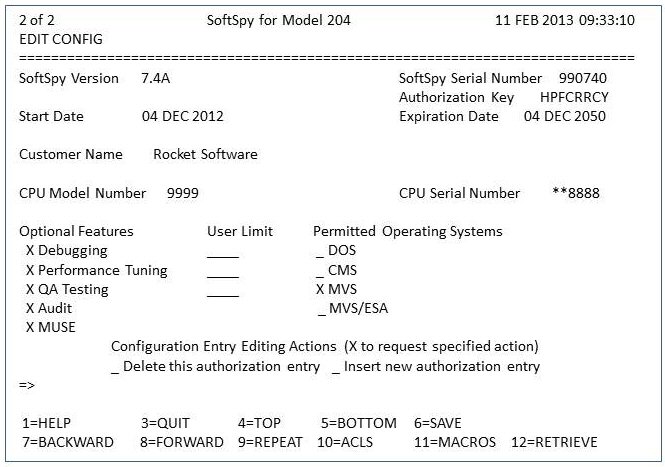
- Update this screen with any new configuration information, expiration date, and authorization key provided with your installation materials. If your authorization key is for an expiration date that has passed, you must contact Technical Support to obtain a new authorization key.
- Once you have made any required changes, press the SAVE PF key (PF6) to save the configuration. Saving the configuration information will write it out to the SPYDATA file. It will also activate SoftSpy servers running in IODEV=55 threads.
- Press the QUIT PF key (PF3) to exit the SoftSpy configuration editor. All authorized products should now be ready for use.


Verifying the installation
This section describes the process of verifying that SoftSpy and MUSE are correctly installed and available for general use.
Verify SoftSpy operation
-
To test that SoftSpy server(s) are enabled issue the command:
SPY ON
When SoftSpy has been successfully turned on, the following message will be displayed prior to the Model 204 command prompt. (There will be a short delay prior to the message while the SoftSpy User Language code precompiles.)
SPY ON SPY.021: For the exclusive use of SoftSpy Trial >
- Create an ad hoc procedure like the one shown below or include any
existing procedure that you have available.
BEGIN FOR %I FROM 1 TO 5 %J = %I * %I PRINT %I AND 'SQUARED IS' AND %J END FOR END
The SoftSpy interactive evaluation screen will now be displayed on your terminal:
- Type the command:
WATCH %I, %J
so that you can monitor the values of the percent variables as they change during evaluation. Use PF4 to single step through the procedure or PF5 to run the procedure to its end. You can also refer to the Introduction to SoftSpy for information about other SoftSpy features to try. - At the completion of this test, turn off SoftSpy by issuing the command:
SPY OFF
You can issue the SPY OFF command from either the Model 204 command prompt or from the command area just above the PF key labels on the SoftSpy screen.
SoftSpy Interactive Evaluation Screen

If you experience any difficulties, contact Technical Support.
Verify MUSE operation
You can run two simple tests to verify that MUSE is available for use:
- To verify command-level MUSE, enter the following command at the Model
204 command prompt:
MUSE CLOSE *
If no errors are issued, then command-level MUSE is active, and ready for use. - To verify statement-level MUSE, enter and run the following request:
BEGIN MUSE CLOSE * END
If this simple request compiles and evaluates without errors, then statement-level MUSE is active and ready for use.
If you experience any difficulties, contact Technical Support.
Customizing SoftSpy
This section describes the process of customizing SoftSpy for site-specific needs.
Customize the SoftSpy configuration
SoftSpy uses configuration information to determine the access authority of end users during SoftSpy sessions. The configuration can be modified only by those Model 204 users whose user identifiers have been included in the SoftSpy ADMIN SCLASS through subsystem management. The initial installation process will prompt you for a list of those user identifiers and perform the required subsystem management tasks. If you want to modify the list of users who are authorized to perform configuration changes, you must use Model 204 Subsystem Management.
The SoftSpy configuration lets you limit end user access to certain SoftSpy features. This is done by associating an Access Control List (ACL) with a SoftSpy privilege through the EDIT CONFIG command. An ACL is a list of Model 204 users who are to be granted privileges. The following table shows which privileges can be limited and the name of the ACL associated with each at the completion of an initial installation.
| Privilege Name | Associated ACL | Meaning |
| M204 Ad Hoc | ADMIN | User can issue M204 command from SoftSpy command line or user macro. |
| M204 Macro | null | User can issue M204 command from system macros. |
| Read ACL | ADMIN | User can read access control lists. |
| Read MACRO | null | User can read system macros. |
| SoftSpy Server | ADMIN | User can issue the SPY SERVER command. |
| Spy ON | null | User can issue the SPY ON command. |
| Update ACL | ADMIN | User can update access control lists. |
| Update MACRO | ADMIN | User can update system macros. |
Model 204 users who are in the ADMIN SCLASS can use the SoftSpy EDIT CONFIG command to change the name of the ACL associated with any of the commands listed above. When an end user attempts to use the command, the newly associated ACL will be checked. A null ACL name indicates that all end users may use the command.
ACLs are constructed and maintained using the EDIT ACL command. Initially, the only users who can perform this function are those that were entered during the installation process. The ADMIN ACL is constructed during an initial installation with the same user identifiers that are put into the SoftSpy Subsystem ADMIN SCLASS.
Customize SoftSpy Environments
The SoftSpy environments topic provides instructions for customizing SoftSpy environments to meet local needs. You can change the following environments:
- Base environment
- Interactive Debug environment
- Interactive Performance Tuning environment
- Interactive Quality Assurance Testing environment
Each of these environments can be customized at two levels:
- For all users of SoftSpy, or,
- For individual users (by Model 204 User ID).
You can customize items such as PFKEY settings and data display columns.
The Tailoring environments section also describes how to make SoftSpy skip over the interactive execution of selected subsystems that are used as tools (such as SSTEST). You can customize SoftSpy to skip over any number of selected subsystems.
Additionally, the SoftSpy macro listing provides a complete listing of the SoftSpy macros, which you can customize as needed.
System Manager Considerations
SoftSpy uses background tasks called SoftSpy servers that normally run in IODEV=55 threads to assist in program monitoring. When a User Language program is being executed under the control of SoftSpy, the program is run in the user's normal server, and one of the server threads is used by SoftSpy to control and monitor the execution of the program. There must be one server thread for each simultaneous user of SoftSpy.
SoftSpy and the MONITOR Command
SoftSpy uses two wait type codes displayed by using the MONITOR command. The codes appear in the WT column that contains the wait type for a user.
The wait code values are:
| 38 | Execution is suspended and the SoftSpy server is awaiting a request from a user. |
|---|---|
| 39 | A user is suspended while a SoftSpy server is performing operations for the user. |
Both of these wait type codes are swappable but not bumpable.
SoftSpy files
SoftSpy uses four different files. The usage of each file is summarized below.
| File | Description |
|---|---|
| SPYPROC | This file contains procedures and help information used by SoftSpy. It is never updated, and it can be shared between several different online systems. If this file is corrupted it can be restored from the installation materials. |
| SPYDATA | This file contains various types of data that must be retained. This includes configuration information, Access Control Lists (ACLs) and copies of all SoftSpy macros. A base version of this file is created by the installation process, but the information in this file is modified when configuration, ACL, or macro changes are made. Periodic backups of this file should be made for recovery purposes. A separate instance of this file is required for each online system. |
| SPYTEMP | This file serves as a scratch pad for information during the execution of SoftSpy. Currently defined window descriptions, copies of macros being edited, and PF key settings are examples of the information saved in SPYTEMP. The CREATE.SPYTEMP procedure in SPYPROC can be used to recreate this file if necessary. A separate instance of this file is required for each online system. |
| ITSAUTH | This file contains authorization data. It is a simple sequential file containing 256 byte fixed length records. It is refreshed when the SoftSpy configuration is saved using the SPY EDIT CONFIG command. If SoftSpy will be used in multiple online and batch systems, ITSAUTH should be shared among them. |
Additional Installations
This section discusses the procedures to follow when you have already installed the current version of SoftSpy and MUSE successfully, and you wish to install them again in different ONLINE or BATCH204 jobs. These procedures are designed to speed up the process for a system manager who is very familiar with SoftSpy and MUSE installation and wants to save time. However, it is never a problem to perform the entire installation process again.
Install SoftSpy in additional ONLINE jobs
If you are installing SoftSpy in additional ONLINEs under the same operating system and Model 204 release after an initial installation, you can use an abbreviated procedure.
The SPYPROC file is never updated and can be shared by multiple ONLINEs running SoftSpy. Therefore, you can omit the Creating and restoring the SPYPROC file step on subsequent ONLINEs.
The DDs/DLBLs/ FILEDEFs for SPYPROC and ITSAUTH for each ONLINE can point to the same data set.
Each ONLINE must have its own SPYTEMP and SPYDATA files.
The INSTALL.SOFTSPY procedure must be run in each ONLINE to add the subsystem definition to CCASYS and to create and initialize SPYTEMP and SPYDATA.
Install MUSE in additional ONLINE and BATCH204 jobs
You might want to use MUSE in Model 204 ONLINE or BATCH204 jobs in addition to the job where SoftSpy was initially installed. For these additional job streams, add a DD/FILEDEF/DLBL for the previously created ITSAUTH data set to the job stream.
VSE JCL
The following JCL files are used for SoftSpy installation on z/VSE systems:
| SPYINST | allocates SoftSpy system files |
|---|---|
| SPYRINST | allocates SPYPROC and SPYDUMP files |
In the JCL files below, the variable xxx has been substituted for the release number; for example:
// LIBDEF PROC,SEARCH=M204LIB.Vxxx
Replace xxx with 750 or 740, as applicable; for example:
// LIBDEF PROC,SEARCH=M204LIB.V740
SPYINST JCL
// JOB SPYINST * ******************************************************************** * Rocket Model 204 * * ******************************************************************** /* SPYINST allocates SoftSpy system files. /* Note that in the allocate step the DLBL and EXTENTs are /* stated explicitly for each SoftSpy system file, while in /* the create step the SoftSpy proc is used. The allocate /* step cannot have the direct access (DA) code present on /* the DLBL statements, and the create step (and the online /* job) must have the (DA) code present. /* * /* Make sure that the explicit DLBL and EXTENT statements in /* the allocate step match the proc in all aspects except /* the DA codes. /* /* *************************************************************** /* *************************************************************** /* /* Add assign statements as needed: /* * /* // ASSGN SYS000,X'CUU' /* /* The JCL as it is provided assumes you have made /* standard assignments for the logical units (SYS000) /* you reference in your EXTENT statements. /* * /* *************************************************************** /* To adapt this stream to your particular installation the /* following changes should be made: /* /* (1) Modify the job statement to conform to your standards. /* /* (2) Change the DLBL and EXTENT to reflect your dataset /* names and locations as in other MODEL 204 jobs. /* assign SYS008 to a printer for the audit trail, or /* add DLBL and EXTENT statements for ccaaudit. /* /* *************************************************************** /* /* *************************************************************** /* step alloc: MODEL204 allocate of all SoftSpy system files * /* ************************************************************** * /* // EXEC PROC=M204JCL DLBL for JCL sublibrary // LIBDEF PROC,SEARCH=M204LIB.xxx // EXEC PROC=M204Vxxx DLBL for Vxxx M204 library // EXEC PROC=M204SYS DLBLS FOR CCASTAT, CCATEMP // LIBDEF PHASE,SEARCH=M204LIB.Vxxx // DLBL SPYPROC,'M204.SPYPROC',99/366,SD // EXTENT SYS000,volser,,,0000,000 (AT LEAST 400 PAGES) // DLBL SPYDATA,'M204.SPYDATA',99/366,SD // EXTENT SYS000,volser,,,0000,000 (AT LEAST 150 PAGES) // DLBL SPYTEMP,'M204.SPYTEMP',99/366,SD // EXTENT SYS000,volser,,,0000,000 (AT LEAST 100 PAGES) // DLBL ITSAUTH,'M204.ITSAUTH',99/366,SD // EXTENT SYS000,volser,,,0000,000 (AT LEAST 7 PAGES) // ASSGN SYS000,DISK,VOL=volser,SHR // ASSGN SYS008,PRINTER // EXEC ALLOCATE,SIZE=AUTO ALLOCATE FILE(SPYPROC,SPYDATA,SPYTEMP,ITSAUTH) /* // EXEC PROC=M204JCL DLBL for JCL sublibrary // LIBDEF PROC,SEARCH=M204LIB.Vxxx // EXEC LIBR ACCESS S=M204LIB.Vxxx CATALOG SFTSPY.PROC REPLACE=YES // DLBL SPYDUMP,'M204.SPYPROC.DUMP',,SD // EXTENT SYS000,volser // DLBL SPYPROC,'M204.SPYPROC',,DA // EXTENT SYS000,volser // DLBL SPYDATA,'M204.SPYDATA',,DA // EXTENT SYS000,volser // DLBL SPYTEMP,'M204.SPYTEMP',,DA // EXTENT SYS000,volser // DLBL ITSAUTH,'M204.ITSAUTH',,DA // EXTENT SYS000,volser /+ /* /&
SPYRINST JCL
// JOB SPYRINST * ******************************************************************** * Rocket Model 204 * * ******************************************************************** /* SPYRINST allocates SPYPROC and SPYDUMP files. /* * /* Note that in the allocate step the DLBL and EXTENTs are /* stated explicitly for each SoftSpy system file, while in /* the create step the SoftSpy proc is used. The allocate /* step cannot have the direct access (DA) code present on /* the DLBL statements, and the create step (and the online /* job) must have the (DA) code present. /* /* Make sure that the explicit DLBL and EXTENT statements in /* the allocate step match the proc in all aspects except /* the DA codes. /* /* *************************************************************** /* *************************************************************** /* * /* Add assign statements as needed: /* /* // ASSGN SYS000,X'CUU' /* /* The jcl as it is provided assumes you have made /* standard assignments for the logical units (SYS000) /* you reference in your EXTENT statements. /* /* *************************************************************** /* To adapt this stream to your particular installation the /* following changes should be made: /* /* (1) Modify the job statement to conform to your standards. /* /* (2) Change the DLBL and EXTENT to reflect your dataset /* names and locations as in other MODEL 204 jobs. /* Assign SYS008 to a printer for the audit trail, or /* add DLBL and EXTENT statements for ccaaudit. /* /* *************************************************************** /* /* *************************************************************** /* step alloc: MODEL204 allocate of all SoftSpy system files /* *************************************************************** /* // EXEC PROC=M204JCL DLBL for JCL sublibrary // LIBDEF PROC,SEARCH=M204LIB.Vxxx // EXEC PROC=M204Vxxx DLBL for Vxxx M204 library // EXEC PROC=M204SYS DLBLS FOR CCASTAT, CCATEMP // LIBDEF PHASE,SEARCH=M204LIB.Vxxx // DLBL SPYPROC,'M204.SPYPROC',exp date,SD // EXTENT SYS000,volser,,,0000,000 (AT LEAST 400 PAGES) // ASSGN SYS008,PRINTER // EXEC ALLOCATE,SIZE=AUTO ALLOCATE FILE(SPYPROC) /* // EXEC PROC=M204JCL DLBL for JCL sublibrary // LIBDEF PROC,SEARCH=M204LIB.Vxxx // EXEC LIBR ACCESS S=M204LIB.Vxxx CATALOG SFTSPY.PROC REPLACE=YES // DLBL SPYDUMP,'M204.SPYPROC.DUMP',,SD // EXTENT SYS000,volser // DLBL SPYPROC,'M204.SPYPROC',,DA // EXTENT SYS000,volser // DLBL SPYDATA,'M204.SPYDATA',,DA // EXTENT SYS000,volser // DLBL SPYTEMP,'M204.SPYTEMP',,DA // EXTENT SYS000,volser // DLBL ITSAUTH,'M204.ITSAUTH',,DA // EXTENT SYS000,volser /+ /* /&