Dictionary/204 Documentation facility
Overview
The Documentation facility provides an interface for defining and describing attributes and relationships that are not controlled by the system or by one of the other facilities listed on the Dictionary/204 main menu. For example, if a COMMENTS attribute has been added to the description of a FILE, you can update that attribute with the Documentation facility. (COMMENTS is not one of the attributes controlled by the File Management facility.) For another example: If a SKILL LEVEL has been added to the ACCOUNT entity type description, you can update this attribute through the Documentation facility.
Although the Documentation facility can display system-controlled dictionary data items, it cannot update them. System attributes and relationships are displayed by this facility in read-only mode.
New relationships can be added to the description of an entity through the Documentation facility. The relationships that can be updated through Documentation are necessarily nonsystem data and are not controlled by any other facility. For example, if you have entity types such as REPORT and USER, you can add a relationship indicating that the user owns the report.
The Documentation facility is entry-oriented: that is, it allows you to add, update, delete, copy, or rename entries. Except for VIEWs, you can add, delete, copy, and rename entries only for nonstandard entity types -- entity types created by your dictionary administrator. You can update entries of any entity type, but only attributes and relationships that are not controlled by other facilities.
The section View management explains the role of the facility in defining views.
Dummy entries
Dictionary/204 allows you to create relationships between a defined entry and an entry that has not yet been defined. These nonexistent entries are called dummy entries. The dummy entry can be updated (more fully defined) through the Documentation facility.
For example, if a nonexistent REPORT called SUMMARY REPORT is cross-referenced to a PROCEDURE entry, Dictionary/204 creates a dummy entry for the SUMMARY REPORT. The dummy entry has no characteristics other than its name, entity type, its relationship to the specified PROCEDURE, and an ALIAS value of DUMMY*. This feature allows you to create a "place marker" entry that can be defined more fully later on.
See Updating an entry for special restrictions that apply to updating dummy entries.
View management
A major function of the Documentation facility is the definition of VIEW entries, including the following: VIEW LINK, VIEW, and VIEW FIELD.
See Dictionary/204 view management for a comprehensive discussion of views.
Scrolling
The Documentation facility allows users to scroll by the page or by the line on certain Add an Entry and Update an Entry screens. Screens that allow scrolling have a line counter in the upper right. A sample screen header for a screen that allows scrolling is:
DOCUMENT <screen title> line n of nn
DOCUMENT is the facility name for the Documentation facility. The screen title varies with the screen. "Line n" indicates the cursor line, and "nn" represents the total number of character lines, which can exceed the number that fit on your terminal screen.
The scrolling commands, BACkward (PF7) and FORward (PF8), allow you to scroll by screens or by a specified number of lines.
Mixed case
The Documentation facility allows users to document the Short Description and Description attributes in lowercase and uppercase values. This feature is available only for these attributes, and is automatically updated to all entries as entered. If you want to maintain the uppercase description information, depress the terminal SHIFT as you enter all alphabetic characters.
Logging on
To log on to the Documentation facility, choose one of the following methods:
- Select the number of the Documentation facility option from the Dictionary/204 main menu.
If your main menu does not display the Documentation option, you cannot access this facility from the Dictionary/204 menu. You can, however, access the facility by using options 2, 3, and 4, if you have user privileges for other facilities.
- Invoke the Documentation facility from the primary screens of another Dictionary/204 facility with the INVOKE command. The syntax of the command is:
INVoke DOCUMENT
Although this logon method does not require that you have user privileges for the Documentation facility, it does not let you use the facility for documenting any entity type. You can use the facility only for documenting entries of entity types controlled by facilities for which you do have user privileges. The main menu requires you to specify the entity type of the entry you are documenting.
For example, if you are a Procedure Editor user, you can add descriptive documentation to PROCEDURE entries using this facility. But if you are not a File Management user, you cannot add descriptive documentation for FILE, FIELD, FIELD GROUP, or RECORD entries, because these are controlled by the File Management facility.
To document the entries of uncontrolled entity types (such as VIEWs or REPORTs), you must have Documentation facility privileges.
The dictionary administrator can establish further restrictions by specifying the set of entities each user is allowed to modify. These special restrictions are described in Establishing security restrictions.
- Call the Documentation facility subsystem from the Model 204 command prompt by typing the subsystem name:
> DOCUMENT
You can log on to the Documentation facility with this method only if the DOCUMENT subsystem has been started. Logging on by this method, you can document entries controlled by facilities for which you are an authorized user.
- The Update function of the Documentation facility can be implemented by issuing the DOCUMENT command from the command line of some Dictionary/204 primary screens. The syntax of the command is:
DOCument
(In most cases this command has an assigned PF key.)
The DOCument command is typically implemented while using another facility such as the Procedure Editor. It documents the work being done in that facility. Issuing the command takes you to the Update function, enabling you to update the entry corresponding to the database entity being worked on. For example, if you have modified a procedure, you can issue the DOC command to document the changes in the dictionary entry for that procedure.
- If using the RKTools main menu, select the Document menu item. If using the RKWeb interface, select
Manage > Dictionary > Documents.
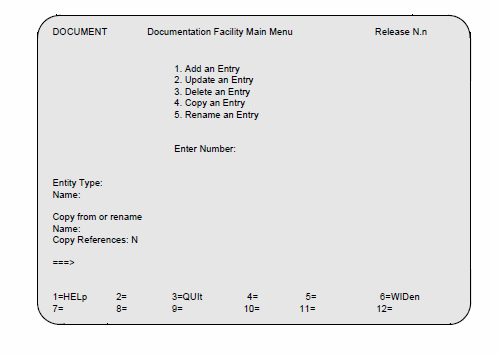
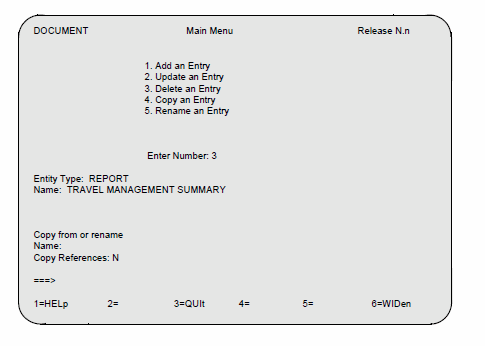
Dictionary/204 displays the following main menu when you select the Documentation facility.
In brief, the Documentation facility provides the following capabilities (numbered items correspond to the menu options):
- Adding an entry for an entity type that is either a VIEW or an entity type created by your installation through the Dictionary Administration facility, for example, REPORTs, USERs, and so on. You cannot add entries managed by other Dictionary/204 facilities (such as FILE and PROCEDURE entries).
-
Updating an entry of any entity type. You can change only the attributes and relationships that are not managed by another Dictionary/204 facility. Using the DOCUMENT command (where that command is allowed) from another facility takes you directly to the Update function, enabling you to describe whatever entity you are using in the other facility.
Updating also allows you to create dummy entries.
- Deleting an entry for either a VIEW or an entity of a type defined at your installation through the Dictionary Administration facility. You cannot delete entries managed by another Dictionary/204 facility.
- Copying an entry for an entity type that is either a VIEW or an entity type created by your installation. You cannot copy entries that are managed by another Dictionary/204 facility.
- Renaming an entry for an entity type that is either a VIEW or an entity of a type created by your installation, such as REPORT, USER, and so on. You cannot rename entries manages by another Dictionary/204 facility.
Input
To select a documentation function from this menu, select a numbered choice from the list of functions and specify the name and entity type of the relevant entry:
- Enter the number of your selection at the Enter Number: prompt.
- Using the tab or cursor keys, advance the cursor, respond to the Entity Type: and Name: prompts. Type the name and entity type of the object whose dictionary entry you want to add, update, or delete.
- If you want to copy or rename an entry, type the entity type and the new name in response to the Entity Type: and Name: prompts. (You can copy and rename only within the same entity type.)
- If you are copying or renaming an entry, see Copying an entry or Renaming an entry for an example of each function.
- To copy an entry, type the name of the entry to copy from at the prompt provided. All attributes are copied automatically, but you must type a Y at the Copy References: prompt if you want all the relationships copied as well. The default is N.
- To rename an entry, type the name of the entry to be renamed at the prompt provided.
Commands
To issue a command, press the assigned PF key or type the command name at the prompt (===>) and press Enter.
| Key | Command | Meaning |
|---|---|---|
| PF1 | HELp | Provides on-line HELP text for this screen. You can read the HELP text and exit from the last screen of text by pressing Enter. |
| PF3 | QUIt | Terminates the Documentation function. The system then returns you to the Dictionary/204 main menu, to the facility from which this facility was invoked, or to the Model 204 command prompt. |
| PF6 | WIDen | Displays the Widen screen, which allows you to enter a FIELD, RECORD, FIELD GROUP, or PROCEDURE name greater than 70 characters. |
| Enter |
|
Processes your report. |
|
INVoke | Invokes another facility.
Type the following command at the command prompt and then press Enter: INVoke facility_name |
Updating FIELD, RECORD, FIELD GROUP, and PROCEDURE entries
Updating FIELD, RECORD, FIELD GROUP and PROCEDURE entries is a special case, because these entries require a file name prefix concatenated by a period to the entry's UNQUALIFIED NAME. For example, the uniquely identifying name of the SOCSECNUM field in the PERSONNL file is PERSONNL.SOCSECNUM.
When requesting a report on a FIELD, RECORD, FIELD GROUP, or PROCEDURE entry, the name (including the file name prefix) of a FIELD, RECORD, FIELD GROUP, or PROCEDURE entry might exceed the 70 character spaces provided at the Name: prompt. In this case, you must press PF6 (or issue the WIDEN command) from the input screen.
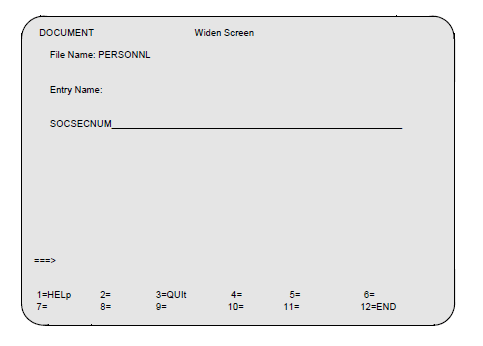
The Documentation facility then displays the following Widen Screen, which allows you to enter a file name not exceeding 8 characters and an entry name not exceeding 70 characters. Any portion of the name that you have entered on the input screen prior to issuing the WIDEN command appears on the Widen Screen. If there is a period in the name prior to the tenth character, the facility interprets the name to the left of the period as a file name.
When you have entered the entry's name on the interim screen, you can press PF3 (QUIT) to cancel the input or press PF12 (END) to enter the input on the Documentation facility main menu. If you press PF12, the first 70 characters of the file name plus the entry name appear on the main menu. Press Enter to process your selection.
FIELD, RECORD, FIELD GROUP, and PROCEDURE entries can be updated by using the Documentation facility to add or delete nonsystem attributes and references, but entries of these types cannot be added, deleted, copied, or renamed by using the Documentation facility.
Adding an entry
To add an entry to the dictionary:
- Select the Add an Entry option from the main menu of the Documentation facility
- Specify the name and entity type of the entry to be added on the main menu
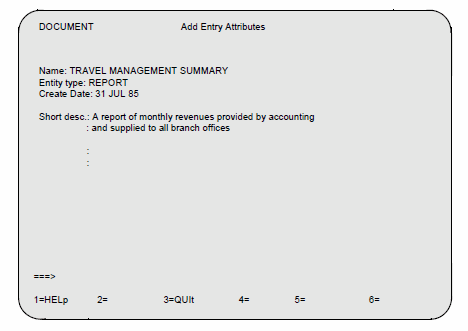
When you press Enter, the system displays the following Add Entry Attributes screen. The name, entity type, and date created are automatically provided from the data processed by the main menu.
You can add entries only for VIEWs and (nonstandard) entity types that are not managed by other Dictionary/204 facilities.
The entry name, entity type, and create date are provided, as in the previous example.
The sample screen presupposes that you supplied the name and entity type of the entry on the preceding screen. You can also provide the short description in response to the Short desc. prompt. The text entered in response to this prompt becomes the value of the SHORT DESCRIPTION attribute for the entry. This description defines the purpose and use of the entry. It is used as a header in entry reports. The short description has a maximum length of four character lines.
Commands
To issue a command, press an assigned PF key or type the command name at the prompt (===>) and press Enter.
| Key | Command | Meaning |
|---|---|---|
| PF1 | HELp | Provides online HELP text for this screen. You can read the HELP text and exit from the last screen of text by pressing Enter. |
| PF3 | QUIt | Aborts the processing of the Add Entry Attributes screen and returns you to the Documentation facility menu. |
| PF8 | FORward | Scrolls forward to the next page of attributes (sample screen follows). Use this command before adding attributes for an entry. Your input is preserved but not stored. |
| PF11 | REFs | Displays the Add Entry References screen. Use this command to add references for an entry. Your input is preserved but not stored. |
| PF12 | END | Stores the data entered on the Add Entry Attributes screen and returns you to the main menu of the Documentation Facility. |
| ENTER |
|
Causes the current screen to be redisplayed but has no other effect. |
Defining entry attributes
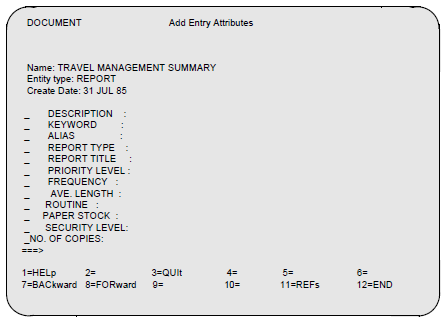
When adding an entry, all the attributes and references that were established for the entity type by the Dictionary/204 administrator appear to the left of the colons, as shown on the following screen.
There are one or more Add Entry Attributes screens, depending upon how many attributes have been assigned by the Dictionary/204 administrator to the entity type in question.
Type in the values of the attributes to the right of the colons. Use the tab keys to advance the cursor to the next or previous attribute.
The attribute values are changed to uppercase when they are stored in the Dictionary/204. The exceptions are DESCRIPTION and SHORT DESCRIPTION (Short desc.), which are stored in the Dictionary/204 as entered.
If you want to revise the Short descr. attribute on the previous screen, press PF7 (BACkward), and then type over the values to be changed.
If you want to specify additional attributes, press PF8 to scroll forward to an additional Entry Attributes screen. The additional attributes appear on the same type of screen.
Press PF11 (REFs) to view the references that have been defined for the entry by the Dictionary/204 administrator. When you move to the Add Entry References screen, the values you have entered on the Add Entry Attributes screen(s) are preserved. To store the attributes (without defining any references), press PF12. This returns you to the Documentation facility main menu.
Inserting multiple values
To define multiple values for an attribute, type an I (for Insert) in the prefix area to the left of the attribute:
I ALIAS : MANAGERS
Press Enter. The system provides another ALIAS line, allowing you to type a new value to the right of the colon.
You can use the Insert command in multiple prefix areas at once. Pressing Enter then yields one new attribute line for each Insert command.
If the additional line does not fit on the same screen, the system creates another Add Entry Attributes screen to contain the inserted lines.
Deleting values
To delete a value currently assigned to an attribute, choose one of the following methods:
- Blank out the value using the space bar.
- Delete the value by positioning the cursor at the beginning of the input field and pressing the Erase EOF key.
- Typing a D (for Delete) in the prefix area to the left of the attribute:
D AVG. LENGTH : 35
Press Enter.
The system deletes the entire line. If you delete the only line that displays the attribute, you cannot enter a value for it without returning to the Documentation facility main menu and selecting the Update an Entry function.
Commands
To issue a command, press the assigned PF key or type the command name at the prompt (===>) and press Enter.
| Key | Command | Meaning |
|---|---|---|
| PF1 | HELp | Provides online HELP text for this screen. You can read the HELP text and exit from the last screen of text by pressing Enter. |
| PF3 | QUIt | Aborts the processing of the entry definition screen and returns you to the Documentation facility menu entry definition. |
| PF7 | BACkward | Displays the previous screen in the series. Your input is retained but not stored.
To scroll back n lines instead of an entire screen, type the number n on the command line and press PF7. Or issue the BACkward command followed by the number n: BAC n |
| PF8 | FORward | Scrolls to the next screen of attributes or references. Your input is preserved but not stored.
To scroll n lines, instead of an entire screen, type the number n on the command line and press PF8. Or issue the FORward command followed by the number n: FOR n |
| PF11 | REFs | Displays the Add Entry References screen. Use this command to add references for an entry. Your input on the Add Entry Attributes screen is preserved but not stored. |
| PF12 | END | Stores the data entered on the Add Entry Attributes screen and returns you to the Documentation facility main menu. |
| Enter |
|
Causes the current screen to be redisplayed and the data on it to be verified. It also processes the Insert and Delete commands. |
Defining entry references
There are one or more Add Entry References screens, depending upon how many relationships have been assigned by the Dictionary/204 administrator to the entity type. Even if no references have been defined for the entity type, there is one screen of prompts in case you want to add references.
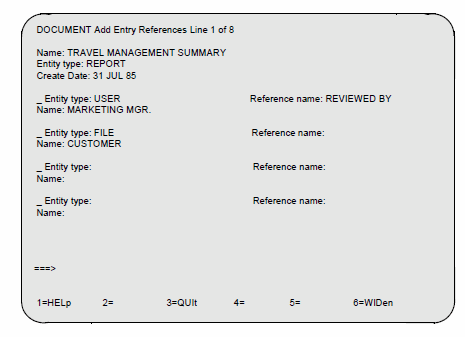
In the following sample screen, the entity types (USER and FILE) and the named relationship, (REVIEWED BY) are supplied automatically. Cross-references to the entry appear as blanks, as in the case of the FILE entry.
Follow these instructions to complete the Add Entry References screen:
- To specify a reference for a defined relationship, type the name of the related entry at the Name: prompt. In the sample screen, the related entries are MARKETING MGR and CUSTOMER.
- Unlike the Add Entry Attributes screen, this screen permits you to add new named or cross-referenced relationships for an entry -- references that have not been defined by the Dictionary/204 administrator.
-
Insert and Delete commands (described in the proceeding section) can be used in the prefix areas in column 1 of this screen. Insert provides a new set of prompts without values. Delete erases the set of prompts and values.
Type the name of the new named relationship at the Reference name: prompt; leave a cross-referenced relationship blank.
Note: References to currently undefined entries create "dummy" entries in the Dictionary/204.
Press PF8 (FORward) to advance to the next screen. The values you have entered on the current screen are preserved. You can return to the previous screen by pressing PF7 (BACkward). Pressing PF8 also provides additional blank lines for entering references.
When the references have been specified, you can store the entry definition (including attributes and references) by pressing PF12 (END). To terminate the definition function without saving any entry definition, press PF3 (QUIT).
To add a reference for a FIELD, RECORD, FIELD GROUP, or PROCEDURE entry whose name is longer that 70 characters, type FIELD, RECORD, FIELD GROUP, or PROCEDURE for the entity type, place the cursor on the Name: field, and press PF6 (WIDEN).
See Updating FIELD, RECORD, FIELD GROUP, and PROCEDURE entries for an explanation of how to use the Widen Screen. Adding references to entries that do not exist creates dummy entries.
Commands
To issue a command, press the assigned PF key or type the command name at the prompt (===>) and press Enter.
| Key | Command | Meaning |
|---|---|---|
| PF1 | HELp | Provides online HELP text for this screen. You can read the HELP text and exit from the last screen of text by pressing Enter. |
| PF3 | QUIt | Aborts the processing of the entry definition screen and returns you to the Documentation facility menu entry definition. |
| PF6 | WIDen | Displays the WIDEN screen, which allows you to enter the name of a FIELD, RECORD, FIELD GROUP, or PROCEDURE that is longer than 70 characters. |
| PF7 | BACkward | Displays the previous screen in the series. Your input is retained but not stored.
To scroll back n lines instead of an entire screen, type the number n on the command line and press PF7. Or, issue the BACkward command followed by the number n: BAC n |
| PF8 | FORward | Advances the definition process to the next screen of attributes or references. Your input is preserved but not stored.
To scroll n lines, instead of an entire screen, type the number n on the command line and press PF8. Or, issue the FORward command followed by the number n: FOR n |
| PF10 | ATTrib | Displays the Add Entry Attributes screen. Use this command to add attributes for an entry. Your input on the Add Entry References screen is preserved but not stored. |
| PF12 | END | Stores the data entered on the Add Entry References screen and returns you to the main menu of the Documentation Facility. |
| Enter |
|
Causes the current screen to be redisplayed and the data on it to be verified. It also processes the Insert and Delete commands. |
Updating an entry
Using Documentation facility to update, delete, copy, and rename an entry.
To update an entry to the dictionary, choose one of the following methods:
- Select the Update an Entry option from the main menu of the Documentation facility, and specify the name and entity type of the entry to be updated.
- Issue the DOCUMENT command from another facility (such as the Procedure Editor) in which the command is allowed.
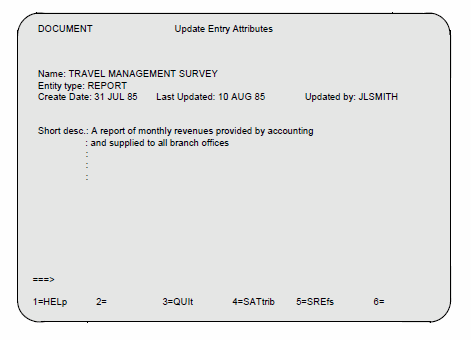
Dictionary/204 displays the following Update Entry Attributes screen when you select this function from the Documentation facility menu. The name, entity type, dates, and short description appear as a header.
You can update those attributes and relationships that are not managed by the system or by other Dictionary/204 facilities. You can also display the system- and facility-managed attributes and relationships in read-only mode.
Note: You cannot update dummy entries for FILE, FIELD, FIELD GROUP, or RECORD. You can update dummy entries only for VIEW, VIEW FIELD, COMPOSITE VIEW, VIEW LINK, and nonstandard (user-defined) entity types.
If you update a FILE, FIELD, FIELD GROUP, or RECORD entry that has a staged version, the updates are made to the staged version only. If the staged commands are "deleted" (canceled) through File Management, the information added through the Documentation facility is lost.
Input
The following screen enables you to revise the short description (Short desc.) attribute for the entry being updated. Type over the current description and delete unwanted text that remains with the Erase EOF key. The maximum length of a short description is four character lines.
You can process this screen in one of the following ways:
- Request HELP text by pressing PF1.
- Terminate the function without saving updates by pressing PF3.
- Update (nonsystem controlled) attributes for this entry by pressing PF8. This preserves the updated short description but does not store the update.
- Update (nonsystem controlled) references for this entry by pressing PF11. This preserves the updated short description but does not save the update.
- View system-controlled attributes by pressing PF4, or view system-controlled references by pressing PF5.
- Save the updated short description and return to the Documentation facility main menu by pressing PF12.
Displaying system data
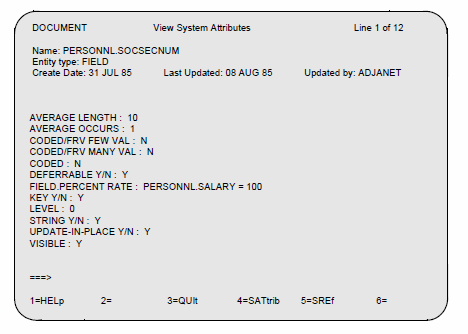
Although you cannot update facility-managed dictionary data by using the Documentation facility, you can display the values of these attributes and relationships with the SATtrib (PF4) and SREfs (PF5) commands.
You can display system attributes and relationships for standard entity types controlled by Dictionary/204 facilities. VIEWs and entity types created by your installation do not have system attributes and references:
- Press PF4 to see the facility-managed attributes of the entry.
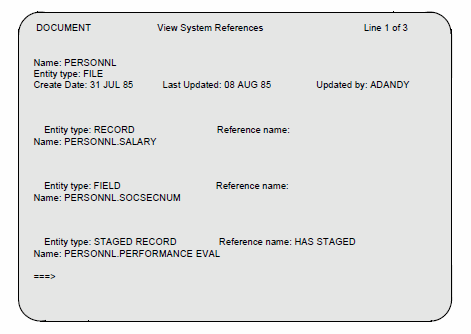
- Press PF5 to see the facility-managed relationships of the entry.
Use the PF keys available from those screens to terminate the display of system data and to return to another Update an Entry screen. To view a FIELD, RECORD, FIELD GROUP, or PROCEDURE name that is longer than 70 characters, position the cursor in the Name: field of the View System References screen and press PF6 (or issue the WIDEN command). The Widen Screen is displayed with the full entry name. See Updating FIELD, RECORD, FIELD GROUP, and PROCEDURE entries for more information about the Widen Screen.
Samples of the system data display screens follow:
Commands
Most of the commands available from the Update Entry Attributes screen have been explained fully in the section Deleting values. Two commands not documented in that section are:
| Key | Command | Displays system-controlled... |
|---|---|---|
| PF4 | SATtrib | Attributes (if any) for this entry. The attributes are displayed in read-only mode. |
| PF5 | SREfs | References (if any) for this entry. The references are displayed in read-only mode. |
Updating entry attributes
There are one or more Update Entry Attributes screens, depending upon how many nonsystem attributes have been assigned by the administrator to the entity type in question.
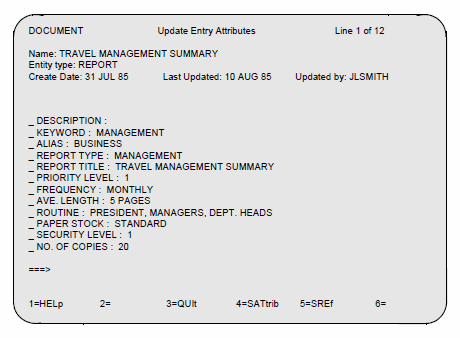
When updating an entry, all the nonsystem-controlled attributes that were defined for that entity type by the dictionary administrator appear in the first column, as shown on the following sample screen. The DESCRIPTION attribute has no value, but it does appear on the Update Entry Attributes screen because this attribute is provided by the system.
Type the new values over the current values of the attributes to be updated. Use the tab keys to advance the cursor to the next or previous attribute.
Use the Erase EOF key to delete unwanted characters. If you want to reconsider the Short desc. attribute on the previous screen, press PF7 (BACkward) to scroll back to the Update Entry Attributes screen, and then type over the description.
The Insert and Delete commands can be used as explained in Inserting multiple values and Deleting values.
If you want to specify additional attributes, press PF8 to scroll forward to the next Update Entry Attributes screen. These attributes appear on the same type of screen.
Press PF7 to scroll back to the previous screen. Press PF12 to save the updated entry without updating entry references.
Commands
The commands available from the Update Entry Attributes screen have been explained in Deleting values and Displaying system data.
Updating entry references
Press PF11 (REFs) to update the references that have been defined for the entry by the dictionary administrator.
There are one or more Update Entry References screens, depending upon how many relationships have been assigned by the dictionary administrator to the entity type. Even if no references have been defined for the entity type, there is one screen of prompts in case you want to add references.
To update the Entry References:
- Type over the reference data that you want to update. Leave cross-reference relationships blank.
- References to currently undefined entities create "dummy" entries in the dictionary (see Dummy entries and Updating an entry for information about updating dummy entries).
- Press PF8 (FORward) to scroll to the next screen. Your input is preserved but not stored until you press PF12 (END).
- Use the Erase EOF key to delete unwanted characters.
- Insert and Delete commands can be used as explained in Inserting multiple values and Deleting values.
- View system-controlled attributes by pressing PF4, or view system-controlled references by pressing PF5.
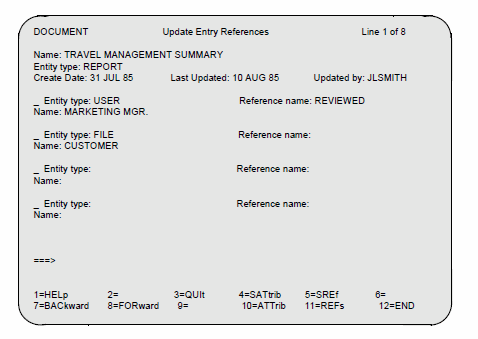
If you need to update additional references, they appear on the next screen. The Update Entry References screen follows.
Unlike the Update Entry Attributes screen, this screen lets you add new named or cross-referenced relationships for the entry.
To add a reference, specify the name and entity type of the related entity. Type in a name at the Reference name: prompt for a named relationship. Leave the prompt blank (do not type any character) for a cross-reference. If you need additional blank prompts for adding more references, either use the Insert command or scroll forward to the end of the display. This system displays additional prompts.
If you want to reconsider some of the values on the previous screen, press PF7 to scroll back to the previous screen, and type over the values to be changed.
To add a reference for a FIELD, RECORD, FIELD GROUP, or PROCEDURE entry whose name is longer than 70 characters, type FIELD, RECORD, FIELD GROUP, or PROCEDURE for the entity type, place the cursor on the Name: field, and press PF6 (WIDEN). The section Updating FIELD, RECORD, FIELD GROUP, and PROCEDURE entries explains how to use the Widen Screen.
When you are satisfied that the entry's references have been correctly updated, press PF12 (END). This saves the new entry definition in the dictionary.
The commands available from the Update Entry References function are the same as those explained in Deleting values and Displaying system data.
Deleting an entry
To delete an entry, select the Delete an Entry option from the main menu, indicating the name and type of the entity to be deleted. You can delete entries only for VIEWs and (nonstandard) entity types that are not managed by other Dictionary/204 facilities. An example of requesting the delete function follows.
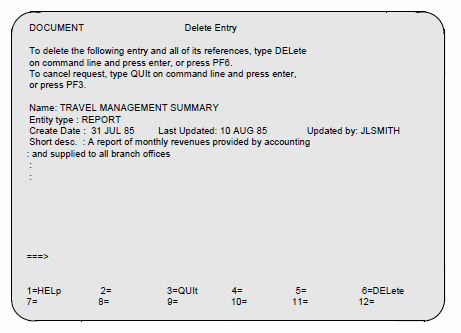
The Delete Entry screen appears with the system data as shown on the following screen. No other attributes or references for the entry are shown. The entry is the one that you specified on the main menu.
Once the deletion has been completed the entry cannot be recovered.
Commands
To issue a command, press the assigned PF key or type the command name at the prompt (===>) and press Enter.
| Key | Command | Meaning |
|---|---|---|
| PF3 | QUIt | Terminates the processing of the Delete an Entry screen and returns you to the Documentation facility main menu. |
| PF6 | DELete | Deletes the entry displayed on the screen. The deletion is final; no recovery of the data is possible. |
Copying an entry
You can copy an entry simply by selecting the Copy an Entry option on the main menu and by responding to the appropriate prompts. You can copy entries only for VIEWs and (nonstandard) entity types that are not managed by other Dictionary/204 facilities.
Copy an entry when you want to have two entities of the same type and generally of the same description. This function allows you to copy the set of attributes that belong to the existing entry to a newly named entry, eliminating the need to fill in the attribute values twice.
All attributes are copied from the source entry to the new entry; references (relationships) are copied optionally when you type a Y at the Copy References: prompt on the main menu screen.
The new entry must have a different name from its source, and it must be of the same entity type.
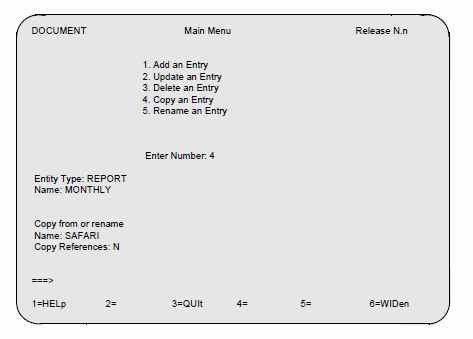
In response to the Entity Type: and Name: prompts, type the name of the new entry. Then type the name of the entry to be copied from at the Name: prompt following:
Copy from or rename:
This example shows a new MONTHLY report entity created as a copy of an existing SAFARI report. Attribute values can be modified later by using the Update an Entry option.
In this example, relationships are copied along with the attributes. This is not always desirable. For example, the SAFARI reports might be READ BY all ACCOUNTs, whereas the MONTHLY reports should be READ BY designated USERs only. Such relationships can be updated later using the Update an Entry function, or you might elect not to copy them at all.
Press the Enter key to perform the requested copying of the entry. If the copy was made successfully, the following message appears in the message line below the command prompt on the main menu screen:
DOC040 Entry has been copied.
Commands
To issue a command, press the assigned PF key or type the command name at the prompt (===>) and press Enter.
The Copy an Entry option uses the main menu screen; the commands available from the main menu are discussed in Updating FIELD, RECORD, FIELD GROUP, and PROCEDURE entries.
Renaming an entry
You can rename an entry simply by selecting the Rename an Entry option on the main menu and by responding to the appropriate prompts. You can rename entries only for VIEWs and (nonstandard) entity types that are not managed by other Dictionary/204 facilities.
Rename an entry when you want to change only the name of an entry, leaving its attributes and relationships the same. You might want to rename an entry to indicate a change in its function within an application, or to use its present name for another entity of the same type. All attributes and references remain the same.
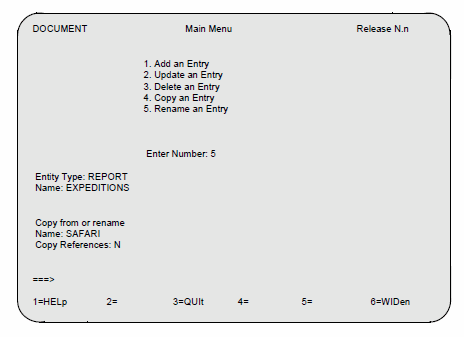
In response to the Entity Type: and Name: prompts, type the new name of the entry. Then fill in the name of the entry to be renamed at the prompt:
Copy from or rename Name: SAFARI Copy References: N
When renaming, relationships are copied along with the attributes. Thus, ignore the Copy References prompt. The previous example shows that the SAFARI report has been renamed the EXPEDITIONS report (perhaps to reflect the fact that it now covers safaris, archeological digs, and fishing trips).
Press the Enter key to perform the requested rename operation. If the rename was successful, the following message appears in the message line below the command prompt on the main menu:
DOC 050 Entry has been renamed.
Commands
The Rename an Entry option uses the main menu screen; the commands available from the main menu are discussed in Using the Documentation main menu.
Establishing security restrictions
The section Logging on describes restrictions that apply to any user who invokes the Documentation facility. To modify an entity controlled by another facility, the user must have the corresponding privileges.
The dictionary administrator can add a second level of security by specifying the entities an individual user is allowed to modify. The administrator can enter each entity allowed as a value of the DOC_ENT_ALLOWED attribute, a multiply occurring field in the user's ACCOUNT entry.
If there are no occurrences of DOC_ENT_ALLOWED, then the user can modify any entities (subject to the usual restrictions). If there are occurrences, then the user can modify only the entities specified.
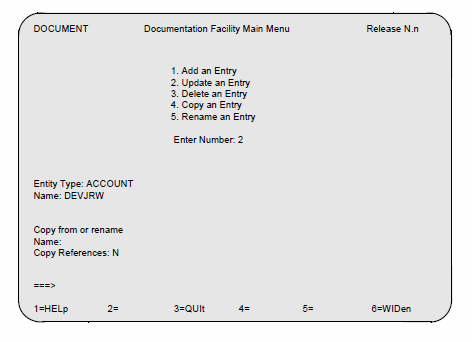
To update a user's DOC_ENT_ALLOWED attribute, you must have Dictionary administration privileges. On the Documentation facility main menu, select the Update function and enter entity type ACCOUNT and the user's Model 204 ID, as follows.
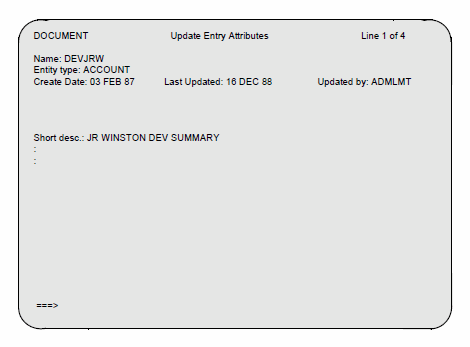
On the next screen, you can enter a short description, which is used as a header for dictionary reports.
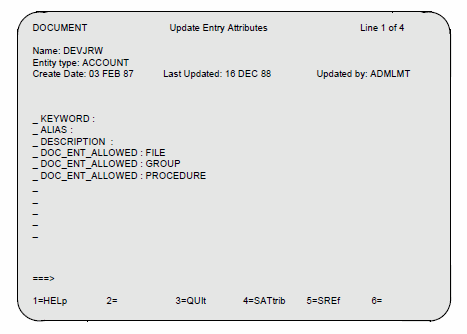
Advance to the next screen by pressing PF8 (FORward), and enter the entity types the user is allowed to modify.
To add a line for a new entity, enter an I (Insert) in the prefix area to the left of the DOC_ENT_ALLOWED attribute. You can specify an unlimited number of entities; the screen scrolls forward if you need to insert several lines.
In this example, user DEVJRW has been authorized to modify the entities FILE, GROUP, and PROCEDURE. This ACCOUNT entry now overrides any other Documentation privileges DEVJRW might have. DEVJRW is allowed to modify only the three entities listed.
See also
- Dictionary/204 overview
- Dictionary/204 view management
- Dictionary/204 logon and commands
- Dictionary/204 administration
- Dictionary/204 reports
- Dictionary/204 Documentation facility
- Dictionary/204 FILEMGMT overview
- Dictionary/204 Cross-Reference facility
- Dictionary/204 migration subsystem
- Dictionary/204 entity type definitions
- Dictionary/204 messages
