SirPro procedure-list operations
Overview
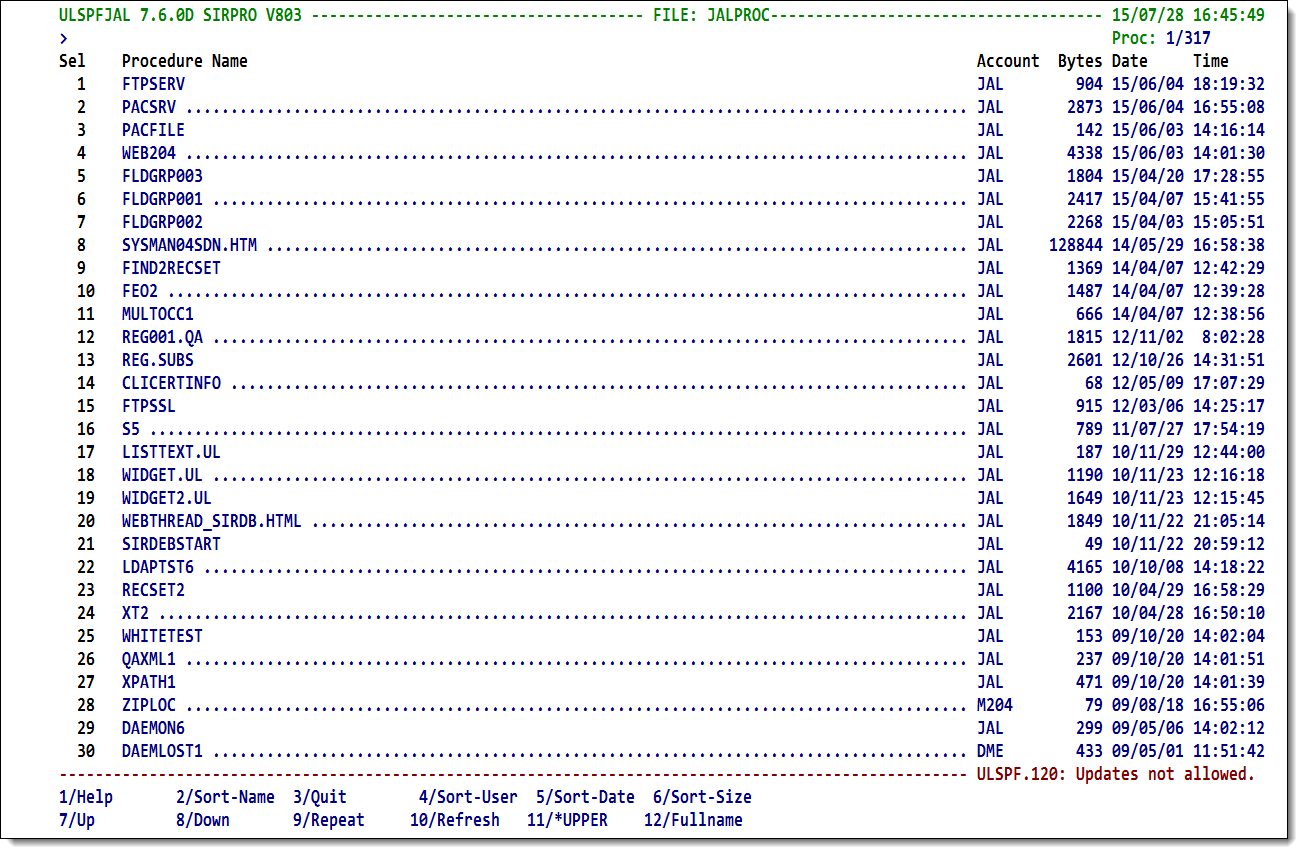
The procedure list shows the procedures that fit the criteria you specified on the selection screen.
Procedure List screen
Note: You can also access this screen from any screen in RKTools by using the PL command-line command. You access a similar screen in RKWeb by selecting Build > Edit and clicking the Open Procedure List button.
Prefix commands
To act on individual procedures in a TN3270 list, you specify single-character procedure commands in the select field (Sel) in the prefix area to the left of a procedure name. These commands are described in the following table, and the screens and processing they invoke are documented later in this page.
Note: Prefix commands and most of their functionality are not available in the RKWeb interface which uses a different editor; they can only be used in the SirPro TN3270 interface.
You may enter any number and combination of prefix commands, none of which execute until the Enter key is pressed. Deletes and Prints are done for all procedures at once. Processing for other commands is performed one procedure at a time, but with all same-type commands processed sequentially (that is, all Edits are performed, then all Browses, then all Prints, etc.) in the order in which commands are encountered from the top of the procedure list.
| Command | Action |
|---|---|
| B | Browse.
For more information, see SmartBrowse: Browse, Variable and (#) Expand, below. |
| C | Copy.
For more information, see Move/Copy, below. |
| D | Delete. |
| E | Edit.
Invokes SoulEdit, the SOUL editor, as of RKTools version 7.5. Under an earlier version of SirPro, it invokes the Model 204 editor. |
| I | Include.
Invokes a Model 204 INCLUDE command. |
| M | Move.
For more information, see Move/Copy, below. |
| P | Print.
For more information, see Printing procedures, below. |
| R | Rename.
For more information, see Renaming procedures, below. |
| S | Edit.
Invokes the Model 204 editor. |
| V | Variable analysis.
For more information, see SmartBrowse: Browse, Variable and (#) Expand, below. |
| # | Expanded browse.
For more information, see SmartBrowse: Browse, Variable and (#) Expand, below. |
In addition, the following are prefix commands that are provided for users of the SirLib change management system. They are described in SirPro change management tools and functions.
| Command | Action |
|---|---|
| X | Xcompare |
| Q | seQuence |
| N | New |
| K | Klobber |
| Z | Resequence (or ReSequence or resequenZ) |
| U | Undo |
| Y | Refresh |
Display fields and function keys
The display area of the screen, described below, can be toggled between a set of views. The DLIST view, similar to the view of procedures most commonly seen by User Language developers at the command level, contains the following information:
| Procedure Name | The name of a procedure available for editing. Procedure names longer than 25 characters are truncated. An asterisk is added as the last character of the truncated procedure name to indicate that the full name is not displayed, and the procedure name is highlighted. These procedures can still be selected from the list, and the full procedure name is used in all functions. |
|---|---|
| Account | The account (user id) of the last user to update the procedure. |
| Bytes | Number of bytes stored in Table D for the procedure. |
| Date/Time | The date and time the procedure was last updated. |
The following function keys invoke actions as described:
| F1 | Full screen help. |
|---|---|
| F2 | Sort the displayed list by procedure name. |
| F3 | Quit (return to previous screen). |
| F4 | Sort the displayed list by last updating user. |
| F5 | Sort the displayed list by last date updated. |
| F6 | Sort the displayed list by size of procedure. |
| F7 | Scroll backward (up). |
| F8 | Scroll forward (down). |
| F9 | Repeat last command-line command. |
| F10 | Refresh the list. Use this key to clear any prefix selections and to recheck the file for procedure information that may have changed (for instance, if another user is deleting procedures in the same file, your list may be out-of-date). |
| F11 | Toggles between upper and mixed case Edit when the editor is invoked. The key label indicates the case to which you will switch when the key is pressed. |
| F12 | Toggle the display between a "D LIST" format and a "FULLNAME" format. In DLIST format, the display shows the traditional Model 204 procedure list information with long procedure names truncated at 25 characters (for display only). In FULLNAME format, long procedure names overlay their corresponding procedure information. |
Command-line commands
The commands in the following table are valid on the command-line of this screen. These commands are not available in the RKWeb interface.
As of version 7.5, you can string command-line commands together using a semicolon (;) as a delimiter. For example, to switch to a new file, SIRIUS, and display those procedures that have "HELP" in their name, specify:
FL SIRIUS;A HELP
An erroneous command remains on the screen so it can be amended.
| Screen navigation commands: |
| ||||||||||||||||||||||||||||||||||
| Procedure list commands: |
As of version 7.5, most of the functions you can perform on the procedure file selection screen, you can issue as commands in the command line field. Most of these commands have a full name and an abbreviation.
| ||||||||||||||||||||||||||||||||||
| Prefix commands: | Any of the prefix commands may be typed on the command line, followed by a procedure name or the number of that procedure in the displayed list. If the procedures selected in this manner is the first procedure selected, processing is initiated immediately. If other prefix commands have already been entered, the procedure is added to the selected list. | ||||||||||||||||||||||||||||||||||
Move/Copy
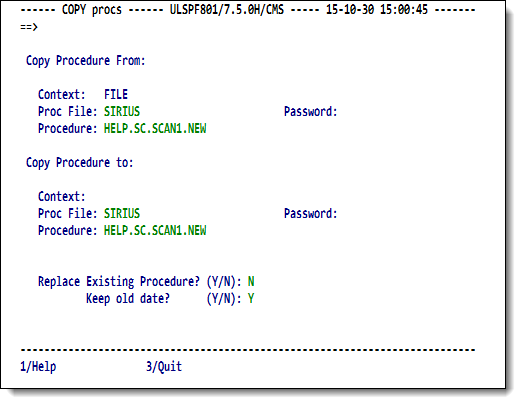
The destination screen is displayed once for each procedure selected for Copy or Move. The screen requires entry of destination file and procedure name, and allows the procedure to be edited on the way to the new location. The source information is protected.
Move/Copy procedure screen
The copy screen requires input in the following fields:
| Copy Procedure From: |
| ||||||||||
|---|---|---|---|---|---|---|---|---|---|---|---|
| Copy Procedure To: |
|
Function keys
The following keys invoke actions as described:
| F1 | Full screen help. |
|---|---|
| F3 | Cancel the request to copy or move this procedure. If this is one of a list of selected procedures, the next procedure is presented; if this is the only procedure, or if it is the last procedure in a list, you are returned to the procedure list display. |
Deleting procedures
Procedures selected for deletion are presented in a single scrollable list, from which you press the F3 key to cancel (and return to the list where the selections can be changed), or F12 to confirm the deletions.
Confirming procedure deletion
Function keys are the same as on the procedure selection list, except that F10 is not active (the user must return to the previous screen to refresh the procedure list), and F12 is used as a confirmation key for the delete.
On returning to the original list, procedure information lines are overwritten with a success or failure message for the delete operation.
Printing procedures
A variety of options are provided for printing procedures.
Procedures may be routed to an output file, or to a printer via a USE
printer.id command or a USE $PRINT command.
No confirmation is performed for print operations. The user is routed directly to the Print Destination screen for routing.
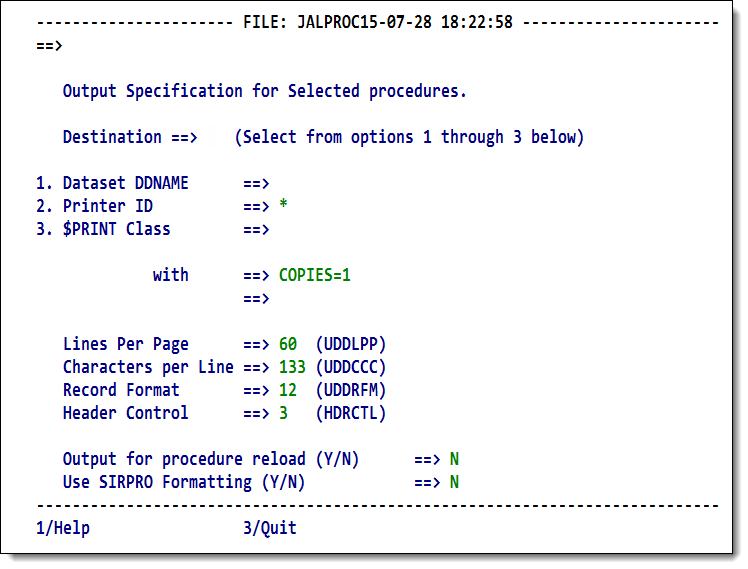
The Print destination screen controls output routing of the procedures, and various characteristics of the print job:
Print destination screen
Enter the following information:
| Destination | The destination of the procedure. Select 1 to print the procedure(s) to the file named in the Dataset DDNAME field, 2 to output to the printer named in the Printer ID field,
and 3 to invoke a USE $PRINT to the specified $PRINT Class and default printer. |
|---|---|
| Dataset DDNAME | DDname of a sequential data set to contain the print output. This name must begin with OUT. |
| Printer ID | A valid predefined printer name. If this field is blank or invalid when a 2 is specified in the Destination field, the print goes to the user's terminal. |
| $PRINT Class | The job class to use for USE $PRINT requests. This must be a valid class at your site.
|
| with | Enter in these two fields any print routing criteria normally placed in the WITH clause of a USE statement (such as COPIES=xx, TAG or ID statements). |
| Lines Per Page (UDDLPP) | The number of lines to be printed or displayed per page. The default is 60 lines per page. |
| Characters Per Line (UDDCCC) | The number of characters to be printed or displayed per line. The default is 133 characters per line. |
| Record Format (UDDRFM) | The number of characters to be printed or displayed per line. The default is 133 characters per line. |
| Header Control (HDRCTL) | Header control settings let you suppress various levels of automatic print headers. |
| Output for procedure reload (Y/N) | Specifying Y to this prompt prints procedures beginning in column 1 and placing PROCEDURE procname and END PROCEDURE procname statements around each output procedure.
This allows later uploading of the output stream directly back into a Model 204 procedure file.
Specifying |
| Use SIRPRO Formatting (Y/N) | Specifying N to this prompt prints procedures as they are in the procedure file. Specifying Y forces a page break at the beginning of each procedure,
numbers the lines of the procedure, and produces a header at the top of each page, indicating the procedure file, procedure name, date, and time of the print. |
Function keys are the same as on the procedure selection list, except that F10 is not active (the user must return to the previous screen to refresh their selected list), and F12 is used as a confirmation key for the print.
If either Option 1 or Option 2 is selected, SirPro executes a simple USE command. If Option 3 is selected, a command of the following format is executed:
USE $PRINT PRINTER=printer.id CLASS=print.class
If the specified printer is invalid, PRINTER=LOCAL is substituted.
All user entries on the print screen are saved in the user profile except the destination.
Renaming procedures
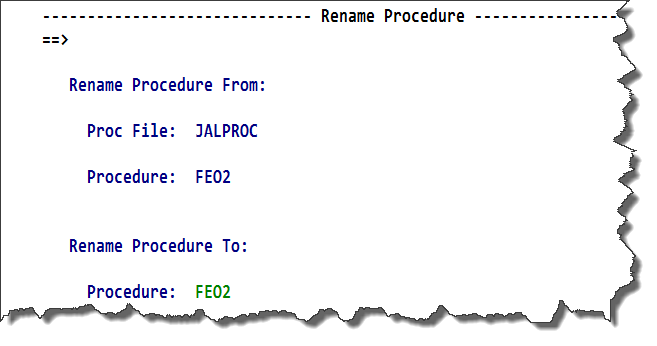
Procedures selected for Renaming are presented one at a time.
Rename Procedure screen
On returning to the original list, procedure information lines are overwritten with a success message for renamed procedures, and they are protected from update until the user's procedure list is refreshed.
On a renaming failure, SirPro reports the reason: insufficient privileges, the procedure name already exists, or the procedure name exists as an alias, or the procedure is locked.
Function keys
The following keys invoke actions as described:
| F1 | Full screen help for this screen. |
|---|---|
| F3 | Cancel the request to rename this procedure. |
SmartBrowse: Browse, Variable and (#) Expand
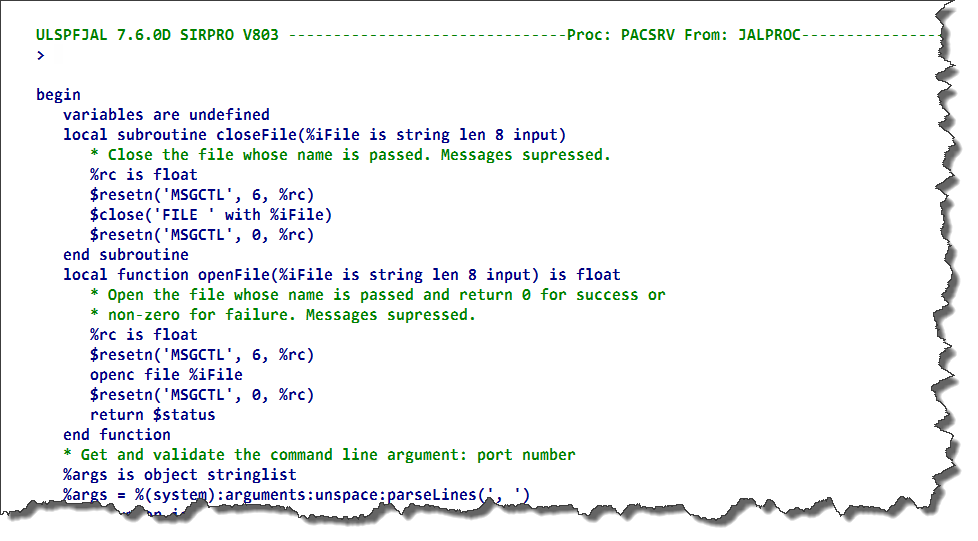
Browse, Variable and # (Expand) prefix commands all invoke SmartBrowse sessions.
- Browse displays the procedure in a scrollable list (which does not invoke an edit session).
- Expand (#) brings inline all INCLUDEd code, and presents the fully expanded procedure in a scrollable list (INCLUDEs of temporary procedures are ignored).
- Variable scans the fully expanded procedure and presents a list of undeclared %variables.
SmartBrowse: Browsing a procedure
The following command-line commands are also valid, depending on the SmartBrowse session context:
| BOTTOM | Moves the display to the bottom of the procedure list. |
|---|---|
| BROWSE | Convert the display to a simple browse session. |
| EXPAND | Expand all include statements. |
| F string or /string | Find a specific "string," starting the search from the top line of the display. This string can be any part of the procedure name. That is, it is not a prefix search. |
| -F string or -/string | Find a specific string, searching backward from the top line of the display. |
| L n | Locate line number n. |
| n or -n | Scroll n or -n lines from the top line of the display. |
| M | When using F7 or F8, scroll up or down to the top or bottom of the list of procedures. |
| TOP | Moves the display to the top of the procedure list. |
| UNDECL or VARIABLE | Display undeclared variable names only. |
Function keys
The following keys invoke actions as described:
| F1 | Full screen help for this screen. |
|---|---|
| F3 | Exit from SmartBrowse of this procedure. |
| F7 | Scroll up. |
| F8 | Scroll down. |
| F9 | Repeat last command-line command. |
See also
- SirPro
- SirPro procedure-list selection
- SirPro procedure-list operations
- SirPro command processor
- SirPro Print All Information facility
- SirPro field definition display
- SirPro CCASTAT password maintenance
- SirPro file-group maintenance
- SirPro change management tools and functions
- SirPro date processing
