SQL DDL from the Table Specification Facility
The Model 204 SQL Table Specification facility (TSF) looks at an existing Model 204 file, reads its field names and their attributes, and allows you to specify how to map the file to an SQL table. The TSF provides an interactive, menu-driven facility that generates a subset of DDL statements based on your specifications. You can use the generated DDL as input to the CVI utility to define your SQL table to the SQL catalog.
You use the TSF to create new tables, not to modify existing ones.
The TSF is the Model 204 subsystem CCATSF. It is subject to typical Application Subsystem security, as described in System requirements for Application Subsystems. This is the case whether you are accessing the TSF directly from your Model 204 command line as described on this page, or whether you are accessing from the RKWeb interface. RKWeb uses Janus Web Legacy Support to serve facsimiles of the panels described on this page.
Introduction to the Table Specification facility (TSF)
DDL processing
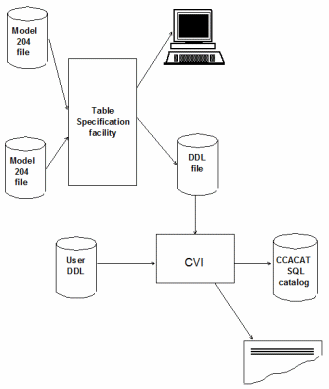
The following figure shows the relationship between the Model 204 files, the TSF, manually created DDL, the CVI utility, and the SQL catalog.
DDL processing overview
TSF processing sequence
The following table summarizes the general processing that goes on within the Table Specification facility.
| Stage | Description |
|---|---|
| 1 | You identify the name of the SQL table you are defining and the Model 204 file to which the SQL table maps. |
| 2 | Table Specification facility reads Table A, the in-file dictionary, of the Model 204 file and displays the existing Model 204 fields. |
| 3 | You identify fields that are to be included in the SQL table and specify SQL column names. |
| 4 | For each column, you specify the SQL attributes. |
| 5 | If necessary, you specify multi-column unique indices using special panels. |
| 6 | If necessary, you specify GRANT options using special panels. |
| 7 | Table Specification facility generates SQL DDL and writes it to an external sequential file. |
DDL statements generated by the TSF
Note: Currently the CCATSF subsystem does not generate DDL statement delimiters, semicolons by default, which are required by the CVI utility. You can add delimiters by hand or use another SQL utility that does not require DDL delimiters. The Connect★ ODBC unsupported utilities, DDLWIN and CLIIVP, are examples of utilities which expect DDL input lines without delimiters.
The TSF is designed for the initial definition of SQL catalog objects. It generates the following DDL statements:
CREATE SCHEMA CREATE TABLE GRANT
Of course, you can also manually generate the DDL statements that the TSF produces. You must manually prepare catalog operations that require the following DDL statements:
ALTER TABLE DROP VIEW CREATE VIEW GRANT (for view privileges and for existing tables) DROP SCHEMA REVOKE DROP TABLE SET SCHEMA
Besides convenience, the advantage of using the TSF is that it returns the current state of the Model 204 file data. Relying on manual creation of DDL for the catalog leaves you without this data consistency safeguard. Remember, changes to a cataloged Model 204 file are not automatically reflected in the SQL catalog. The person creating DDL manually is responsible for being aware of the current definition of the Model 204 file.
Model 204 SQL DDL extensions generated by the TSF
The TSF-generated DDL includes the following Model 204 SQL extensions to standard SQL. These extensions are described where appropriate in the individual panel discussions in this chapter. For more information about these extensions, see SQL Data Definition Language (DDL).
| Model 204 extension | Provides... |
|---|---|
| SYSNAME filename or fieldname | Aliasing of both table and column names. The SYSNAME value is the actual name of the Model 204 file or field; it does not have to comply with SQL table and column naming rules.
The SYSNAME clause is required only if the SQL table or column name (after any modification to meet Model 204 naming conventions) differs from the Model 204 file or field name. The TSF automatically applies a name-correcting algorithm to your SQL table and column names to determine whether a SYSNAME clause is needed. |
| SYSTEM qualifier for PRIMARY KEY | System-generated primary key in cases where no suitable column is available or where two or more columns are used as a composite primary key, for example, to link a nested table to its parent table.
In the TSF, the system-generating action of SYSTEM is available as a default on the Column List panel (TSF2). TSF has no explicit prompt for SYSTEM. |
| NESTED USING clause | Definition for the table as a nested table and indicates the table column (foreign key) that links the nested table to its parent table. This extension permits the mapping of Model 204 multiply occurring fields to a set of columns in a nested table.
If you designate a table as nested on the TSF Main Menu, you must also specify the nested table linking or foreign key. |
| REFERENCES parent table name | Qualifier (and constraints) for the foreign key column of a nested table.
The Model 204 SQL REFERENCES clause functionality is nonstandard in that it is required for a nested table and cannot be used in any other context. The TSF has no explicit prompt for the REFERENCES clause. If you designate a nested table Primary Key on the TSF Main Menu, the generated DDL for the nested table foreign key includes a REFERENCES clause in the CREATE TABLE statement. |
SQL and Model 204 data consistency
When you use the TSF, it displays the current Model 204 file definitions. With these you specify SQL DDL mappings of the files and populate the SQL catalog. If no changes were made to the file before you submitted this DDL to the SQL catalog, you can be sure that the catalog and the Model 204 file are consistent.
If you edit the TSF-generated DDL before using it to populate the SQL catalog, you are responsible for ensuring that your edits are based on the current Model 204 file definition.
Using TSF panels
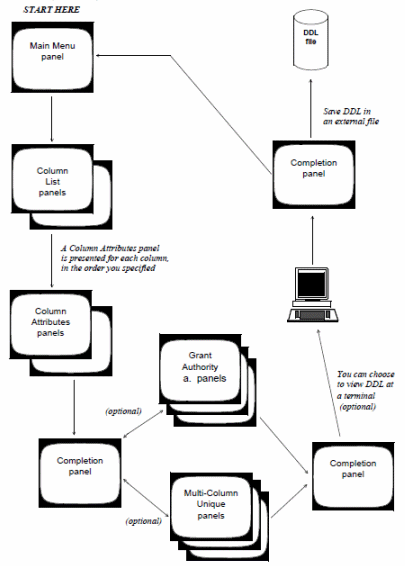
TSF panel map illustrates the order in which you would likely use the TSF panels to define DDL. Each of these panels is discussed separately in the following sections of this chapter.
You do not need to complete the entire table definition process in one session. You can complete part of the process, log off, and return later to the TSF subsystem and pick up where you left off.
The Model 204 files that you name during a TSF session are opened by TSF processing. Make sure these files are available to the Model 204 Online run.
Panel conventions
The Table Specification facility has the following panel conventions:
- Panel number (for example, TSF1) appears in the upper left corner of the panel. The panel title (for example, Main Menu) appears in the center of the top line of the panel. The version number appears in the upper right corner of the panel.
- Error messages appear at the bottom of the panel. Input areas that are in error are tagged with an asterisk (*) and highlighted.
- Command line (===>) is near the bottom of the panel. Use the command line to enter commands in lieu of PF keys. The minimum abbreviation for a command is displayed in capital letters and is generally the first three characters (for example, DEL for DELete).
TSF panel map
ENTER and PF key conventions
At the bottom of each TSF panel is a list of the PF keys that you can use on the panel. The following table displays the TSF key conventions. In the RKWeb display, comparable buttons replace the PF keys.
| Key | Performs this function... |
|---|---|
| Enter | On menus, processes your selections; on update panels, edits the panel, but does not store any updates |
| PF1 | Accesses online help |
| PF2 | Refreshes the screen without processing any updates |
| PF3 | Leaves the current panel or application (if you are on the Main Menu) without storing any updates |
| PF4 | Moves screen left |
| PF5 | Moves screen right, or stores definition and provides fresh panel (on Grant Authority or Multi-Column Unique panels) |
| PF7 | Scrolls back to the previous screen of data without storing updates, or displays the previous data definition (on the Grant Authority or Multi-Column Unique panels) after storing updates |
| PF8 | Scrolls forward to the next screen of data without storing updates, or displays the next data definition (on the Grant Authority or Multi-Column Unique panels) after storing updates |
| PF9 | Deletes the current Model 204 file definition |
| PF10 | Takes you to the Completion panel |
| PF11 | Takes you to the Column Attributes panel |
| PF12 | Leaves the current panel or application (if you are on the Main Menu) and commits all updates |
Logging in
Before you can log in to the TSF, the CCATSF subsystem must already have been started (with the Model 204 START SUBSYSTEM command). If you access the TSF from the RKWeb interface, this command is probably already issued as part of the recommended set up during RKTools installation.
To log in to TSF, at your Model 204 Online prompt, type:
CCATSF
and press Enter.
The Table Specification facility Main Menu appears.
Creating or modifying a base table (Main Menu panel)
After you log in to TSF, the Table Specification facility Main Menu panel (TSF1) is displayed.
This section includes a description of each of the panel fields and nonstandard PF keys of the Main Menu, general usage notes for the panel, and information about how to use the TSF to create nested tables.
The descriptions of the individual panel fields include directions for how to use the panel, such as whether you immediately press Enter to record your entry or whether you fill in other fields before you press Enter.
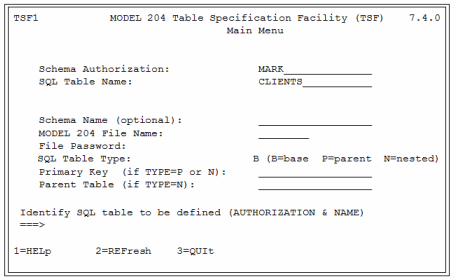
Main Menu panel shows an example of the Main Menu with user entries in four of the fields. These entries initiate the definition of Mark's CLIENTS table, which is mapped to the Model 204 demonstration database CLIENTS file. Examples in subsequent sections follow this mapping to completion.
Main Menu panel
Press Enter, then fill in SCHEMA and Model 204 File name.
Creating SQL objects in the context of a schema
The TSF generates a stream of SQL DDL statements for creating or modifying SQL tables and columns. Each such stream includes a CREATE SCHEMA statement naming the schema to which the DDL applies.
The schema name must be unique within the SQL catalog, and issuing CREATE SCHEMA for a schema that already exists is an error.
Because the TSF does not validate each schema name against previous schemas, you must review the DDL generated by the TSF and determine whether to keep the schema name, delete it, or change it (using a SET SCHEMA statement).
Schema Authorization
At the Schema Authorization prompt, enter an authorization ID. The default authorization ID is the Model 204 login user ID. You must enter a value at this prompt, and, because the TSF does not validate authorization IDs, you must ensure that the value is a valid Model 204 login ID.
The authorization ID you enter becomes the owner of the tables you create. The authorization is generated in the CREATE SCHEMA DDL that the TSF produces for this table.
The authorization ID must follow the naming rules for a Model 204 login ID (no more than 10 characters and no underscore characters, must begin with an alphabetic character and must not contain certain character combinations). The authorization ID cannot be an SQL reserved word (see SQL reserved words).
To see a list of pending authorization IDs, IDs from table definitions you have not deleted from the TSF, place your cursor in the input area for this field and press PF1.
SQL security is based on authorization IDs and granted privileges.
SQL Table Name
At the SQL Table Name prompt, enter the name of the SQL table that you are defining. Multiple nested tables are allowed. You must enter a value at this prompt.
The table name can contain up to 18 characters (A-Z, 0-9, and underscore). No embedded blanks are allowed. Table names must begin with an alphabetic character.
The TSF applies certain truncation and compression rules (described further in Mapping table names to file names) to the SQL table name you specify and compares the resulting name to the corresponding Model 204 file name. If the resulting name does not match the Model 204 file name, the TSF automatically adds a SYSNAME clause with the Model 204 file name to the TSF-generated DDL.
To see a list of pending tables, names from table definitions you have not deleted from the TSF, place your cursor in the input area for this field and press PF1.
At this point, the other input areas are protected (unavailable for input). After inputting the authorization and table name, press Enter.
If this is a new table definition, the TSF displays a message to tell you that this is a new definition. If a table definition exists, the TSF displays a message telling you the definition is pending, and enables PF9, PF10, and PF11. To delete the existing table definition, press PF9. To proceed to the Completion panel (TSF4), press PF10. To proceed to the Column Attributes panel (TSF3), press PF11.
At this point, the other input areas are unprotected and the authorization and table name input areas are protected.
Schema Name
At the Schema Name prompt, enter the SQL schema name as you want it to appear in the CREATE SCHEMA statement. If you do not specify a schema name, Schema Name defaults to the authorization ID specified for Schema Authorization.
Model 204 File Name and Password
At the Model 204 File Name prompt, enter the name of the Model 204 file that you want defined as an SQL table. An entry for Model 204 File Name is required.
If applicable, include the file password. The password you enter must give you the authority to read the file and all the field names for which you want to set up columns in the SQL table you will create.
Note: You cannot use Model 204 file groups, although you can use individual files that may belong to a file group. Also, the Model 204 file to be used as an SQL table must be defined as a transaction backout (TBO) file. For more information about TBO files, see Transaction back out.
Table Type
At the Table Type prompt, enter the appropriate table type: B (Base), P (Parent), or N (Nested). The Table Type value is required.
Model 204 SQL base tables are SQL schema tables that map directly to Model 204 files and fields. By contrast, views are schema tables that map directly to SQL base tables or to other views. Base tables are created by CREATE TABLE; views are created by CREATE VIEW.
A nested table is a base table with columns that map to Model 204 multiply occurring fields or groups of fields. A nested table is associated with a single base table parent by a unique table column key which joins the nested table to the parent table.
If you designate a table as nested, the TSF-generated DDL for the table includes the NESTED USING clause in the CREATE TABLE statement.
For more information about creating nested tables with the TSF, see Defining nested tables.
Primary Key
At the Primary Key prompt, enter the name of the primary key if the table type is P (Parent) or N (Nested). The primary key is required and valid only for these table types.
Note: To use the TSF to define a primary key in a B (Base) table, define the table as a P (Parent) with no associated nested table.
This field identifies the SQL column name of the primary key in a parent or nested table. (By definition, in Model 204 SQL DDL the nested table primary key is also a foreign key: the values of the nested table primary key must match the values of the parent table primary key.) Later (on the Column List panel) you are asked to map this column name to an existing Model 204 field. If you do not provide a Model 204 field at that time, by default TSF treats this as a system-generated key.
The primary key must be mapped to a field that has unique values. The corresponding Model 204 field must have the UNIQUE (and ORDERED) attribute.
Do not enter the name of a column that maps to a Model 204 INVISIBLE field.
For more information about creating nested tables with the TSF, see Defining nested tables.
Parent Table
At the Parent Table prompt, enter the name of the SQL table that each nested table references. The parent table name is required for nested tables (Table Type N).
Keeping or deleting the pending definition
The definition of the actual Model 204 database file that you are defining is copied into a work record within the CCATSF subsystem only once, when the specification process begins. This work record represents a frozen "snapshot" picture of the Model 204 definition at the time you start the specification process.
If you are modifying an existing definition, the CCATSF subsystem does not read the Model 204 database file nor look at its most recent status; it instead does all its processing from the work record already built. If significant changes have been made to the definition of the Model 204 database file, then you might want to delete the "pending" definition (using PF9) and begin again.
If you continue with the pending definition, you can use PF11 to go to the Column Attributes panel (TSF3) where you can define SQL attributes for columns already selected. Or you can use PF10 to go to the Completion panel (TSF4) to build GRANT statements and multicolumn UNIQUE keys and to generate DDL for the table.
Defining nested tables
If you are defining a nested table with the TSF, follow these guidelines:
- Map each column in a nested table (except the foreign key) to a Model 204 field that can multiply occur (that is, does not have OCCURS 1 or AT-MOST-ONE field attribute).
- Make sure that the field mapped to the parent table primary key is defined with the Model 204 field attributes UNIQUE and ORDERED.
- Be sure that each column in the nested table (except the foreign key) occurs the same number of times on the Model 204 record to which the occurrence group maps.
- Go through the TSF panels multiple times: once for the parent table, and once for each nested table. Whether you define the parent table before or after the nested table(s) does not matter.
- Specify a Primary Key value for parent and for nested tables. The nested table primary key is really a foreign key, and its data values, although not its name, must match the data values of the parent table primary key.
- Specify a Parent Table value for each nested table.
- Do not specify a multicolumn unique key for a nested table.
TSF rules
The TSF automatically enforces the following rules by limiting your panel choices:
- Columns in each nested table must be NOT NULL.
- Column in a nested table (including the foreign key) must not be mapped to a field with the Model 204 field attribute INVISIBLE.
For more information about using DDL to define nested tables, see Creating nested tables. Using DML to access nested tables is discussed in Using SQL DML against nested tables.
Defining column names (Column List panel)
After you specify the Model 204 file and the SQL table name and press ENTER from the Main Menu, the Column List panel appears.
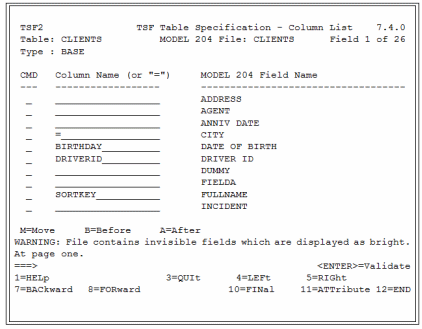
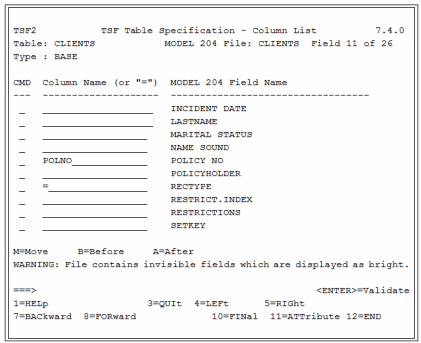
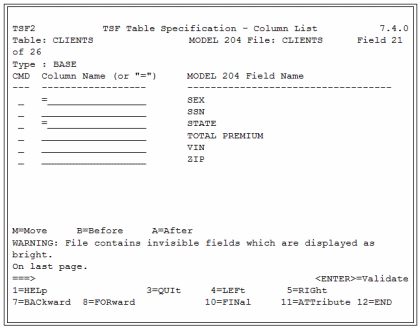
Column List panel, Column List, second panel, and Column List, third panel, show a Column List panel with user column selections filled in.
Column List panel
Column List, second panel
Column List, third panel
Model 204 field names
The Column List panel displays the SQL table and Model 204 file name that you entered on the Main Menu. The message at the upper right-hand corner (for example, Field 1 of 21) denotes where you are in the list of Model 204 field names.
The field names for the selected Model 204 file appear in the middle of the panel. As described in Defining SQL column names, you select the Model 204 fields you want defined as SQL columns by entering a column name next to the associated field name.
After you specify the column names, you can press PF11 to go to the Column Attributes panel to define the column attributes. Rocket Software recommends that you define the attributes of each column before using the Completion panel (TSF4) to request DDL generation. If you do not explicitly define attributes, default SQL attributes are assigned to each column based on its Model 204 field attributes.
Because the complete MODEL 204 Field Name list might cover more than one panel, use PF7 or PF8 to move panel by panel through the list. You can type BAC n or FOR n on the command line and move backward or forward the indicated number of lines on the panel. You can also type a number on the command line and press PF7 or PF8 to move the indicated number of lines on a panel.
To remove a column name, overwrite it with spaces.
Notes: As you scroll forward and backward through the panels, no selections are permanently captured until you use PF10, PF11, or PF12. If you attempt to quit without storing modifications, you receive a warning message and are asked to reconfirm the quit.
If a field name is longer than 45 characters, you can use PF4 and PF5 to scroll left and right to see the entire field name.
Changing the order of field names
Initially, the Model 204 field names appear in alphabetical order. Specify M, B, or A in the CMD (command) column and press Enter to change the order of column names and field names. M indicates the field to be moved. B (Before) and A (After) indicate where the marked field is to be placed.
The columns in the DDL CREATE TABLE statement that the TSF generates are listed according to the order of the columns on this panel. The exception to this rule is that a primary key that you have the TSF generate is always listed last in the DDL column definitions.
Defining SQL column names
Select the fields you want defined as SQL columns by entering a column name next to its associated field name. To simplify the data entry process, enter an equal sign (=) to make the column name the same as the Model 204 field name (embedded blanks and periods are translated to underscores and field names are truncated to 18 characters).
A valid column name contains the characters A-Z, 0-9, or underscore and has a maximum length of 18 characters. Embedded blanks are not allowed. The column name cannot be an SQL reserved word (see SQL reserved words).
The TSF compares the column name to the corresponding Model 204 field name. If the SQL name does not match the Model 204 field name, the TSF automatically adds a SYSNAME clause with the Model 204 field name to the TSF-generated DDL. The SYSNAME value is the actual name of the Model 204 field; it does not have to comply with SQL table and column naming rules.
For more information about the SYSNAME extension, see Column naming and the SYSNAME extension.
Note the following provisions:
- Model 204 INVISIBLE fields are displayed with bright highlighting. You can select these fields as columns (for nonnested tables), but their SQL use is restricted. For example, you cannot update such a column in SQL. INVISIBLE field restrictions are described in Using Model 204 file data features and in Using SQL DML against INVISIBLE fields.
- You cannot select Model 204 fields that have the attribute AT-MOST-ONE or OCCURS 1 (meaning that the field does not multiply occur) as SQL columns in a nested table (the exception to this rule is the primary key field which might be defined this way).
- If a file is a sorted or hash key file, you must select the sort or hash key as a column if the SQL table type is Parent or Base and the Model 204 FILEORG parameter has the X`02' option (key required) set. In this case, a default column name is automatically supplied to ensure that this field is selected. Default column names (which you can change) are SORTKEY or HASHKEY.
- You must select at least one column name.
- If you do not assign to any Model 204 field the SQL column you designated (on the Main Menu) as the primary key, the TSF automatically includes a system-generated key in the TSF output DDL. The DDL for the table has PRIMARY KEY SYSTEM.
- If you change the names of columns or the selections of the columns in a table after defining your GRANT and UNIQUE statements on the Grant Authority and Multi-Column Unique panels, you receive an error message when you attempt to generate DDL.
Defining column attributes (Column Attributes panel)
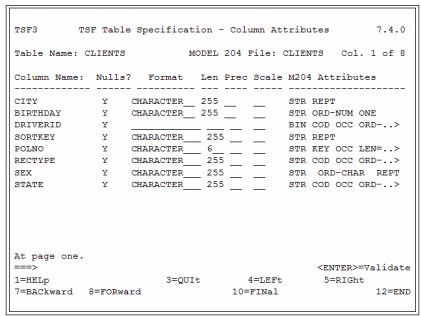
After you press PF11 on the Column List panel, one or more Column Attributes panels appear with default attributes for the columns selected on the Column List panel. On the Column Attributes panel, you define the SQL attributes you want for the selected columns.
The top of the Column Attributes panel has the SQL table name and the corresponding Model 204 file name. The listing below includes the SQL column names, the TSF-supplied default SQL attributes, and the attributes (abbreviated) of the associated Model 204 fields. See Field design for details.
If the string of Model 204 field attributes ends with two periods and an angle bracket (..>), there are more attributes than can fit in the display area. Use PF4 and PF5 to scroll the panel to the left and right to view the attributes.
Column Attributes panel shows a Column Attributes panel before any user modifications.
Column Attributes panel
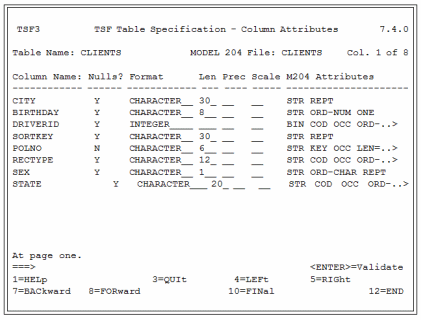
The following figure shows the Column Attributes panel after user modifications.
Modified Column Attributes panel
Specifying attributes
The TSF automatically generates default SQL attributes for each selected SQL column based on its Model 204 field attributes. If you make no revisions to these default SQL column attributes, the TSF assigns them by default. Otherwise, you can modify the selected values.
Note: Attributes that you supply must apply to all records in the Model 204 file, regardless of record type.
Nulls
You must indicate whether or not nulls are allowed for each selected column. Your choice determines whether the NOT NULL clause is built into the generated DDL for each column.
If you know that a field cannot contain nulls or that a field always has a value on a record, define a column as:
CHAR (n) NOT NULL
This results in more efficient queries and prevents generating different results in Model 204 SOUL.
For example, when doing an index count, in SQL "not equal" (<>) is true only if there is a value for the field on the record that is not equal to the search string. In Model 204, if the field is not present on the record, the NOT NULL values are included in the count using the index, because Model 204 does not keep an index value NULL or NOT NULL. Once the NOT NULL count is established using the index, the Model 204 SQL processor has to check every record in that set to see whether or not there is a value for the field, and, for each record that does not have a value, reduce the index count by one. This can be very costly in terms of I/O and CPU consumption. Alternatively, if you define the column as CHAR (n) NOT NULL, Model 204 SOUL simply does an indexed search to evaluate the "not equal" query.>
For more information about matching Model 204 and SQL data formats, see Matching Model 204 and SQL data formats.
The NULL field defaults to Y (yes) except for the following cases in which it defaults to N (no): all columns in a nested table, and the primary key of a parent table.
Note: In some cases, TSF prevents you from changing the default value displayed for this field. Typically, the field value area is protected when the default is N.
Format
You must indicate the data type format of the column. Valid values are:
- DECIMAL or DEC
- NUMERIC
- INTEGER or INT
- SMALLINT
- FLOAT
- CHARACTER or CHAR
- REAL
- DOUBLE (for DOUBLE PRECISION)
Defaults, which you can change, are as follows:
| SQL data type | Model 204 field attribute |
|---|---|
| CHARACTER | STRING |
| FLOAT | FLOAT |
| INTEGER | BINARY |
Specify INTEGER or DECIMAL for real numeric data only where leading and trailing zeros of significance do not occur. If leading or trailing zeros have significance (for example, in Social Security Numbers or dates), choose CHARACTER.
Also specify CHARACTER if the data field can ever contain nonnumeric data values.
For more information about matching Model 204 and SQL data formats, see Matching Model 204 and SQL data formats.
Len (length)
You must specify a length if your data format is CHARACTER. Enter a length between 1 and 255. This is the length of the string displayed to SQL requests for this column. To prevent the display value from being truncated, enter a length large enough to hold the maximum value the corresponding Model 204 field is likely to contain.
The default value is the Model 204 length; if the Model 204 field is not preallocated or float, the default is 255.
For more information about Model 204 SQL data conversions, see Optimizing Model 204 data conversion and Observing data precision limits.
Prec (precision)
If your data format is DECIMAL or NUMERIC, you must specify an integer value between 1 and 15 for decimal digit precision.
If your data format is FLOAT, you must specify an integer value between 1 and 53 for binary precision (between 1 and 21 is equivalent to REAL; between 22 and 53 is equivalent to DOUBLE).
For more information about the precision available for Model 204 SQL processing, see Observing data precision limits.
Scale
If your data format is DECIMAL or NUMERIC, you can optionally specify the scale. The scale must be an integer value less than or equal to the specified precision.
Usage note
The UNIQUE column attribute is automatically assigned or not assigned to a column in the TSF-generated DDL based on the Model 204 attribute ORDERED UNIQUE; therefore, it does not appear as an input option on the panel.
Nonstandard PF key functions
PF7 (BACkward)
In addition to its standard usage (scrolling backward 12 lines, which returns you to the previous page of data for the panel), you can use PF7 to scroll backward a number of lines that you specify. If you type BAC and a number on the command line, or if you type a number on the command line and press PF7, the panel is scrolled backward that number of lines.
PF8 (FORward)
In addition to its standard usage (scrolling forward 12 lines, which takes you to the next page of data for the panel), you can use PF8 to scroll forward a number of lines that you specify. If you type FOR and a number on the command line, or if you type a number on the command line and press PF8, the panel is scrolled forward that number of lines.
Completing table definitions (Completion panel)
After defining your last column on the Column Attributes panel, Press PF10 to access the Completion panel (TSF4). Or from the Column List panel, press PF10 to access the Completion panel (TSF4).
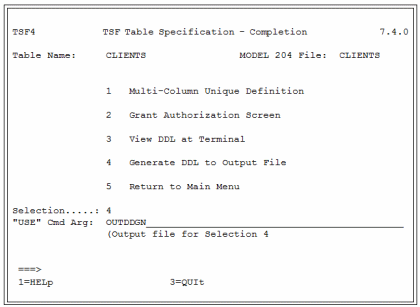
Completion panel shows an example of a Completion panel with user specifications for generating the DDL to the OUTDDL file.
Completion panel
Completion panel functions
The Completion panel selections perform the following functions.
| This Completion panel selection... | Performs this action... |
|---|---|
| Multi-Column Unique Definition | Takes you to panels to identify columns that combine together to form a unique identifier for a row of data. |
| Grant Authorization panel | Takes you to panels to specify the data needed to generate GRANT statements for this schema. |
| View DDL at Terminal | Allows you to view at a terminal the DDL generated. |
| Generate DDL to Output File | Allows you to route DDL to a specified output location. You can specify any valid argument for a USE command.
For example:
If the output destination is an output file (OUTxxxxx), define the output file with a disposition of MOD if you intend to generate DDL several times before processing the output file. |
| Return to Main Menu | Enables you to define a new table. |
Selection
At the Selection prompt, enter the number of the task you want and press Enter.
"USE" Cmd Arg
If you specify Option 4 (to generate DDL), you must also specify where the output DDL is to be written. Enter a string of characters that make a valid argument for the Model 204 USE command. For example:
OUTxxxxx PRINTER DALLAS $PRINT R *
Error condition
If you have changed the names of columns or the selections of the columns in a table after defining your GRANT and UNIQUE statements, the following error message appears when you attempt to generate DDL:
Column Names have been altered, revalidate GRANT & UNIQUE definitions
Because the GRANT and UNIQUE definitions were edited with a now-altered table definition, you must reedit these GRANT and UNIQUE definitions before you can generate DDL. Select Options 1 and 2 from the Completion panel (refer to Completion panel) and then revalidate each GRANT and UNIQUE definition by pressing PF8 for each definition to the last definition, and then press PF12.
Defining multicolumn unique keys (Multi-Column Unique panel)
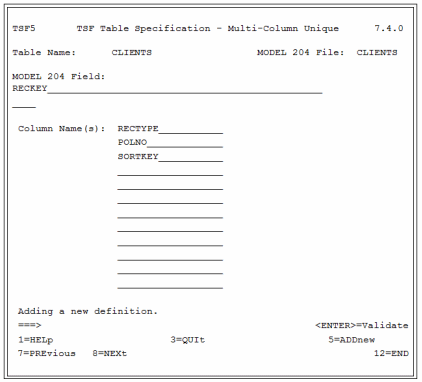
If you select Option 1 from the Completion panel), the Multi-Column Unique panel is displayed. You can identify a set of columns that, when concatenated together, form a unique constraint key for the rows in the table. By preserving the uniqueness of the combination of the values of these columns, you preserve the uniqueness of the combination of the Model 204 field values associated with the columns.
Multi-Column Unique panel shows a Multi-Column Unique panel with the names filled in of the SQL columns that combine to form a unique key, and with the name of the Model 204 field (RECKEY) that is the concatenated index of the fields associated with the indicated columns.
Note The RECKEY field in Multi-Column Unique panel is specified for example purposes only. RECKEY is not defined in the Model 204 demonstration database. If you attempt to reproduce this example, you receive an error message. For the example to work, you must define and populate a special index field in the demonstration database.
When you complete your definition, press PF5 to edit the panel, store the updates, and provide an empty panel to generate a new multi-column unique definition. Press PF7 or PF8 to move to the previous or to the next definition.
Multi-Column Unique panel
Specifying a multicolumn unique key
The Model 204 SQL Server supports multicolumn unique keys only if there is an ORDERED CHAR UNIQUE field (which can be INVISIBLE) defined in the Model 204 file that is generated by the concatenation of data in the individual columns or fields. That is, a Model 204 DEFINE FIELD command must be issued for this field before the multicolumn unique key is defined to the SQL catalog.
The order in which you list the columns that compose the key determines the order in which they are concatenated to build the supporting Model 204 index field.
Once the Model 204 index field and multicolumn unique key are defined, you must populate the index with data from its component fields. If you are maintaining the associated Model 204 file exclusively with SQL, you can populate the index automatically with an SQL UPDATE statement. If you are maintaining the file with SOUL or the Host Language Interface, you can manually apply the same algorithm the SQL Server uses for the automatic population.
For more information about populating the multicolumn unique index, see Populating the index field. For more information about manually defining a multicolumn unique key, see Specifying a multicolumn UNIQUE key.
Note: A multicolumn UNIQUE key is not allowed in a nested table.
Model 204 Field
The Model 204 field name must be the name of a field defined in the file with the ORDERED CHAR UNIQUE attribute.
Using a multicolumn UNIQUE definition requires some modifications to the existing Model 204 file that is being used. A field name must be added for the concatenated data that results from a multicolumn UNIQUE definition. The field must have the attribute of ORDERED CHAR UNIQUE. The field must be populated with data for existing records. The Usage note provides more information about defining such a field.
Once the table has been defined to the SQL catalog with the multicolumn unique DDL clause, SQL updates or deletions of any of the columns corresponding to the fields automatically update or delete keys from the index field you added to support the multicolumn unique definition.
You might want to define the field as INVISIBLE in Model 204 to save duplicate storage of data. However, if you do define the field as INVISIBLE, make sure that the data in that field is not corrupted by SOUL programs (SQL programs do not corrupt the data). If a SOUL program deletes any records in a file with the Reuse Record Number option active, that program must also explicitly delete any INVISIBLE fields associated with those records.
Refer to the Field design topic for information about the INVISIBLE attribute.
To get a list of fields defined in the file with the ORDERED CHAR UNIQUE attribute, place the cursor on the input field and press PF1. On the help panel, use any character to select the field value you need, and that value appears on the panel in the input field when you return to the Multi-Column Unique panel.
Note: Due to physical panel size limitations, the Model 204 field name you provide can be no longer than 58 characters. Ordinarily, Model 204 field names can be as many as 255 characters. If you require more than 58 characters for the field name, do not use the TSF to map this field. Manually include DDL creating this key before submitting it to the CVI.
Column Name(s)
You must specify at least one column name; you cannot specify more than ten. Each name must be a valid column name defined in this table.
The TSF concatenates the SQL column names you specify and compares the resulting name to the corresponding Model 204 field name. If the resulting SQL name does not match the Model 204 field name, the TSF automatically adds a SYSNAME clause with the Model 204 field name to the TSF-generated DDL. The SYSNAME value is the actual name of the Model 204 field.
To get a list of columns that can be selected, place the cursor on the field and press PF1. On the help panel use any character to select the value(s) you need and these value(s) appear on the panel at the Column Name input field(s) when you return to the Multi-Column Unique panel.
You must not specify columns that are mapped to INVISIBLE fields.
For an example of how the SQL Server concatenates the SQL column names, see Using the multicolumn unique key algorithm. For more information about the Model 204 SQL SYSNAME extension, see Column naming and the SYSNAME extension.
Usage note
Remember, if you are defining a multicolumn unique field for an existing Model 204 file that contains data, you must take the following actions:
- Define the field that is to be the concatenated index as ORDERED CHAR UNIQUE (and preferably INVISIBLE).
- Populate the new index with data from its component fields, as described in Populating the index field.
Specifying GRANT authority (Grant Authority panel)
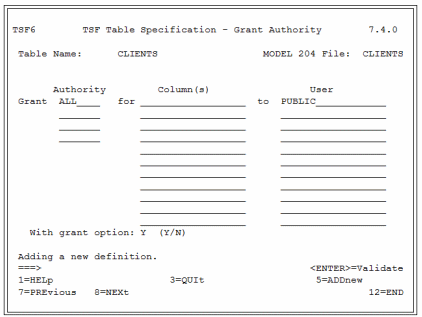
If you select Option 2 from the Completion panel), the Grant Authority panel appears. With the Grant Authority panel you can generate GRANT statements for the schema in which the table is being defined.
For more information about the Model 204 SQL implementation of GRANT, see Granting privileges for SQL objects.
Grant Authority panel shows a Grant Authority panel with user specifications for granting privileges for all four DML actions to all valid Model 204 SQL users. These users can grant these privileges to others ("With grant option" clause of GRANT statement is included).
Grant Authority panel
Authority
You must specify at least one authority value. Valid values are SELECT, INSERT, DELETE, UPDATE, and ALL. If you specify ALL, do not specify any other value.
Column(s)
Only if you specify UPDATE as the authority value can you optionally include valid column name(s) defined in this table.
To access help information about columns, place the cursor on the field and press PF1. On the help panel use any character to select the value(s) you need and these value(s) appear on the panel in the Column input field(s) when you return to the Grant Authority panel.
User
Specify at least one entry. Valid user names must be valid or plausible Model 204 login IDs (having no more than 10 characters and no underscore characters, initial numbers, or certain character combinations).
Grant option
You must select either Y for Yes or N for No.
Usage note
When you complete your definition, press PF5 to edit the panel, store the updates to the database, and provide a new empty panel to generate a new GRANT definition. Press PF7 or PF8 to move to the previous or to the next GRANT definition.
Viewing DDL at the terminal (Completion panel)
To view the generated DDL on the screen, select Option 3 from the Completion panel). The DDL generated by the Table Specification facility appears.
To page through the output, press Enter. Pressing Enter at the last page of output brings you back to the Completion panel.
An example of DDL displayed at a terminal is shown in the following figure.
Note: The DDL at the bottom of the generated stream that defines the multicolumn unique key is displayed for example purposes only. You cannot generate such DDL using an unaltered version of the Model 204 demonstration database. The demonstration database includes no field designed to serve as a multicolumn unique key.
TSF-generated DDL
SET SCHEMA DEMO CREATE TABLE CLIENTS ( CITY CHAR(30), BIRTHDAY SYSNAME 'DATE OF BIRTH' CHAR(8), DRIVERID SYSNAME 'DRIVER ID' INTEGER NOT NULL, SORTKEY SYSNAME 'FULLNAME' CHAR(30), POLNO SYSNAME 'POLICY NO' CHAR(6) NOT NULL, RECTYPE CHAR(12), SEX CHAR(1), STATE CHAR(20), UNIQUE (DRIVERID, POLNO) SYSNAME ‘RECKEY’ ) GRANT ALL PRIVILEGES ON CLIENTS TO PUBLIC WITH GRANT OPTION
Generating DDL to an output file (Completion panel)
To generate DDL into a specified output file, select Option 4 from the Completion panel.
You must either dynamically allocate or have your system manager define or allocate this output file prior to your using it from the TSF. For best results under z/OS (and comparably for VM and VSE), make sure that the following is specified in the DD statement or ALLOCATE command for the output file (data set):
- Data set name begins with OUT.
- DISP=MOD, if you intend to generate DDL several times before processing the output file
- RECFM=FS, to prevent the printing to the file of carriage control characters
- LRECL=80, to facilitate the reading of the file by CVI
After generating DDL to an output file, you receive the following message:
********************************************************************** * * * WARNING: Generation of DDL to an output file causes this utility * * to delete all work records generated by this utility. * * If you do not wish to delete these work records at this time * * respond "N" to the question below, and remember that the deletion * * of these records will be a manual process under your control. * * * ********************************************************************** $$Proceed with delete (Y/N)? >
Delete the work file records after you have stored the DDL from the TSF in an output file.
You can use your editor to manually adjust or add to the DDL stream generated by the TSF before you submit the DDL to the CVI.
As stated earlier, the CVI utility requires that the DDL input statement must each be delimited, which the CCATSF utility currently does not generate. This delimiter character, the semicolon (;), must be manually supplied by the user, if the CVI utility is to be used.
See also
- SQL Server overview
- SQL Server installation
- SQL catalog
- SQL representation of Model 204 data
- SQL Data Definition Language (DDL)
- SQL DDL from the Table Specification Facility
- SQL catalog reporting and querying
- SQL Data Manipulation Language (DML)
- SQL DDL syntax
- SQL reserved words
- SQL DDL mapping of the demonstration database
