Dictionary/204 reports
Overview
This topic explains how to query the dictionary and generate reports on dictionary data. All reports are displayed at the terminal, unless routed to a printer or a specified output file.
Dictionary/204 provides online interfaces for querying and reporting on the entries in the dictionary. The reports can include:
- All the attributes and relationships for a given entry
- List of all of the entries for a given type of entity -- all SCREENs, all FILEs, and so on
- Entries selected by name, entity type, relationship with another specified entry, or specific keywords
Logging on
To log on to the Dictionary Reports facility, choose one of the following methods:
- Type the number of the Dictionary Reports option at the Enter Number: prompt on the Dictionary/204 main menu.
If your main menu does not display the Dictionary Reports option, you have not been authorized to use this facility.
- If the DICTREPORT subsystem has been started, you can call Dictionary Reports from the Model 204 command prompt by typing the subsystem name:
> DICTREPORT
- If using the RKTools main menu, select the DictReport menu item. If using the RKWeb interface, select
Manage > Dictionary > Reports.
Selecting a report option
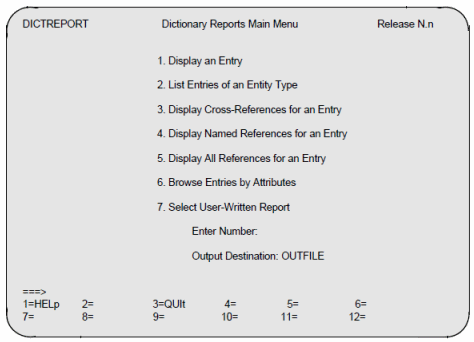
Dictionary/204 displays the following menu when you select Dictionary Reports facility:
The Dictionary Reports facility provides the following capabilities:
-
Displaying dictionary entries.
You can display the attributes and/or relationships (or references) for an entry of a specified entity type.
-
Displaying lists of entries by entity type.
You can display a list of entries of one or several entity types. For example, the names of all the files, all the procedures, and so on.
-
Displaying relationships between entries based on cross-references only.
You can search all entries or only entries of a particular entity type.
-
Displaying relationships between entries based on named references only.
You can search all entries or only entries of a particular entity type. Named references are unidirectional and take the form A ===> B. Yet, Dictionary/204 also allows you to search for entries that are related to B (including A).
-
Displaying any relationship between entries including cross-, named, or path (indirect) references.
(See Path relationships and Defining paths: in theory for a discussion of path relationships.)
-
Browsing through entries selected by the value of their KEYWORD attribute, the UNQUALIFIED NAME attribute, or optionally browsing entries selected by the value of specific standard attributes.
You can restrict browsing to a single entity type or browse all the dictionary entries, regardless of entity type.
- Selecting a report written by your installation.
Input
To select a standard report option from this menu, enter the number of your selection at the prompt:
Enter Number:
Dictionary/204 responds by displaying a screen appropriate for the report requested. For example, if you select the option Display an Entry, Dictionary/204 next displays the Display An Entry screen, which prompts you to specify the name of the entry to be reported on. (See Displaying an entry.)
Output
Normally, reports are sent to your terminal. However you can optionally send them to a designated output device (such as a printer) or to a specified file. The following prompt names an alternative destination for your output:
Output Destination:
The default output file is OUTFILE, if no other value has been specified in your ACCOUNT entry. Responding to this prompt, however, does not constitute an instruction to route your output to an alternative destination. It simply designates the destination in case you select the option later. The Output Destination name can be from 1 to 30 characters.
If you want to send a report to a destination other than your terminal, a value for Output Destination is required.
Commands
To issue a command, press the assigned PF key or type the command name at the prompt (===>) and press Enter.
| Key | Command | Meaning |
|---|---|---|
| PF1 | HELp | Provides online HELP text for this screen. You can read the HELP text and exit from the last screen of text by pressing Enter. |
| PF3 | QUIt | Terminates the Dictionary Reports function. You return to the Dictionary/204 main menu, to the screen from which this facility was invoked, or to the Model 204 command prompt. |
| INVoke | Invokes another facility for which you have user privileges. Enter the following command at the command prompt and then press the Enter key:
INVoke facility_name |
Displaying an entry
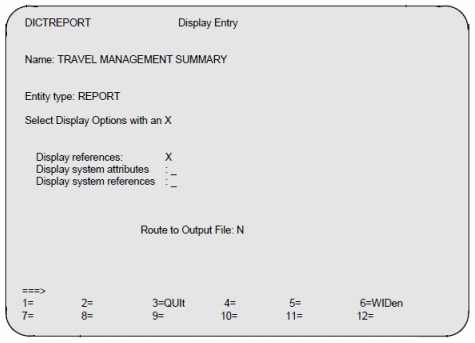
Dictionary/204 displays the following screen when you select the following option from the Dictionary Reports menu:
Display an Entry
Use this screen to display the dictionary definition of a particular entry. You can display the report on your terminal or have it printed to the output location specified on the preceding screen.
Input
Identify the dictionary entry to be displayed and request particular display options by responding to the following screen prompts:
-
Type the name of the entry at the prompt:
Name:
-
Enter the entity type for the dictionary entry being displayed (for example, FILE, FIELD, REPORT), at the prompt:
Entity Type:
- Use your cursor or tab keys to position the cursor at the prompts. Do not press Enter until you have completed your report specification.
-
On this report, nonsystem attributes are displayed by default. To display relationships and/or system data for this entry, type an X at the appropriate prompt:
Display references: _ Display system attributes: _ Display system references: _
In the previous sample screen, the TRAVEL MANAGEMENT SUMMARY report entry is requested. No system data for the REPORT entity type exists, because REPORT is an entity type created by the dictionary administrator and has no system attributes.
-
By default, Dictionary/204 sends reports to your terminal. You can direct the output to a different destination, however, by typing Y over the default value of N at the following prompt:
Route to Output File: N
Your output file is already specified on the Dictionary Reports menu. (The output destination can be a printer or a specified file.)
- Press Enter to generate the report. Issue the QUIT command to terminate this function and return to the Dictionary Reports menu without generating a report.
Displaying FIELD, RECORD, FIELD GROUP, and PROCEDURE entries
Displaying FIELD, RECORD, FIELD GROUP, and PROCEDURE entries is a special case, because these entries require a file name prefix concatenated by a period to the entry's UNQUALIFIED NAME. For example, the uniquely identifying name of the SOCSECNUM field in the PERSONNL file is PERSONNL.SOCSECNUM.
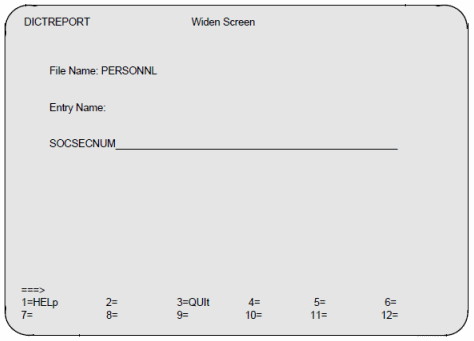
When requesting a report on a FIELD, RECORD, FIELD GROUP, or PROCEDURE entry, the name (including the file name prefix) of a FIELD, RECORD, FIELD GROUP, or PROCEDURE entry might exceed the 70 character spaces provided at the Name: prompt. In this case, you must press PF6 (or issue the WIDEN command) from the input screen.
Dictionary Reports then displays the Widen Screen shown above, which allows you to enter a file name not exceeding 8 characters and an entry name not exceeding 70 characters. Any portion of the name that you have entered on the input screen prior to issuing the WIDEN command appear on the Widen Screen. If there is a period in the name prior to the tenth character, the facility interprets the name to the left of the period as a file name.
When you have entered the entry's name on the interim screen, you can press PF3 (QUIT) to cancel the input or press PF12 (END) to enter the input on the preceding (Display an Entry) screen. If you press PF12, the first 70 characters of the file name plus the entry name appear on the Display Entry screen. Press Enter to process your report.
Output
When the report is displayed at your terminal, press Enter to return to the Display Entry screen or to see additional report screens.
When you have finished displaying or printing your report, Dictionary/204 presents the Display Entry screen again. At this point, you can request another report or press PF3 to quit.
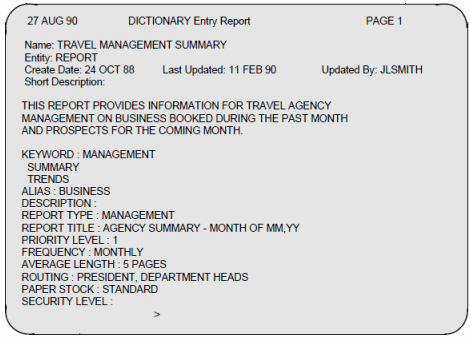
An example of an entry report based on the request shown on the sample screen follows.All attributes defined by the dictionary administrator are listed, including those categories for which no values have been entered by the dictionary users.
Interpreting the report
Attributes provided for this entity type appear to the left of the colons. The values appear to the right. Notice that multiple values have been added for the attribute KEYWORD, while no value has been entered for DESCRIPTION (perhaps because the SHORT DESCRIPTION is sufficient).
Relationships appear on an additional screen, including cross-references and named relationships in both directions. For example, this report is cross-referenced to the CUSTOMER file and is reviewed by two users (TOUR AND TRAVEL, CRIMSON) and is part of the MARKETING report.
Listing entries of an entity type
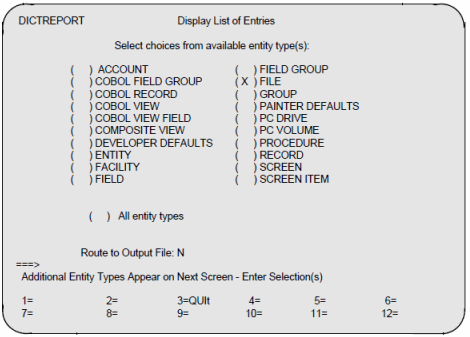
Dictionary/204 displays the following screen when you select the following option from the Dictionary Reports menu:
List Entries of an Entity Type
Use this screen to display or print the names of the dictionary entries of one or more particular entity types (for example, all the files in the dictionary), or the names of all the entries in the dictionary.
Select the desired entity type(s) from the entity types defined in your own installation's dictionary. The following sample menu displays only those standard entity types supplied with Dictionary/204. If your dictionary administrator has added other entity types to the dictionary (for example, REPORT, PROGRAMMER, and so on), these are displayed on the screen.
Input
Dictionary/204 displays up to 20 entity types on a single screen. The entity types are displayed in alphabetical order in two-column format.
When more entity types are defined in the dictionary than can fit on the screen, Dictionary/204 displays the following message:
Additional Entity Types Appear on Next Screen - Enter
Selection(s)
To advance to the next screen, press Enter. Scrolling backward from the next screen is not allowed.
- Select as many entity types as you want by typing an X in the parentheses to the left of the entity type. Type an X to the left of "All entities" if you want to see all the entries in the dictionary.
-
By default, Dictionary/204 sends reports to your terminal. You can direct the output to a different destination by typing Y over the default value N at the following prompt:
Route to Output File: N
Your output file has already been specified on the Dictionary Reports menu (see Selecting a report option). The output destination can be a printer or a specified file.
- Press Enter to generate the report. Issue the QUIT command (PF3) to terminate this function without generating a report and return to the Dictionary Reports menu.
Output
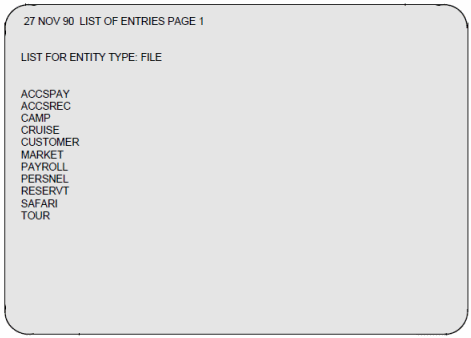
An example of a List report, based on the request shown on the sample screen, follows. The report shows the requested entity type (FILE), and lists the entries (the names of the files) defined in the dictionary. All entries are listed in alphabetical order. When the report is displayed at your terminal, press Enter to see additional screens of the report and to return to the previous selection screen.
After returning to the selection screen, you can request another report or press PF3 to quit.
Displaying cross-reference relationships
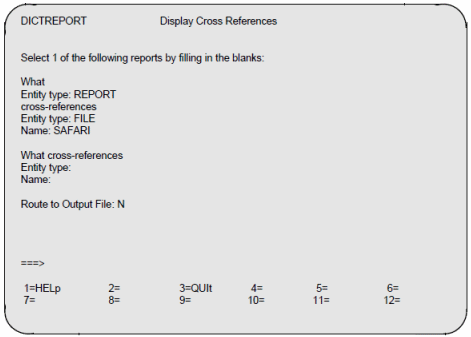
Dictionary/204 displays the following screen shown when you select the following option from the Dictionary Reports menu:
Display Cross References for an Entry
Use this screen to request the display of either of the following:
- Dictionary entries of a particular entity type that cross-reference a specified dictionary entry; for example, REPORTs that cross-reference the SAFARI FILE.
- Dictionary entries of any entity type that cross-reference a specified dictionary entry; for example, all entries that cross-reference the SAFARI FILE.
This screen generates reports that display cross-references established by the dictionary administrator or added to the dictionary by a user.
Input
To see online help text for this screen, press PF1 or enter HELP. You can read the help text and exit from the last screen of text by pressing Enter.
-
Select the desired cross-reference report by typing the appropriate entity types and the entry name at the prompts provided. The name field allows a maximum length of 70 characters.
Use your tab key to move the cursor to each input field. Do not press Enter until you are ready to generate the report.
In the sample screen, the user asks Dictionary/204 which reports are cross-referenced to the SAFARI file.
The following prompts ask the dictionary for all entries that are cross-referenced to the SAFARI file (or some other specified entry):
What cross-references Entity type: Name:
-
By default, Dictionary/204 sends reports to your terminal. You can direct the output to a different destination, however, by typing Y over the default value of N at the following prompt:
Route to Output File: N
The name of your output file has already been specified on the Dictionary Reports menu (see Selecting a report option). The output destination can be a printer or a specified file.
- Press Enter to generate the report. Issue the QUIT command (PF3) to terminate this function and return to the Dictionary Reports menu without generating a report.
Output
Dictionary/204 searches the dictionary for the specified name and entity type(s). If the entries cannot be found for the specified entity type, or if the specification is invalid, an appropriate message is displayed.
If no references are found in the specified categories, a report is generated with the following message:
No Cross-References Found
When the report is displayed, press Enter to see additional report screens and to redisplay this selection screen.
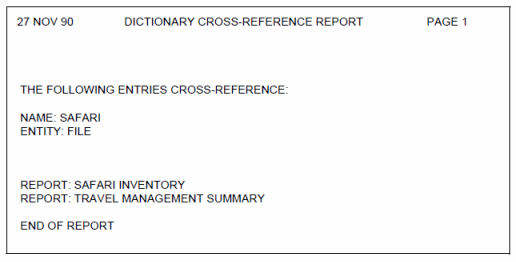
An example of a cross-reference report, based on the request shown on the sample screen, follows. The report lists the reports that reference the SAFARI FILE, one per line.
Displaying named relationships
Dictionary/204 displays the following screen when you select the following option from the Dictionary Reports menu:
Display Named References for an Entry
Use this screen to display information about specified named relationships.
You can display the following:
- Entries that have the specified named relationship with any other entry.
- Entries (of any entity type or of a particular entity type) that the specified entry is related to by the specified named relationship.
- Entries (of any entity type or of a particular entity type) that have the specified named relationship to the specified entry.
Input
To see online help text for this screen, enter HELP or press PF1. You can read the help text and exit from the last screen of text by pressing Enter.
-
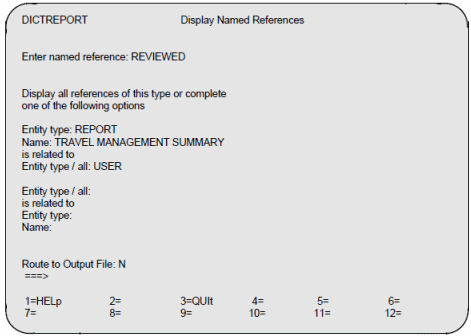
Specify the desired named reference at the prompt:
Enter named reference:
If you press Enter and generate a report at this point, Dictionary/204 includes all entities referenced by the particular named relationship (REVIEWED).
-
By responding to the following prompts, you can ask Dictionary/204 to find entries of one or all entity types that are related by the named relationship (REVIEWED) to a particular entry (in this case the TRAVEL MANAGEMENT SUMMARY report):
Entity type: Name: is related to Entity type / all:
The sample screen asks which users reviewed the TRAVEL MANAGEMENT SUMMARY report. The entry name field allows a maximum length of 70 characters.
Use your tab key to move the cursor to each input field. Do not press Enter until you are ready to generate the report.
-
By responding to the following prompts, you can ask Dictionary/204 to find all entries (or all entries of a particular entity type) that are related to the specified entry by the REVIEWED relationship:
Entity type / all: is related to Entity type: Name:
The sample screen asks Dictionary/204 which users review the TRAVEL MANAGEMENT SUMMARY report.
-
Press Enter to generate the report. Issue the QUIT command (PF3) to terminate this function and return to the Dictionary Reports menu without generating a report.
Output
Dictionary/204 searches for the specified named relationship, entity type, and entry name. If they cannot be found, or if the specification is invalid, an appropriate message is displayed.
If no entry is found for the specified relationship, Dictionary/204 generates a report with the following message:
No Named Reference <specified relationship > Found
When a full report is displayed, press Enter to see additional report screens or to redisplay the Named References report menu.
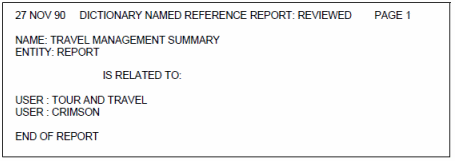
An example of a named relationship report, based on the request shown on the sample screen, follows. The report lists the entries to which the TRAVEL MANAGEMENT SUMMARY report is related by the REVIEWED relationship.
Displaying all relationships
Dictionary/204 displays the following screen when you select the following option from the Dictionary Reports menu:
Display All References for an Entity
Use this screen to request the display of one of the following:
- Dictionary entries of a particular entity type that have any kind of relationship with a specified dictionary entry (for example, REPORTS that reference the SAFARI FILE).
- Dictionary entries of any entity type that have any kind of relationship with a specified dictionary entry (for example, all entries that reference the TRAVEL MANAGEMENT SUMMARY report).
The Display All References function also searches along relationship paths, reporting on entries that are indirectly related.
For example, if a REPORT is reviewed by a USER and generated by a PROCEDURE, then the report can show a relationship between the USER and the PROCEDURE. This occurs if the dictionary administrator has defined a path connecting the USER, REPORT, and PROCEDURE, even if no explicit cross-referenced or named relationship is defined between USER and PROCEDURE. (For more information about paths, see Path relationships.)
Input
This screen enables you to determine both the named and cross-references between a specified entry and a single entity type, or between a specified entry and all entity types.
-
Use the tab keys to move the cursor to the appropriate input field. Do not press Enter until you are ready to generate the report.
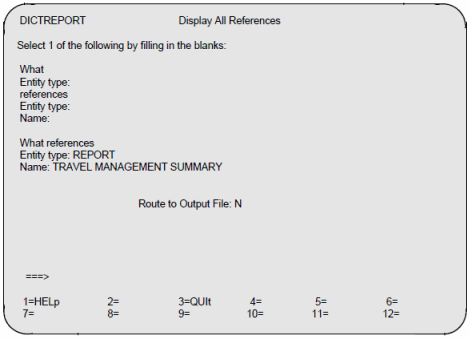
Indicate the entity type whose references (both named and cross-references) to a particular entry you want to determine (regardless of entity type) in response to the following prompts:
What Entity type: references Entity type: Name:
-
If you want to determine all entries of any type that reference a particular entry, indicate the entity type and entry name in response to the following prompts:
What references Entity type: Name:
The previous sample screen asks which entries (regardless of entity type) reference the TRAVEL MANAGEMENT SUMMARY report. The entity name field allows for the maximum length of 70 characters.
To see online help text for this screen, press PF1 or enter HELP. You can read the help text and exit from the last screen of text by pressing Enter.
-
By default, Dictionary/204 sends reports to your terminal. You can direct the output to a different destination, however, by typing Y over the default value of N at the prompt:
Route to Output File: N
The name of the output file has been specified previously on the Dictionary Reports menu (see Selecting a report option). (The output destination can be a printer or a specified file.)
- Press Enter to generate the report. Issue the QUIT command (PF3) to terminate this function and return to the Dictionary Reports menu without generating a report.
Output
Dictionary/204 searches the dictionary for the specified name and entity type(s). If the entry cannot be found for the specified entity type, or if the specification is invalid, an appropriate message is displayed.
If no references are found, the following message is displayed:
NO REFERENCES FOUND.
When the report is displayed, press Enter to see additional report screens or to redisplay the Display All References screen.
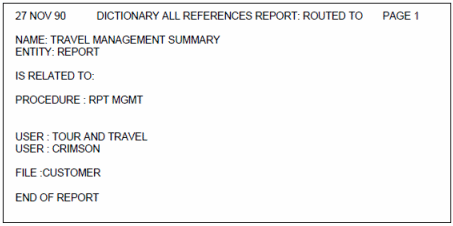
An example of the Display All References report, based on the request shown on the sample screen and the definitions above, follows. The report lists the entries to which the TRAVEL MANAGEMENT SUMMARY REPORT is related.
Browsing dictionary entries by attributes
Dictionary/204 displays the following screen when you select the following option from the Dictionary Reports menu:
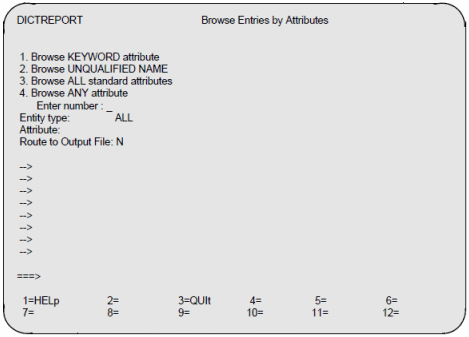
Browse Entries By Attributes
Use this screen to search through the dictionary for entries that include the specified keywords. For example, you can specify keywords such as MANAGEMENT and BUSINESS. Dictionary/204 retrieves all entries that contain one or more of these keywords in their definitions.
Because the DESCRIPTION and Short Desc. attributes can be entered in mixed case, Dictionary/204 performs a case-insensitive search of the specified entries. You do not need to know whether the descriptions were entered in mixed case or uppercase or which words might have been spelled with initial capital letters.
Input
Choose from the types of reports listed in the following table (numbers indicate the screen option number).
Types of reports Option Report type Description 1. Only on the KEYWORD attribute If the value of the KEYWORD attribute in the dictionary entry matches one or more of the specified keywords, the entry is listed in the report. 2. Only on the UNQUALIFIED NAME attribute If the value of the UNQUALIFIED NAME attribute in the dictionary entry (for FIELD, RECORD, FIELD GROUP, PROCEDURE only) matches one or more of the entered values, the entry is listed in the report. Select 2 if you are browsing FIELD, RECORD, FIELD GROUP, or PROCEDURE entries. The UNQUALIFIED NAME of a FIELD, RECORD, FIELD GROUP, or PROCEDURE entry is the entry name without the file name prefix.
For example, the UNQUALIFIED NAME of the field PERSONNL.SOCSECNUM is SOCSECNUM. If the UNQUALIFIED NAME is specified for a FIELD, FIELD GROUP, RECORD, or PROCEDURE entry, the facility browses all entries having that UNQUALIFIED NAME, regardless of the file in which they occur.
3. On all of the following attributes: NAME
ENTITY
SHORT DESCRIPTION
KEYWORD
ALIASIf one or more of the specified keywords matches the value for any of these attributes, the entry is listed. 4. On any single attribute You must first specify the entity type to which the attribute applies, or select the default ALL entity types. Then specify the name of the attribute to be reported on at the Attribute: prompt. You can specify any attribute, not simply the standard attributes listed under option 3. For example, you can report on the attribute BSIZE of the entity type FILE. - Specify an entity type to search only entries of that type (for example, only FILEs, only REPORTs). Leave the default value ALL to search all entity types for the specified keywords.
-
By default, Dictionary/204 sends reports to your terminal. You can direct the output to a different destination, however, by typing Y over the default value of N at the prompt below:
Route to Output File: N
The name of the output file has already been specified on the Dictionary Reports menu (see Selecting a report option). The output destination can be a printer or a specified file.
-
Type the keywords you want to search for at the arrow prompts:
--> MANAGEMENT --> BUSINESS --> --> --> --> --> -->
Enter only one keyword per line. If you make an error, type over the incorrect character and delete extra characters with the EOF key. You can search on a maximum of eight keywords.
-
Press Enter when you are ready to generate the report. Issue the QUIT command (PF3) to terminate this function and return to the Dictionary Reports menu without getting a report.
- When the report is displayed, press Enter to see additional report screens or to redisplay the Browse Entries menu.
Output
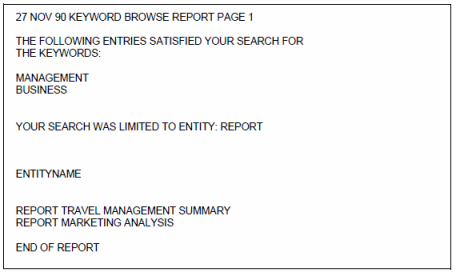
An example of a Browse Report, based on the request shown on the sample screen, follows.
For each dictionary entry retrieved by Dictionary/204, the entity type (for example, REPORT) and the entry name are displayed. You can display the entire definition for a particular dictionary entry by returning to the Dictionary Reports menu and selecting the Display an Entry option.
Selecting a user-written (customized) report
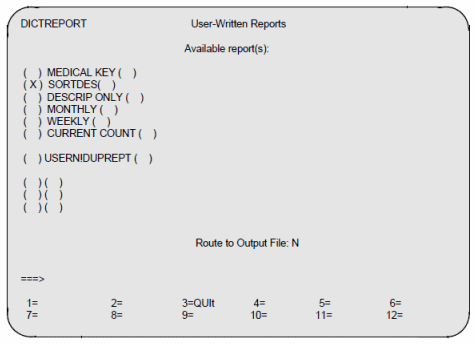
If you select user-written reports (option 7) from the Dictionary Reports menu, Dictionary/204 displays a list of the available reports that have been customized by the dictionary administrator.
The dictionary administrator determines which customized reports are listed on this menu. See Dictionary Reports administration for details.
If no reports are available, Dictionary/204 displays the following message:
No user-written reports are available
If more reports are available than fit on the first selection screen, Dictionary/204 displays the following message:
Additional reports appear on next screen
Press Enter to display the additional reports.
Input
- Select the desired report by typing an X in the parentheses to the left of the report name.
- You can route the user-written report to an output file. Name the Report Destination on the primary screen. See Browsing dictionary entries by attributes for a discussion of routing reports to an output file.
- Press Enter to generate the report. Issue the QUIT command (PF3) to terminate this function and redisplay the Dictionary Reports menu without generating a report.
Output
The report is displayed on the screen (unless you sent it to a file).
When the report is displayed, press Enter to see additional report screens and to redisplay the User-Written reports menu.
See also
- Dictionary/204 overview
- Dictionary/204 view management
- Dictionary/204 logon and commands
- Dictionary/204 administration
- Dictionary/204 reports
- Dictionary/204 Documentation facility
- Dictionary/204 FILEMGMT overview
- Dictionary/204 Cross-Reference facility
- Dictionary/204 migration subsystem
- Dictionary/204 entity type definitions
- Dictionary/204 messages
