Dictionary/204 administration
Overview of the administrator role
Defining the role
The system manager determines the first account that has administrator privileges during installation. The system manager can authorize as many administrators as are required by the site. The dictionary administrator has privileges for the Dictionary Administration facility and all other Dictionary/204 facilities.
The system manager must also define the administrator in the ADMIN class for each subsystem by using the Subsystem Management facility.
This definition enables the dictionary administrator to START and STOP the Dictionary/204 subsystems and to authorize other ADMIN class users to START and STOP the subsystem.
The Subsystem Management facility is described in Overview of the Subsystem Management facility.
Areas of responsibility
The responsibilities of the dictionary administrator cover six main areas:
- Starting, stopping, and testing the DICTIONARY subsystems
- Maintaining Dictionary/204 files (such as backing up, restoring, and reorganizing dictionary files)
- Maintaining dictionary structure through entity type maintenance (such as defining, deleting, and updating new entity types)
- Maintaining Dictionary/204 facilities (for example, setting parameters and defaults)
Several of the facilities that are part of the Dictionary/204 environment can be modified to suit the needs of your installation. Specifically, you can alter default and control parameters for File Management and Dictionary Reports.
- Maintaining Dictionary/204 security (defining Dictionary/204 users and their privileges). See also Security considerations.
The administrator controls access to the Dictionary/204 and Documentation facilities through the ACCOUNT entry in the dictionary.
- Populating the Dictionary (with the DDGEN and DDGENSET utilities) to define and synchronize existing Model 204 files in the dictionary
The Dictionary Administrator normally runs the DDGEN and DDGENSET utilities.
The administrator can also create customized reports with the Dictionary Reports facility.
Installing Dictionary/204
For information about installing Dictionary/204, see the Dictionary/204 installation guide.
Starting and stopping the Dictionary/204 subsystems
Administrators of Dictionary/204 start the subsystem as follows:
- Log in to the Model 204 system by using the LOGIN or LOGON command as the Dictionary/204 administrator, and by using the account name defined by your system manager.
- To start Dictionary/204, enter:
START SUBSYSTEM DICTIONARY
For more information, see START command: Starting an application subsystem. - To use Dictionary/204, enter:
DICTIONARY
This command invokes the Dictionary/204 subsystem after it has been started.
Note: Starting Dictionary/204 starts only the Dictionary/204 main menu. It does not automatically start the individual subsystems (or facilities) that make up the Dictionary/204 product.
You must start each subsystem independently, using the word SUBSYSTEM and the facility name as the arguments of the START command. If you are accessing Dictionary/204 facilities from the RKWeb interface, all the subsystem starting commands are probably already issued as part of the recommended set up for RKWeb.
The facility names are:
| Facility | Facility Name |
|---|---|
| Dictionary Administration | DICTADMIN |
| Dictionary Reports | DICTREPORT |
| Documentation | DOCUMENT |
| File Management | FILEMGMT |
| Subsystem Management | SUBSYSMGMT |
| User Language Cross-Reference | XREF |
You can start all the subsystems along with starting Dictionary/204 by adding the START SUBSYSTEM commands to the CCAIN file for your Model 204 Online system. Consult your system manager about adding these commands to CCAIN.
If you are having trouble with one of the Dictionary/204 subsystems, you might want to delete the corresponding START command from CCAIN before starting Dictionary/204 and its other subsystems.
Typically, you stop Dictionary/204 subsystems at the end of the day. You might also need to stop the subsystems periodically to perform utility functions. For example, it might be necessary to stop the Dictionary/204 subsystems to open and use the individual files that make up the dictionary.
Refer to the Rocket Model 204 installation instructions for your operating system for a discussion of these utility functions. For information about more generalized Model 204 file maintenance, see File management overview.
To stop Dictionary/204, issue the following command:
STOP SUBSYSTEM DICTIONARY
After you issue the STOP command for Dictionary/204 and its subsystems, users cannot invoke the main menu or any of its subsystems. If no one is currently using the subsystem, Model 204 displays:
DICTIONARY STOPPED
If any Dictionary/204 facilities are in use when the STOP SUBSYSTEM command is issued, the following message is displayed on your terminal:
DICTIONARY SET TO STOP, REMAINING USERS = n
where n represents the current number of active users. Current users of Dictionary/204 are allowed to finish their work, but additional users cannot start a session. When all users have ended their sessions, Dictionary/204 is stopped.
This STOP command applies only to the Dictionary/204 main menu, the subsystem for which you have entered the STOP command. Each subsystem must be stopped individually, just as each must be started individually. If any other subsystems are running, users can still access them, but not through the main menu.
If you stop the Dictionary/204 (main menu) subsystem before stopping other Dictionary/204 facility subsystems, users who logged on to the other subsystems through the main menu receive an error message when logging off. The error, however, does not interfere with saving data or any other facility function.
Even though Dictionary/204 is now shut down, you as administrator are still logged on to Model 204 and can issue any of the Model 204 commands.
For more information, see STOP command: Stopping an application subsystem.
You can restart Dictionary/204 by typing the following Model 204 command:
START SUBSYSTEM DICTIONARY
Sending a BROADCAST message
You can use the Model 204 BROADCAST command to send a message to subsystem users. After you send a message, it is displayed on a user's screen as soon as that user completes the current function and returns to a menu selection screen. The BROADCAST command can be used to alert subsystem users to end a session so that file maintenance or other utility functions can be performed.
Diagnosing Dictionary/204 session errors
If during a Dictionary/204 session a "DICTIONARY SESSION ERROR" occurs, you can use the TEST command to diagnose the problem. The TEST command displays all messages on your terminal. From these messages, you can determine the source of the session error and resolve the problem. To run the TEST command, you must first stop Dictionary/204. This is necessary, because the command puts Dictionary/204 in a single-user mode while the system displays all messages to the terminal.
To use the TEST command, issue the following commands:
STOP SUBSYSTEM DICTIONARY TEST DEBUG DICTIONARY
You can either try to duplicate the session with the TEST command or consult the audit trail for a listing of the messages.
Dictionary/204 file maintenance
See Dictionary/204 operation and file maintenance for details.
Creating or updating Dictionary entries with DDGEN
You can use the DDGEN utility (a Dictionary/204 subsystem) to create or update dictionary entries that describe the characteristics and contents of existing Model 204 files. The DDGEN utility enables you to populate your dictionary with entries for physical files, fields, field groups, records, and procedures.
Following the completion of DDGEN, you can use Dictionary/204 to add any desired attributes or values to these entries.
DDGENSET utility
DDGENSET is a supplementary utility for DDGEN that creates a file of file names from existing dictionary entries, enabling you to edit the list of files to run through DDGEN. DDGENSET updates the entries. You can run DDGEN against as many as 100 files at one time.
Before you can update Dictionary/204 files with external procedures, you must have the required update privileges.
Note: Transaction backout files must be updated without accessing non-transaction-backout files.
DDGEN and standard definitions
For each file that is processed, DDGEN creates or updates the following dictionary entries:
| For this item... | One entry is added to the dictionary... |
|---|---|
| FILE | For file parameters and table sizes for the file |
| PROCEDURE | For each procedure in the file, along with any of its aliases |
| FIELD | For each field in the file to specify the attributes of the field |
| RECORD | If there is no record defined for the file |
References from the FILE entry to each FIELD, and from the FILE entry to each PROCEDURE are also created when DDGEN is run.
When running DDGEN, you must ensure that the attributes required by DDGEN are not deleted from the entity type definitions.
Note: If any of these required attributes have been deleted from the entity type definitions, you can add the attributes again with the Dictionary Administration facility (by selecting the Entity Type Maintenance option).
When DDGEN stores an entry in the dictionary, the utility writes the entry to a report file (OUTFILE). You can optionally send the report to CCAPRINT. If the dictionary already contains an entry with the same name as the file, procedure, or field being stored, the entry is updated and a message is written to both the CCAPRINT data set and the Model 204 journal or audit trail.
| Item | Required attributes |
|---|---|
| FILE | DDGEN creates a FILE entry for the Model 204 file that it is processing. The values for the FILE attributes are derived from the parameters or table sizes defined for the Model 204 file.
A list of the FILE attributes can be found in FILE, where the FILE entity type is defined. |
| FIELD | DDGEN creates a FIELD entry for each field defined for the Model 204 file. The values for the FIELD attributes are derived from the field definition statements for the Model 204 file.
A list of the FIELD attributes can be found in FIELD, where the FIELD entity type is defined. |
| PROCEDURE | DDGEN creates a PROCEDURE entry for each procedure defined for the file.
Each entry consists of attributes and relationships that are defined in PROCEDURE, where the PROCEDURE entity type is defined. One occurrence of the ALIAS attribute is added to the PROCEDURE entry for each alias associated with the procedure. |
| RECORD | DDGEN creates a record entry, if no record exists for that file. The record is given the UNQUALIFIED NAME <filename>. Thus, the (unique) NAME of the entry will be <filename.filename>.
Additionally, all preallocated fields will be cross-referenced to a RECORD entry. See RECORD for information about the attributes of the RECORD entity type. |
Using the Batch utility to run DDGEN
Use the DDGEN Job and/or the DDGENSET Job (z/OS or z/VSE) or the DDGEN option of the D204 EXEC (z/VM) to run the DDGEN utility. Customize this Job or EXEC for your installation, as described in your installation guide. (Consult the relevant chapter of your installation guide.) You must specify a DD statement (z/OS); DLBL, EXTENT, and ASSIGN (z/VSE); or LINK, ACCESS, and FILEDEF (z/VM) for the multiple Model 204 files to be used. You must also specify this filename in the CCAIN (User 0) along with a password, if required.
You can specify up to 100 Model 204 files in a single DDGEN run.
The following example shows the CCAIN stream for DDGEN when run in batch mode:
PAGESZ=6184,SPCORE=20000,SERVSIZE=180000,LGTBL=1000,NFILES=110, X NDCBS=110,NDIR=110,INCCC=0,MINBUF=10,LENQTBL=6000 ********************************************************************** * MAKE THE FOLLOWING MODIFICATIONS TO THIS CCAIN INPUT STREAM: * * 1) USERID = THE PRIVILEGED ID * * 2) PASSWORD = THE PASSWORD FOR THAT ID * * 3) ENTER FILENAME AND FILE PASSWORDS AS SPECIFIED BELOW * * 4) THE WORD "END" MUST FOLLOW THE LAST FILE,PASSWORD ENTERED * * NOTE: OUTFILE REFERS TO THE REPORT FILE FOR THE RUN * * OUTDDGN IS THE TEMPORARY WORK FILE FOR THE RUN * ********************************************************************** LOGON USERID PASSWORD START SUBSYS DDGEN DDGEN OUTFILE OUTDDGN *ENTER FILENAME 001 * *ENTER FILENAME 001 PASSWORD OR BLANK LINE * *ENTER FILENAME ... * *ENTER FILENAME ... PASSWORD OR BLANK LINE * *ENTER FILENAME 100 * *ENTER FILENAME 100 PASSWORD OR BLANK LINE * END
As the CCAIN stream indicates, OUTFILE is the name of the report file for the batch run. OUTDDGN is the name of the work file that you must specified for this batch run.
The OUTDDGN record format must be FBA.
Running DDGEN Online
DDGEN can be run Online with certain restrictions. Each user who runs DDGEN must have an exclusive report OUTFILE and work OUTDDGN file. This is necessary to maintain the integrity of the report and of the updates. Optionally, the report can also be routed to the screen, but an exclusive work file is required in any case.
To run DDGEN Online, follow the flow of the CCAIN stream for DDGEN shown in Using the Batch utility to run DDGEN. Although the first two lines (or the User 0 line) are not necessary to run DDGEN Online, be sure that all the relevant parameters are set to values at least equal to those given in the example. Follow these steps:
- Log in to Model 204.
- Issue the command START SUBSYS DDGEN.
- To run the job, type:
DDGEN
- You are prompted for the report OUTFILE filename. Enter the report outfile name for spooled output, or press enter to have the report printed on the screen.
- You are prompted for an exclusive work OUTDDGN. Enter the name of the work OUTDDGN. For each file to run through DDGEN, you are prompted for a filename and then a password. Press Enter to receive prompts for additional files to be processed.
- To end the entry of filenames, enter END for the file name and press Enter. To cancel the DDGEN run, enter QUIT for the file name (instead of END) and press Enter.
You can process up to 100 files in a single run. It is recommended that you start with only a few files to determine how long it takes to run DDGEN in your environment.
Modifying and running DDGENSET
The DDGENSET job can be used as a front end to the DDGEN job described in Running DDGEN Online. DDGENSET reads your installation's dictionary and automatically creates the CCAIN stream. For z/VSE it creates the step override statements for DDGEN JCL. For z/OS, it creates the FILEDEF statements to be included in D204FDEF EXEC.
DDGENSET processes existing dictionary entries only. Each entry must contain valid data set and DDname attribute values. If there are more than 100 files in your dictionary (the limit for DDGEN), DDGENSET creates multiple sets of CCAIN and step override statements.
After DDGENSET has created statements, be sure to edit these statements to specify any missing data set or password information and to delete files that do not actually exist as Model 204 files.
| Replace... | With... |
|---|---|
| USERID | Your installation's privileged system manager login account name. |
| PASSWORD | Password for the USERID account name. |
Refer to your Model 204 installation guide for more information.
Note: Run DDGENSET in batch mode to help prepare you for a batch run of DDGEN.
Recovering from system problems
When a system error (for example, a system crash) causes you to exit from a Dictionary/204 facility, the protection (or lock) for the data you were using at the time of the error might not be returned. This occurs because the subsystem error routines cannot run. If this happens, the dictionary administrator must run the procedure SHRO.LOCKFREE to maintain the lock for the data.
Also, if an individual user is restarted, locks can be restored by running SHRO.LOCKFREE.
(See the appropriate sections of the Rocket Model 204 installation instructions for your operating system for more information.)
To run SHRO.LOCKFREE:
- Open M204TEMP.
- Enter:
INCLUDE SHRO.LOCKFREE
This utility deletes the locks for specified entries.
- You are prompted to provide the entity type and entry name. Specify the entry, or, to quit the utility, press Enter in response to this prompt.
- If you specify the entry, press Enter. The system displays a message confirming that the lock has been freed.
Locks are maintained across sessions for files. Thus, the utility leaves the file locked to the same user ID.
Logging on to Dictionary/204
To log on to the Dictionary Administration facility, choose one of the following methods:
- Select the number of the Dictionary Administration facility option from the Dictionary/204 main menu.
If your main menu does not display the Dictionary Administration option, you have not been authorized to use this facility.
- Invoke the Dictionary Administration facility from the primary screens of other Dictionary/204 facilities with the INVOKE command. The syntax of the command is:
INVoke DICTADMIN
- Call the Dictionary Administration subsystem from the Model 204 command prompt by typing the subsystem name:
DICTADMIN
You can log on with this method only if you have started the Dictionary Administration subsystem.
- If using the RKTools main menu, select the DictAdmin menu item. If using the RKWeb interface, select
Manage > Dictionary > Administration.
Dictionary/204 displays the following main menu when you select the Dictionary Administration option:

In brief, the Dictionary Administration facility provides the following capabilities (numbered items correspond to the menu options):
- Defining, modifying, or deleting an entity type. You can define the attributes and named or cross-referenced relationships of the new entity types, and obtain a report on entity types and path relationships.
- Defining, viewing, modifying, and deleting path relationships.
- Modifying the default and control parameters for File Management and Dictionary Reports.
- Maintaining security by controlling access to the Dictionary/204 facilities.
- Requesting a printed inventory of entity types and their attributes and relationships. The report is available only in hard copy and cannot be sent to the terminal.
Input
To select an option from this menu, type a numbered choice at the Enter Number: prompt and press the Enter key.
Commands
To issue commands, press the assigned PF key or type the command name at the prompt (===>) and press Enter.
| Key | Command | Meaning |
|---|---|---|
| PF1 | HELp | Provides the online HELP text for this screen. You can read the HELp text and exit from the last screen by pressing Enter. |
|
|
INVoke | At the command prompt, type:
INVoke facility_name Then press Enter to invoke another facility. |
| PF3 | QUIt | Terminates Dictionary Administration. You also can type QUIT at the command prompt and then press Enter. The system then returns you to the Dictionary/204 main menu, to the primary screen of the facility from which Dictionary Administration was invoked, or to Model 204 command level. |
| Enter |
|
Processes your main menu selection. |
Entity type maintenance
Overview
The structure of the dictionary is based on entity types, attributes, and relationships. Although there are standard entity types, each having a predefined set of attributes and relationships, the administrator can customize or "extend" the dictionary by:
- Adding new entity types that have their own attributes and relationships
- Adding attributes and relationships (also called references) to the standard entity types
The standard entity types, their attributes and relationships are defined in Dictionary/204 entity type definitions, except for VIEW, COMPOSITE VIEW, VIEW FIELD, and VIEW LINK which are described in Dictionary/204 view management.
The administrator should not delete or modify the system- or facility-controlled attributes and relationships of the standard entity types. The standard entity types can be modified only by adding attributes or relationships.
Attributes, relationships, and entity types added to the dictionary by the administrator are not system- or facility-controlled. Their values are entered by users, primarily through the Documentation facility.
Users can add new relationships between dictionary entries through the Documentation facility, even if the new relationship is not part of the entry's definition as set up by the administrator. Users, however, cannot add attributes to the entity type definition.
Entity Type Maintenance screen
Dictionary/204 displays the following screen when you select the option Entity Type Maintenance from the Dictionary Administration menu:

This menu provides the following capabilities:
- Defining the attributes and relationships of a new entity type. The administrator must define the entity type before users can define entries.
- Updating an entity type, when there is a need to change the attributes and/or references of that entity type.
- Deleting an entity type, when there is no further need for entries of that type.
- Obtaining an entity type and path report when you need to survey the definitions of entity types or the spectrum of relationships between entity types. You can obtain a report on a single entity type or on all entity types and optionally include information on relationship paths.
Input
To select a function from this menu, you must select a numbered choice from the list of functions and then specify the entity type. Use options 1, 2, and 3 for maintaining the dictionary records, and option 4 for reporting on them.
- Defining, updating, and deleting entity types:
Type the number of your selection at the Enter Number: prompt.
Respond to the Entity Type: prompt by typing the name of the entity type you want to define, modify, delete, or report on.
The maximum length of an entity type name is 20 characters.
- Reporting on entity types:
To report on all entity types, respond by typing ALL at the Entity Type: prompt. Otherwise, enter the name of a particular entity type.
If you do not want information about path relationships, type an N over the default value of Y after the following prompt:
Path Information on Report: Y
By default, Dictionary/204 sends reports to your terminal. You can direct the output to a different destination, however, by typing Y over the default value of N at the following prompt:
Route to Output File: N
Your output file default is specified in your ACCOUNT entry. (The output destination can be a printer or a specified file.)
To override the default Output Destination for your account, type a new value for the following prompt:
Output Destination: OUTFILE
The Output Destination name can be from 1 to 30 characters.
The system uses this file to send output to a destination other than your terminal.
To process your input on the Entity Type Maintenance menu, press the Enter key. You can press PF1 to read the HELP text for this menu, or press PF3 to terminate the Entity Type Maintenance function and return to the facility main menu.
Defining new entity type attributes
A screen similar to the following is displayed when you select the option Define New Entity Type from the Entity Type Maintenance menu. The following screen shows a sample REPORT entity type definition. Your screen is empty, except for the name of the entity type that you have specified on the previous screen and the arrow (-->) prompts.
The attributes you define here for the entity type appear as prompts for the Dictionary/204 users when they define a particular entry for this entity type. Users define entries for nonstandard entity types (such as REPORT) through the Documentation facility.
It is not necessary to add the following standard system-supplied attributes: NAME, CREATE DATE, LAST UPDATE, UPDATED BY, KEYWORD, ALIAS, SHORT DESCRIPTION, and DESCRIPTION. When users define particular entries through the Documentation facility, Dictionary/204 either provides these values or prompts the user for the values.

Input
Use your tab keys to position the cursor at the next (or previous) line.
Type the names of the attributes to be associated with this entity type to the right of the prompt:
===>
Note the following restrictions:
- Type only one attribute following each arrow prompt.
- Maximum length is 20 characters.
- Allowable characters are the same as for Model 204 field names.
To change an attribute name on this screen, type over the current name. To delete an attribute on this screen, use the Erase EOF key or use blank characters.
If you need more than the available number of lines on the screen to complete the attribute set, press PF8 (the FORward command). This command provides a new blank attributes definition screen. The FORward command is described in #Defining new entity type references. You can enter as many attributes on as many screens as necessary.
Reserved words for attributes
Avoid the reserved words listed in the following table when creating attributes for Dictionary/204 entity types. An attribute name that contains reserved words generates an error condition.
| ALL | OR | # |
| AND | RECORD | ; |
| AT | RECORDS | , |
| BEFORE | TAB | EQ |
| BY | THEN | GE |
| COUNT | TO | GT |
| EACH | VALUE | LE |
| EDIT | WHERE | LT |
| END | WITH | NE |
| FROM | = | + |
| IN | $ | - (minus sign) |
| IS | ?? | * |
| LIKE | ?$ | / |
| NOR | $& | ... |
| NOT | ( | ^ (not equal sign) |
| OCC | ) | ̺ |
| OCCURRENCE | @ | > |
To move on to the definition of relationships for the new entity type, press PF11 or issue the REFERENCES command. Your input is preserved but not saved until you issue the END command (PF12). You can quit (PF3) out of the definition process at any time before ending.
Defining new entity type references
| Key | Command | Meaning |
|---|---|---|
| PF3 | QUIt | Terminates the definition process. Dictionary/204 returns you to the Entity Type Maintenance Menu, but does not save any part of the entity type definition. |
| PF8 | FORward | Lets you define more attributes for the new entity type. To see another "Define New Entity Type: Attributes" screen, press PF8. This command preserves your input but does not store your definition; next attributes definition screen. |
| PF11 | REFs | Takes you from the attributes definition screen to the screen that allows you to define references (relationships between entries). Your previous input is preserved but not saved until you issue the END command. |
| PF12 | END | Saves your definition of the new entity type's attributes and references press. This command stores your input and returns you to the Entity Type Maintenance menu. |
After you have specified all the attributes for the new entity type, you can specify the new entity type relationships to other entity types by pressing PF11 on the screen shown in the preceding section.
Use the following screen to specify relationships between the new entity type and existing entity types.

This sample screen specifies a cross-referenced relationship between REPORT and FILE, and a named relationship between REPORT and USER. Two implications for users of the Documentation Facility are:
- Whenever you add or update a REPORT entry or FILE entry, Dictionary/204 prompts you to specify a particular report or file for cross-referencing. The TRAVEL SUMMARY report, for example, can be cross-referenced to the TRIPS file.
- Whenever you add or update a REPORT entry, Dictionary/204 prompts you to specify that the named relationship ROUTED TO applies to a particular USER. (The TRAVEL SUMMARY report, for example, can be ROUTED TO Johnson.)
Type the name of a named relationship following the tilde (~) as shown in the ROUTED TO example. Leave cross-references blank, as shown in the FILE example. See Relationships for more information.
Named references are directional and can be updated (when using the Documentation Facility) only from one of the two related entity types (in this case only from the REPORTS entity). But all references (cross-references and named references in both directions) are displayed when users query the dictionary with the Dictionary Reports facility.
From this screen, you can:
- Request another screen for defining relationships by pressing PF8 (FORward).
- Cancel the definition of the entity type by pressing PF3 (QUIt).
- Save the entity type definition by pressing PF12 (END).
Input
You can enter as many related entity types (for example, FILE, FIELD, USER) as you want. Specify one entity type per line in response to the prompt:
===>
The maximum length for an entity type name is 20 characters. You can specify a named relationship by adding a reference name in the space provided following the tilde (~). The maximum length for a relationship name is 19 characters. The previous example is ROUTED TO.
Use the tab keys to position the cursor at a new prompt.
To change a value typed on this screen, type over the current value. To delete a value, use the Erase EOF key or use blank characters.
Commands
Commands are the same as those for the previous screen, except that there is no REFs command (PF11). You cannot return directly to the screen for defining attributes. You can, however, modify the attributes by saving the definition (using the END command) and then selecting the Update Entity Type option from the Entity Type Maintenance menu.
Updating an entity type
Dictionary/204 displays this screen when you select the option Update Entity Type from the Entity Type Maintenance menu. Use this screen to indicate that you want to change the definition format of an existing entity type. Specify the name of the entity type on the main menu when you select the update option.
You can add new attributes to the definition of standard entity types, but you cannot modify the standard system-controlled attributes provided by Model 204. If you have created a new entity type (such as REPORT) you can modify any of its attributes or relationships.
You might want to update an entity type:
- When the attributes for an entity type have changed. For example, additional REPORT attributes might need to be specified.
- When an entity type contains references to another entity type that has been, or that will be, deleted.
The following screen shows the REPORT entity type definition ready to be updated:

Input
Dictionary/204 displays all the attributes and references defined for the specified entity type on two update screens: one for attributes (shown above), and one for relationships (shown in Updating entity type references).
You can modify the attributes by following the directions on the previous screen:
- Type over existing attributes, using the Erase EOF key or blank characters to delete extra characters.
- Specify new attributes on a blank line.
Note: Typing over an attribute name deletes the current attribute and replaces it with a new attribute; it does not simply change the name of the existing attribute. Moreover, values entered for the deleted attribute do not apply to the new attribute.
Commands
The commands are the same as those described in the Commands section.
Updating entity type references
Press PF11 to begin updating the entity type references. A screen similar to the following is displayed. The screen lists the relationships defined for the entity type by the administrator or by Model 204 (in the case of standard entity types). You can add references to standard entity types, but you cannot modify those provided by the system.

Input
Dictionary/204 displays all the references defined for the specified entity type on a screen like the previous one. You can modify the references by following the directions on the screen:
- Type over existing entity type names and relationship names, using the Erase EOF key or blank characters to delete extra characters.
- Specify a new related entity type and named or cross-referenced relationship on a blank line.
- Maximum length for an entity type name is 20 characters.
- Specify a named relationship by adding a reference name in the space provided following the tilde (~). The maximum length for a relationship name is 19 characters. Leave the space following the tilde blank for cross-references.
Note: Typing over an existing reference deletes the current reference; it does not simply change the name or entity type that makes up the existing reference.
The commands are the same as those described in the Commands section.
Deleting an entity type
Dictionary/204 displays this screen when you select the following option from the Entity Type Maintenance menu:
Delete Entity Type
This function enables you to delete an entity type from the dictionary. Deleting an entity type does not automatically delete the entry records for that entity type from the dictionary, but it does make the entries inaccessible. First delete the individual entries from the dictionary by using the Documentation facility. If you delete the entity type first, users cannot specify that the entries are to be deleted.
You might want to delete an entity type:
- If the entity type is no longer useful.
- If you want to make the entries for the entity type inaccessible for an indefinite period. (Redefining the entity type at a later time makes the entries accessible again.)
Before you actually delete an entity type, Dictionary/204 displays the current attributes and related entity types for the entity type to be deleted. Dictionary/204 also tells you how many entries are currently defined in the dictionary for the entity type being deleted. The following screen provides an example.

Input
After Dictionary/204 displays the attributes and references for the entity to be deleted, it prompts:
Press Enter to Continue:
Press the Enter key to advance to the confirmation screen.
Confirming the deletion
Dictionary/204 displays the following Confirmation screen when you press Enter, after viewing the attributes and relationships for the entity to be deleted. The screen tells you how many entries of the type to be deleted are stored in the dictionary.
You must either confirm the deletion by pressing PF6 (DELete), or abort the deletion by pressing PF3 (QUIt).

The previous sample screen indicates that eight REPORT entries are defined in the dictionary. When you delete the REPORT entity type from the dictionary, you delete the definition of attributes and relationships for this entity. Report entries defined by users through the Documentation facility remain in the dictionary database, but they become inaccessible.
If you press PF6, Dictionary/204 displays the Entity Type DELETED message on the message line of the Entity Type Maintenance menu.
If you press PF3, Dictionary/204 cancels the delete operation and returns you to the Entity Type Maintenance menu.
Displaying entity type and path report
The Entity Type Maintenance menu enables you to display the attributes and relationships that have been assigned to the various entity types -- both system-controlled entity types and those created by the dictionary administrator. By selecting the Entity Type and Path Report option, you can:
- Display the definition of a single entity type
- Display the definitions of all entity types
- Optionally display path information for either of the above
- Optionally route the information to a printer or specified file
The following sample Entity Type Maintenance menu shows the input for a report on the REPORT entity type, including path information, sent to the terminal.

Input
To respond to this menu, type the name of the entity type or ALL in response to:
Entity Type:
The default value is Y for:
Path Information for Report:
Type N over the default value, if you do not want a report on the paths in which the entity type occurs.
Normally, Dictionary/204 sends reports to your terminal. You can direct the output to a different destination, however, by typing Y over the default value of N at the following prompt:
Route to Output File:
Your Output Destination default value is specified in your ACCOUNT entry. (The output destination can be a printer or a specified file.) To change your output destination, type a new value for:
Output Destination
You can specify a name of 1 to 30 characters.
The default value is OUTFILE. The system uses this file to send output to a destination other than your terminal.
Output
Dictionary/204 displays a report similar to the following when you select the option from the Entity Type Maintenance menu:
Display Entity Type and Path Report
The sample report is based on the definition of the SUBSYSTEM entity type and a hypothetical path relationship.
A dictionary entity type definition contains a list of the attributes and relationships established for an entity type. It does not include the individual entry names and attribute values. (The Inventory Report, described in Printing a dictionary inventory, enables you to display the existing entries for each entity type, along with their attributes and relationships.)
A dictionary path definition contains a list of the entity types that comprise the relationship path, as shown on the second screen of the sample report.


If Dictionary/204 displays the > prompt at the bottom of the screen, press the Enter key to advance to the next screen, or to return to the Entity Type Maintenance menu. (The prompt (>) does not appear in the sample above, because the report was sent to a printer rather than to a terminal.)
Path maintenance
The previous sections explained how to use the functions available from the Entity Type Maintenance menu. This section shows you how to use a function available from the Dictionary Administration main menu.
Dictionary/204 displays this screen when you select the following option from the Dictionary Administration main menu:
Path Maintenance
Path relationships are defined in Path relationships and are described further in Displaying a path definition.

This menu provides the following capabilities (numbered items correspond to menu options):
- Displaying all path relationships along with their assigned path numbers
- Defining a maximum of eight entity types as a path
- Updating the definition of existing path relationships
- Deleting the definition of a path relationship
Input
You can select an option from this menu by typing a numbered choice at the Enter Number: prompt, and then pressing Enter.
If you want to update or delete a path, you must type its number at the prompt:
Path Number:
This prompt applies only to updating and deleting. Path numbers are assigned automatically and sequentially by the system. To determine the number of a path, use the Display Path Definition option from the Path Maintenance menu.
Commands
To issue a command, press the assigned PF key or type the command name at the prompt (===>) and press Enter.
| Key | Command | Meaning |
|---|---|---|
| PF1 | HELp | Provides the online HELP text for this screen. You can read the HELp text and exit from the last screen by pressing Enter. |
| PF3 | QUIt | Terminates the Path Maintenance function. The system returns you to the Dictionary Administration main menu. |
| Enter |
|
Processes your menu selection. |
Defining paths: in theory
Before examining the interface for defining paths, it is important to examine why paths are defined and how to ensure their usefulness.
As defined in Path relationships, a path relationship is one that is derived from other relationships. Paths increase the reporting capabilities of the dictionary by enabling it to show indirect relationships among as many as eight entity types and their entries.
Paths can be based on cross-references, as shown in the following figure.
Path relationship - Example 1

This relationship allows users to obtain reports on relationships between PROCEDURE and FIELD entries, even though there is no direct relationship defined between these two entity types.
Paths can also be based on named references, as shown in the following figure.
Path relationship - Example 2

This relationship allows reports on existing references between FILE and USER entries. (See Selecting a report option for an example of how to request such reports.)
In defining path relationships, the dictionary administrator must anticipate the users needs, because the defined paths must support the users' reporting requirements. But keep in mind the following guidelines:
- Paths can be defined between any valid entity types, even if no existing relationship exists at all between certain entity types in the path. However, such a "bogus" path does not enhance the users' reporting capabilities. Paths, therefore, must be derived from existing relationships defined for the relevant entity type definitions.
If no relationship exists between two consecutive entries, the report path is broken. The report does not "wrap around" from the last entity type in the path to the first.
See Adding a path definition for instructions on defining paths.
- When named relationships are part of a path, users can obtain reports that entity type B is related to entity type C even if the unidirectional, named relationship flows from C to B. Consider this example:
A <---> B <--- C ---> D
If a user asks (using Dictionary Reports) which entities are related to B, the report yields A, C, and D. A Dictionary Reports query asks only if a relationship exists along a path, but not what type it is or what direction is implied by the relationship.
Displaying a path definition
The following screen is displayed when you select the following option from the Path Maintenance menu:
Display Path Definitions
This screen displays a list of all the paths currently defined in the dictionary, along with their identifying path numbers. These numbers are used on the Path Maintenance menu to specify the particular path to be changed or deleted. Paths are numbered sequentially; when paths are deleted, the next defined path takes the number of a previously deleted path.
Always display a path and its number before updating or deleting it; do not assume that you know the correct and current number of a path without checking.

Input
If Dictionary/204 displays the > prompt, press the Enter key to advance to the next screen. After all the paths have been displayed, press Enter to return to the Path Maintenance menu.
Adding a path definition
Dictionary/204 displays the following screen when you select the following option from the Path Maintenance menu:
Add Path Definition
Use this screen to specify a new path for the entities in your dictionary.

Input
Dictionary/204 prompts you to describe the path by specifying up to eight entity types that comprise it. Enter the entity types, one per line, in response to the --> prompts. Use the tab keys to position the cursor at the next or preceding prompt.
You must list the entity types in the order in which Dictionary/204 is to proceed in following the path. If no relationship exists between two sequential entries, the reporting path is broken, as explained in Defining paths: in theory.
To indicate that the path is complete, press PF12 or issue the END command.
Dictionary/204 checks the entity types that you have specified to ensure that definitions for these entity types exist.
If an entity type is not valid, an angle bracket tag (<) is displayed in column 80 of the line containing the invalid entry. An error message is displayed on the message line (the line below the command prompt). Correct the entity type, using the ERASE EOF key to delete the entered value.
Dictionary/204 also displays an error message if you define a path that is already defined in the dictionary.
If no errors are found, Dictionary/204 adds the path to the Dictionary/204 and displays the Path Maintenance menu with the message:
The reference path has been defined.
To cancel the add operation, press PF3, or issue the QUIT command at the command prompt (===>).
Changing a reference path
Dictionary/204 displays the following screen when you specify the number of the path on the Path Maintenance menu, and select the following option from the Path Maintenance menu:
Update Path Definition
Use this screen to change a reference path by replacing one or more of the entity types that make up the path.
Dictionary/204 displays the entity types that comprise the path, as shown in the following sample screen.

Input
To modify a path, type over the display of the existing entity types, or use the ERASE EOF key to delete the display.
If you specify an entity type that is not defined in the Dictionary/204, an angle bracket tag (<) is displayed in column 80 on the line containing the erroneous entry. An error message is displayed on the message line (the line below the command line). You can then either correct the entry or cancel the operation by pressing PF3.
Dictionary/204 also displays an error message if you attempt to define a path already defined in the dictionary.
To indicate that the path is updated to your satisfaction, press PF12 or issue the END command. The update is stored, and the system returns you to the Path Maintenance menu.
To cancel the update, press PF3. Dictionary/204 returns you to the Path Maintenance menu.
Deleting a reference path
Dictionary/204 displays the following screen when you specify the number of the path on the Path Maintenance menu and select the following option from the Path Maintenance menu:
Delete Path Definition
To determine the correct path number, use the Display Path Definition option from the Path Maintenance menu.
Before Dictionary/204 permits you to delete the path from the dictionary, it displays the entity types that comprise the path, as shown on the sample screen.

Input
Press PF6 to delete the path, or cancel the deletion by pressing PF3. Once you have deleted the path, it cannot be recovered. All path numbers are resequenced after a deletion.
Facility administration
The previous sections described functions available from the Path Maintenance menu. This section describes the Facility Administration function available from the Dictionary Administration main menu (described in Using the Dictionary/204 Administration main menu). This function enables data administrators to control various options and parameters that affect the operation of their respective facilities.
Dictionary/204 displays the following screen when you select the following option from the Dictionary Administration main menu:
Facility Administration

The Facility Administration menu displays the options for the administration of those facilities installed at your site.
This menu provides the following options (numbered items correspond to menu choices):
- Adding, deleting, or renaming procedure names on a list of user-written procedures that produce reports
- Determining command options and setting defaults for the File Management facility
Input
To select an option from this menu, type the number of your choice after the Enter Number: prompt and then press the Enter key.
To terminate the Facility Administration function and return to the Dictionary Administration main menu, press PF3 or issue the QUIT command. You can read the HELP text for this screen by pressing PF1 or by issuing the HELP command. Press Enter to read the HELP text and to exit from the last help screen.
Dictionary Reports administration
Two distinct tasks comprise the administration of Dictionary Reports:
- Maintaining a list of customized (also called "user-written") reports through the Facility Administration facility
- Creating customized reports, which can be accomplished only from the Model 204 command prompt
This section describes both tasks.
The following screen is displayed when you select the following option from the Facility Administration menu:
Dictionary Reports Administration
Use this screen to add, rename, or delete a procedure name from the list of user-written procedures in the Dictionary Reports facility (DICTREPORT).

Input
The Facility Administration facility prompts you to add, rename, or delete the procedure names for user-written reports. When you use this function, the names on the list displayed by the Dictionary Reports facility change. However, the names of Model 204 procedures for those reports are not affected. To change the name of the actual procedures, you must modify the procedure stored in TABLE D of the D204RPT file.
To add a procedure name:
- Type an X in the prefix area for the Add Procedure Name prompt.
- Use the tab or cursor keys to advance the cursor to the Enter Procedure Name: prompt.
- Type the name of the procedure you want to add.
- Press PF6 or issue the EXECUTE command.
To rename a procedure:
- Type an X in the prefix area for the Rename Procedure prompt.
- Use the tab or cursor keys to advance the cursor.
- Respond to the Enter Procedure Name: prompt by typing the name of the procedure you want to rename.
- Advance the cursor to the prompt Rename Procedure to:, and type in the new name of the procedure.
- Press PF6 or issue the EXECUTE command to process the rename.
To delete a procedure name:
- Type an X in the prefix area for the "Delete procedure name" prompt.
- Respond to the Enter Procedure Name prompt.
- Press PF6 or issue the EXEcute command to proceed to the following confirmation screen.

- The name of the procedure is supplied by the system. Press PF6 or issue the DELETE command to complete the deletion, or press PF3 to cancel the deletion.

If you confirm the deletion, the procedure name no longer appears on the list of user-written procedures that the Dictionary Reports facility displays. However, the procedure remains in the D204RPT file, though it is no longer available to users. If you want to delete the procedure, you must remove it from the D204RPT file using Model 204 commands.
Creating customized reports
The administrator can create customized reports to control the selection of dictionary records and to organize the reports according to the needs of your installation. For example, you might want a report that shows duplicate data records in your dictionary. No standard report shows that information. This section demonstrates how the dictionary administrator can write and name a customized (or user-written) report. Further on in this section there is an example of a procedure that produces a customized report.
Dictionary internal structure
Two types of records are stored in METADATA. Control records (identified by REC=X field=value) are the template for each entity type; and entry records (identified by REC=D field=value) are the actual entity occurrences with data. The following example shows a METADATA control record for an ACCOUNT entity type:
REC =X ENTITY =ACCOUNT REQ =NAME REQ =CREATE DATE REQ =LAST UPDATED REQ =UPDATED-BY REQ =DES SYS.ATTRIB =OUTPUT FILE SYS.XREF =FACILITY SYS.REFTYPE =~USES ATTRIB =KEYWORD ATTRIB =ALIAS ATTRIB =PROC FILE NAME XREF =VIEW REFTYPE =~OWNS XREF =VIEW REFTYPE =~UPDATES
The REQ values specify required attributes. SYS.ATTRIB values specify attributes controlled by Dictionary/204 facilities and ATTRIB values specify other attributes maintained through the DOCUMENT facility.
Within the dictionary system, the values of REQ, SYS.ATTRIB, and ATTRIB become field names in METADATA. Entry occurrences are stored using the value of the attribute as the field name. The value with that field name becomes the character string the user supplies during an "add entry" or "change entry" operation.
XREF and REFTYPE and SYS.XREF and SYS.REFTYPE occur in pairs. XREF contains the values of entity types (one per XREF) and REFTYPE contains the name of the reference type to the entity type in the corresponding XREF field. A tilde (~) by itself indicates a cross-reference. The tilde must also prefix any reference name.
Values from XREF and REFTYPE are displayed on the screen to prompt the user for references to other entries. SYS.ATTRIB, SYS.XREF and SYS.REFTYPE values are maintained through specific Dictionary/204 facilities.
Sample Customized Report
***************************************************************** * * * PROCEDURE NAME..........: USRN.DUPREPT * * VERSION.................: 1 * * PROCESSING SUMMARY......: SAMPLE USER WRITTEN REPORT, IT WILL * * READ METADATA AND LOOK FOR DUPLICATE DATA RECORDS AND * * DISPLAY RESULTS, IT THEN RETURNS TO USER WRITTEN REPORT * * MENU IN THE DICTREPORT FACILITY * * WRITTEN BY..............: RICK WAHLBERG * * modifying authors * * CALLED FROM.............: DIRN.USERREPT * * CALLS TO................: N/A * * INCLUDES................: N/A * * INCLUDED BY.............: N/A * * GLOBAL VARIABLES READ...: N/A * * GLOBAL VARIABLES SET....: N/A * * LOCAL VARIABLES READ....: N/A (used for subroutine procs * * LOCAL VARIABLES SET.....: N/A (to describe arguments * ***************************************************************** IF PAPR=Y,DIRO.DDRPTS * BEGIN * VARIABLE.DECLARATIONS: * %ENTITY IS STRING LEN 20 %NAME IS STRING LEN 255 %CURREC IS FLOAT %DUP.FOUND IS FLOAT %RETRY IS FLOAT %CHOICE IS STRING LEN 70 %INDEX IS FLOAT ERROR.MESSAGES: %GFMSG IS STRING LEN 50 %GFMSG = 'GLOBAL VARIABLE TABLE IS FULL.' %USR001 IS STRING LEN 60 %USR001 = 'USR001 PA1 ENTERED ON SCREEN, REPORT IS CANCELLED' %USR002 IS STRING LEN 60 %USR002 = 'USR002 UNRESOLVED ENQUEUE CONFLICT, REPORT HALTED.' *********************************************************************** * ON UNIT DECLARATIONS *********************************************************************** ON.ATTN: ON ATTN PRINT %USR001 JUMP TO RETURN.TO.MENU END ON ON.FIND.CONFLICT: ON FIND CONFLICT %RETRY = %RETRY + 1 IF %RETRY > 10 THEN PRINT %USR002 AUDIT %USR002 JUMP TO RETURN.TO.MENU ELSE RETRY END IF END ON MAIN.LOGIC: IN METADATA CLEAR LIST XRECS FD.XREC: IN METADATA FD REC = X END FIND PLACE RECORDS IN FD.XREC ON LIST XRECS RELEASE RECORDS IN FD.XREC FR.FD.XREC: FOR EACH RECORD ON LIST XRECS %ENTITY = ENTITY FD.DREC: IN METADATA FD REC = D AND ENTITY = %ENTITY END FIND IN METADATA CLEAR LIST DRECS PLACE RECORDS IN FD.DREC ON LIST DRECS RELEASE RECORDS IN FD.DREC FR.FD.DREC: FOR EACH RECORD ON LIST DRECS %NAME = NAME FD.DUP.DREC: IN METADATA FD REC=D ENTITY=%ENTITY NAME=%NAME END FIND CT.FD.DUP.DREC: CT FD.DUP.DREC IF COUNT IN CT.FD.DUP.DREC > 1 THEN %DUP.FOUND = %DUP.FOUND + 1 SKIP 2 LINES PRINT ' DUPLICATE RECORDS ON METADATA FOUND ' AT 10 PRINT 'ENTITY TYPE IS: ' AND %ENTITY AND ' NAME IS: ' AND - %NAME FR FD.DUP.DREC %CURREC = $CURREC SKIP 1 LINE PRINT 'RECORD NUMBER: ' AND %CURREC PRINT ' CREATE DATE IS' AND CREATE DATE PRINT ' LAST UPDATED ' AND LAST UPDATED PRINT ' UPDATED BY ' AND U'PDATED-BY' END FOR REMOVE RECORD FROM LIST DRECS END IF RELEASE RECORDS IN FD.DUP.DREC END FOR END FOR NUMBER.DUPS: SKIP 2 LINES PRINT 'NUMBER OF DUPLICATES FOUND IS: ' AND %DUP.FOUND RETURN.TO.MENU: ** NEXT STATEMENT WILL CAUSE RETURN TO USER WRITTEN REPORTS MENU %CHOICE = 'DIRN.USERREPT' IF $SETG('COMM',%CHOICE) THEN PRINT %GFMSG END IF END
File Management options
The following screen is displayed when you select the following option from the Facility Administration menu:
File Management Options
Use this screen to set command options and defaults for the File Management facility.

Input
This screen enables you to determine the File Management command options supported at your site and to define the defaults for these options.
Type an X in the left column, to select the options that you want to make available at your site. Type an X in the column to the right of the option that you want to be the default. The default must be one of the options selected. (The previous screen shows the system default values.)
| Option | If you choose this option... |
|---|---|
| Active-Immediate Execution | Dictionary/204 and Model 204 are synchronized and any change you make in the dictionary files is also made in the Model 204 database at the same time. |
| Active-Delayed Execution | File management facility updates the command's status as "pending." These pending commands are implemented later while running the batch version of File Management (DDFIMCMD). |
| Inactive: Generate Commands Only | Dictionary/204 generates commands, but you must run them independently.
If you choose this option, you must supply either the name of a directed output file (called a USE file, such as OUTFILE), or you must indicate that you want the commands stored in a procedure file. Select a procedure file by entering a file name at the Proc filename: prompt. |
The system manager can prevent users from issuing commands against files from outside of Dictionary/204 by setting the SYSOPT parameter to the appropriate value.
Setting the parameter to prevent command execution outside of Dictionary/204 precludes selecting the Inactive execution mode.
Security administration
The dictionary administrator uses the Security Administration function on the Dictionary Administration menu to specify the privileges of Dictionary/204 users. The administrator defines the privileges through the user's ACCOUNT entry in the dictionary. (The Dictionary/204 installation procedure gives the dictionary administrator user privileges for all the Dictionary/204 facilities.)
A user's privileges are authorized by facility. No distinction is made between update privileges and read-only privileges. Access to a facility implies the privileges to do whatever that facility allows. Dictionary/204 users, however, are limited by their Model 204 privileges, which override their ability to use certain features of the Dictionary/204 facilities. (For specific examples, see Security considerations.)
PUBLIC account
During installation, an ACCOUNT entry named PUBLIC is defined by Dictionary/204. The PUBLIC account, as its name implies, shares its "user" privileges with all Dictionary/204 users. For example, if the administrator gives PUBLIC privileges to use Dictionary Reports, then all accounts become Dictionary Reports users.
The ACCOUNT entity type has an OUTPUT FILE attribute, indicating the device (usually a printer) to which output is sent when the user does not want it sent to the terminal. The default value for this attribute is the same as the default value of the PUBLIC account, which is set at installation. The value can be modified by the dictionary administrator by updating the PUBLIC account through the Security Administration screen. Users can also override the default value when using the Dictionary/204 facilities.
The administrator assigns user privileges for the PUBLIC account prior to assigning privileges for the accounts of individual users. This means PUBLIC facilities are assigned to each user automatically on the "Facility Profile" for each individual account (see the screen in Defining, updating, and deleting ACCOUNT privileges).
Selecting security administration
Dictionary/204 displays the following screen shown when the dictionary administrator selects the Security Administration function from the Dictionary Administration menu:

This menu enables the administrator to define (add) a new account, update the privileges of an existing account, or delete an existing account.
The previous menu shows a sample selection: updating the privileges of the user whose account name is JLSMITH. This function works by providing an interface (see the following screen) that updates the ACCOUNT entry with the name JLSMITH.
Input
To make a selection from the menu, enter the number of your choice at the Enter Number: prompt and type the name of the account to be defined, updated, or deleted at the following prompt: Account:
If the administrator is assigning privileges to the PUBLIC account, for example, the name PUBLIC appears following the Account: prompt.
You can process your menu selection by pressing Enter, which causes the following Security Administration screen to be displayed. You can also quit this facility by pressing PF3 or request HELP text by pressing PF1 (or issuing the HELP command).
Defining, updating, and deleting ACCOUNT privileges
Dictionary/204 displays a screen similar to the following when you select one of the options from the preceding menu.

The sample screen shows 12 facilities for which the account JLSMITH might be assigned privileges. You can scroll forward to display more facilities by pressing PF8.
JLSMITH is the name that was entered at the Account: prompt on the previous menu. The heading on the screen shows that the update function was selected. When the delete function is selected, the screen heading reads "Deleting Security Profile for <ACCOUNT name>." When the add function is selected, the screen heading reads "Security Profile for <ACCOUNT name>."
In the prefix area, an X marks those facilities and products for which the ACCOUNT has user privileges. Facilities designated as PUBLIC can be used by all accounts. A "Not Installed" message (as shown in column two of the screen) indicates that the corresponding facility has not been installed with your Dictionary/204 product.
Input
To indicate that an ACCOUNT has user privileges for a facility, type an X in the prefix area:
X DICTREPORT
To revoke facility privileges from the ACCOUNT, erase the X by blanking it out with the space bar or the Erase EOF key. Use the tab keys to move the cursor from one prefix line to the next.
If a facility is available to all Dictionary/204 users, the following word appears in column three, as shown in the sample screen, and an X appears in the prefix area for that facility:
PUBLIC
As noted earlier, if the administrator has given the PUBLIC account user privileges for a facility, that privilege extends to all Dictionary/204 users and the word PUBLIC appears to the right of the facility (as shown on the screen).
To specify an alternative output destination (other than the user's terminal), type the device or file name at the prompt:
Default Output Destination:
The alternative output destination is an option for the Dictionary/204 user when output to the terminal is not desired. This value is the default. (The system sets the default destination to the value of the OUTPUT FILE attribute specified for the PUBLIC account.) Normally, the user can change the output destination when using a facility. The Output Destination name must be from 1 to 30 characters.
After filling in the screen, you can implement your selection by pressing PF12 (or issuing the END command), or cancel the request by pressing PF3 (or issuing the QUIT command).
When the function you have selected on the menu has been processed, Dictionary/204 returns you to the Security Administration menu and displays the following message on the message line:
Account <ACCOUNT name> has been <function>
Commands
To issue a command, press the assigned PF key or type the command name at the prompt (===>) and press Enter.
| Key | Command | Meaning |
|---|---|---|
| PF1 | HELp | Provides online HELP text for this screen. You can read through a series of HELP screens, or exit from the last screen in the series, by pressing any key. |
| PF3 | QUIt | Terminates this function. You return to the Security Administration menu. |
| PF6 | DELete | Deletes an account entry. This option is displayed only if the delete function is selected from the Security Administration menu. |
| PF7 | BACKward | Scrolls backward through the list of facilities. This option appears at the bottom of the screen only if you have scrolled forward. |
| PF8 | FORward | Scrolls forward through the list of facilities. This option appears at the bottom of the screen if there are more facilities to be displayed. |
| PF12 | END | Implements the selection on the screen. You return to the Security Administration menu. |
Printing a dictionary inventory
You can request a formatted, printed report of the entire contents of the dictionary. This facility reports on the attributes and references of all entries of each entity type.
Note: The processing time required to format and print the dictionary inventory can be quite long, depending upon the complexity and number of dictionary entries.
-
Select the following option from the Dictionary Administration menu:
Inventory Report
The following screen appears:
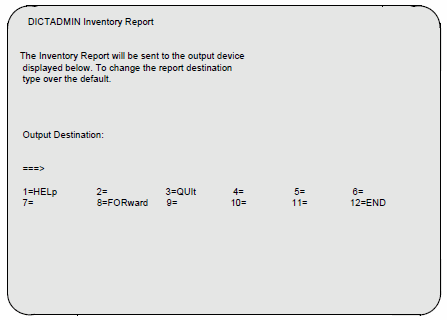
The screen shows the default output device. The Inventory Report is always sent to a printer; it cannot be displayed on your terminal.
- To change the printer, type over the default value with the device name of another printer.
- When you are satisfied with the output device, press Enter to proceed.
- To cancel before printing starts, press PF3 to return to the Dictionary Administration menu.
- To cancel after printing starts, press PA1.

Upon completion of the report, the system returns you to the Dictionary Administration menu, where the following message is displayed:
The Inventory Report has been sent to the output device
A sample entry from an Inventory Report follows.
The Dictionary Inventory Report is printed in sorted order. Each entry begins on a new page, as shown in the sample.


Duplication correction utilities
Dictionary/204 provides a set of utilities for the dictionary administrator to use for verifying data integrity. These utilities are described in detail in this section. Use the utility to correct duplicate entity types or entries if any of the following error messages are generated during the operation of Dictionary/204:
- Dictionary Administration facility message:
DIA102 Duplicate entity types found, contact your Dictionary Administrator.
- Documentation facility messages:
DOC013 Duplicate entries found for the tagged name. Contact System Administrator.
DOC015 Duplicate control records for this entity type.
- Dictionary Reports facility message:
DUPLICATE ENTRIES WERE FOUND FOR ENTRY: RECORD_ONE ENTITY: DUPRECORD REPORT THIS TO YOUR DICTIONARY ADMINISTRATOR. THIS REPORT HAS BEEN CANCELLED.
The Dictionary administrator must supply the entity type and entry name for the entry in error when taking corrective action, as described in the following section.
Correcting duplicate entries or entity types
Dictionary/204 provides a special routine, called DICN.CTRLDUP, which can be used to eliminate duplicate entries or entity types. This routine is distributed in the form of a Model 204 SOUL procedure that resides in the Dictionary/204 file M204PROC.
To run DICN.CTRLDUP:
- Stop Dictionary/204 and all its facilities, as described in Starting and stopping the Dictionary/204 subsystems.
- Open the Dictionary/204 M204PROC file.
- Run the procedure, using the Model 204 INCLUDE command (INCLUDE or I):
> OPEN M204PROC > I DICN.CTRLDUP
- Model 204 automatically opens the Dictionary/204 METADATA file. The METADATA password prompt is displayed after the file is opened. Enter the password at the prompt or press Enter.
- The procedure prompts you for the entity type (for example, FILE) and entry name (for example, PAYROLL) of the dictionary entry for which the duplicate record was found:
*** FILE METADATA OPENED ??METADATA PASSWORD $$ENTER ENTITY TYPE VALUE: > FILE $$ENTER NAME IF FOR ENTRY RECORD: > PAYROLL
Note: If a password is required, you must supply an update password.
- If you are correcting a duplicate entity type, press Enter in response to the ENTER NAME IF FOR ENTRY RECORD prompt.
-
DICN.CTRLDUP displays the duplicate records, as shown in the following example. Each entry is identified with a DDSTAT number. After the display has been completed, enter the DDSTAT number of the entity or entry record that you want to preserve:
$$ENTER DDSTAT VALUE OF ENTRY YOU WISH TO KEEP:
-
The procedure deletes the duplicate record and redisplays the record that is being preserved. You are prompted for the following:
$$DO YOU WISH TO CONTINUE (Y/N)?
Enter N to return to command level; enter Y to continue.
If the specified duplicate record cannot be found, DICN.CTRLDUP displays one of the following messages:
**** NO DUPLICATES WERE FOUND FOR ENTITY **** REQUEST FINISHED *** NO DUPLICATES WERE FOUND FOR NAME ENTITY **** REQUEST FINISHED
In this case, DICN.CTRLDUP displays the existing entity type or entry.
DICN.CTRLDUP example
The following example uses DICN.CTRLDUP:
STOP DICTIONARY OPEN M204PROC I DICN.CTRLDUP ENTER ENTITY TYPE VALUE: > WIDGET ENTER NAME IF FOR ENTRY RECORD: > SNX13 **** ENTRY RECORD FOLLOWS: ENTITY=WIDGET NAME=SNX13 CREATE DATE=19 MAR 82 DDSTAT=1 **** ENTRY RECORD FOLLOWS: ENTITY=WIDGET NAME=SNX13 CREATE DATE=19 MAR 82 DDSTAT=2 **** ENTRY RECORD FOLLOWS: ENTITY=WIDGET NAME=SNX13 CREATE DATE=19 MAR 82 LAST UPDATED=22 MAR 82 KEYWORD=WID DDSTAT=3 $$ENTER DDSTAT VALUE OF ENTRY YOU WISH TO KEEP: >3 **** THIS IS THE CURRENT ENTRY FOR SNX13 WIDGET: ENTITY=WIDGET NAME=SNX13 CREATE DATE=19 MAR 82 LAST UPDATED=22 MAR 82 KEYWORD=WID *** REQUEST FINISHED *** $$DO YOU WISH TO CONTINUE (Y/N)? > N
Note: A sample report is provided (USRN.DUPREPT) that reports on duplicate entries in the dictionary. It is available as a customized report in Dictionary Reports (see Selecting a user-written (customized) report).
Correcting duplicate relationships
Dictionary/204 provides a special routine, called DICN.CLEANLNK, to eliminate duplicate relationships in the DATALINK file. This routine is distributed in the form of a Model 204 SOUL procedure that resides in the Dictionary/204 file, M204PROC.
To run DICN.CLEANLNK:
- Stop Dictionary/204 and all its facilities, as discussed in Starting and stopping the Dictionary/204 subsystems.
- Open the Dictionary/204 files DATALINK and M204PROC.
- Run the procedure using the Model 204 INCLUDE command (INCLUDE or I):
> OPEN DATALINK (enter update password if secured) OPEN M204PROC (enter password if secured) > I DICN.CLEANLNK
DICN.CLEANLNK displays the current number of entries found in DATALINK:
THERE ARE # REFERENCES CURRENTLY STORED.
The procedure then deletes any duplicate reference entries found.
At the completion of the request another count is displayed:
THERE ARE # RESULTING REFERENCES.
DICN.CLEANLNK example
The following example uses DICN.CLEANLNK:
> O DATALINK *** M204.0620: FILE DATALINK OPENED > O M204PROC *** M204.0620: FILE M204PROC OPENED > I DICN.CLEANLNK THERE ARE 1293 REFERENCES CURRENTLY STORED. THERE ARE 1289 RESULTING REFERENCES. *** M204.0172: END OF UPDATE 7 at 10:29:57.45
See also
- Dictionary/204 overview
- Dictionary/204 view management
- Dictionary/204 logon and commands
- Dictionary/204 administration
- Dictionary/204 reports
- Dictionary/204 Documentation facility
- Dictionary/204 FILEMGMT overview
- Dictionary/204 Cross-Reference facility
- Dictionary/204 migration subsystem
- Dictionary/204 entity type definitions
- Dictionary/204 messages