Connect-Star for ODBC: Difference between revisions
m (restore <span class="superstar">★</span>) |
m (misc formatting) |
||
| Line 1: | Line 1: | ||
{{DISPLAYTITLE: Connect<span class="superstar">★</span> for ODBC}} | {{DISPLAYTITLE: Connect<span class="superstar">★</span> for ODBC}} | ||
==Overview== | ==Overview== | ||
Connect<span class="superstar">★</span> for ODBC is multithreading capable. Connect<span class="superstar">★</span> provides a common memory stack that will be shared during access of a multithreaded environment or application. | |||
Connect<span class="superstar">★</span> is not multithreading. | Connect<span class="superstar">★</span> is not multithreading. | ||
| Line 25: | Line 24: | ||
<p>The driver runs with ODBC 2.0 and ODBC 3.0 applications. | <p>The driver runs with ODBC 2.0 and ODBC 3.0 applications. | ||
An informational message is returned for ODBC 2.0 and ODBC 3.0 requests that are not supported.</p> | An informational message is returned for ODBC 2.0 and ODBC 3.0 requests that are not supported.</p></li> | ||
</li> | |||
<li>ODBC Administrator, 32-bit, version 3.0 with SP2 or higher.</li> | <li>ODBC Administrator, 32-bit, version 3.0 with SP2 or higher.</li> | ||
</ul> | </ul> | ||
===Platforms tested=== | ===Platforms tested=== | ||
The following platforms have been tested successfully for connectivity with Connect<span class="superstar">★</span> ODBC: | The following platforms have been tested successfully for connectivity with Connect<span class="superstar">★</span> ODBC: | ||
<ul> | <ul> | ||
<li>Windows<sup>®</sup> 7, Windows 8.1, or Windows 10</li> | <li>Windows<sup>®</sup> 7, Windows 8.1, or Windows 10</li> | ||
<li>Windows Server<sup>®</sup> 2008 or Windows Server 2012</li> | <li>Windows Server<sup>®</sup> 2008 or Windows Server 2012</li> | ||
| Line 52: | Line 51: | ||
<th>Action</th> | <th>Action</th> | ||
</tr> | </tr> | ||
<tr> | <tr> | ||
<td>1</td> | <td>1</td> | ||
| Line 57: | Line 57: | ||
for ODBC.</td> | for ODBC.</td> | ||
</tr> | </tr> | ||
<tr> | <tr> | ||
<td>2</td> | <td>2</td> | ||
<td>[[#Installing the product for ODBC|Install Connect<span class="superstar">★</span> for ODBC]].</td> | <td>[[#Installing the product for ODBC|Install Connect<span class="superstar">★</span> for ODBC]].</td> | ||
</tr> | </tr> | ||
<tr> | <tr> | ||
<td>3</td> | <td>3</td> | ||
<td>[[Connect* to Model 204 connection#Confirming workstation-to-mainframe communication|Confirm the workstation-to-mainframe communication.]]</td> | <td>[[Connect* to Model 204 connection#Confirming workstation-to-mainframe communication|Confirm the workstation-to-mainframe communication.]]</td> | ||
</tr> | </tr> | ||
<tr> | <tr> | ||
<td>4</td> | <td>4</td> | ||
<td>[[#Defining an ODBC data source|Define an ODBC data source.]]</td> | <td>[[#Defining an ODBC data source|Define an ODBC data source.]]</td> | ||
</tr> | </tr> | ||
<tr> | <tr> | ||
<td>5</td> | <td>5</td> | ||
| Line 92: | Line 96: | ||
<ol> | <ol> | ||
<li>Ensure that you have fulfilled the preinstallation requirements as described in [[Connect* installation requirements#Preparing to install|Preparing to install]].</li> | <li>Ensure that you have fulfilled the preinstallation requirements as described in [[Connect* installation requirements#Preparing to install|Preparing to install]].</li> | ||
<li>With your [[Rocket M204 user ID]] and password handy, go to the [https://model204.rocketsoftware.com Rocket M204 Customer Care page].</li> | <li>With your [[Rocket M204 user ID]] and password handy, go to the [https://model204.rocketsoftware.com Rocket M204 Customer Care page].</li> | ||
<li>Click the <b>Download client (workstation) files</b> link to go to the [https://m204.rocketsoftware.com/maint/cllist Client files for Rocket Software page]. </li> | <li>Click the <b>Download client (workstation) files</b> link to go to the [https://m204.rocketsoftware.com/maint/cllist Client files for Rocket Software page]. </li> | ||
<li> | |||
The Connect<span class="superstar">★</span> drivers are available in zip format. Click the <b>Download ZIP file</b> link for the Connect<span class="superstar">★</span> drivers.</li> | <li>The Connect<span class="superstar">★</span> drivers are available in zip format. Click the <b>Download ZIP file</b> link for the Connect<span class="superstar">★</span> drivers.</li> | ||
<li> | |||
Click <b>Save as</b> to save the cstar.zip file in your preferred directory. (You will later be prompted for the directory where you want to actually install Connect<span class="superstar">★</span>.) | <li>Click <b>Save as</b> to save the cstar.zip file in your preferred directory. (You will later be prompted for the directory where you want to actually install Connect<span class="superstar">★</span>.) </li> | ||
</li> | |||
<li> | <li>Expand the file in an unzip application, such as WinZip, and double-click the setup file: setup_odbc32.exe. </li> | ||
Expand the file in an unzip application, such as WinZip, and double-click the setup file: setup_odbc32.exe. </li> | |||
<li> | <li>The Connect Star Setup Wizard appears. Click <b>Next</b> and select an installation folder, or use the default folder (C:\Program Files (x86)\CCA\Connect Star for Model 204\). Click <b>Next</b>.</li> | ||
The Connect Star Setup Wizard appears. Click <b>Next</b> and select an installation folder, or use the default folder (C:\Program Files (x86)\CCA\Connect Star for Model 204\). Click <b>Next</b>.</li> | |||
<li>Click <b>Install</b> to begin the installation.</li> | <li>Click <b>Install</b> to begin the installation.</li> | ||
<li>Click <b>Finish</b> to complete the installation.</li> | <li>Click <b>Finish</b> to complete the installation.</li> | ||
</ol> | </ol> | ||
===DLL files installed=== | ===DLL files installed=== | ||
In addition to the files installed in your installation destination folder, Connect<span class="superstar">★</span> installs the following files in Program Files (x86) under Common Files\CCA: | In addition to the files installed in your installation destination folder, Connect<span class="superstar">★</span> installs the following files in Program Files (x86) under Common Files\CCA: | ||
<table> | <table> | ||
| Line 115: | Line 121: | ||
</tr> | </tr> | ||
<tr> | <tr> | ||
<td>M204IN32.DLL</td> | <td>M204IN32.DLL</td> | ||
</tr> | </tr> | ||
<tr><td>M204OD32.DLL</td> | <tr><td>M204OD32.DLL</td> | ||
</tr> | </tr> | ||
<tr><td>M204RX32.DLL</td> | <tr><td>M204RX32.DLL</td> | ||
</tr> | </tr> | ||
<tr> | <tr> | ||
<td>M204SC32.DLL</td> | <td>M204SC32.DLL</td> | ||
</tr> | </tr> | ||
<tr> | <tr> | ||
<td>M204TC32.DLL</td> | <td>M204TC32.DLL</td> | ||
</tr> | </tr> | ||
<tr> | <tr> | ||
<td>M204UT32.DLL</td> | <td>M204UT32.DLL</td> | ||
| Line 153: | Line 165: | ||
<p class="figure">[[File:CStar_3-1_CLIIVP.jpg]] </p> | <p class="figure">[[File:CStar_3-1_CLIIVP.jpg]] </p> | ||
<p> | |||
CLIIVP32 uses either an SQL or an RCL ODBC data source to connect to Model 204. It accepts a file or a command-at-a-time as input. Output is returned in a results window. You can edit and save both input and output.</p></li> | |||
<li>DDLWin32 | |||
<p class="figure">[[File:CStar_3-2_DDLWIN.jpg]] </p> | <p class="figure">[[File:CStar_3-2_DDLWIN.jpg]] </p> | ||
<p>DDLWin32 runs the DDL UTILITY which accepts a file of DDL statements and updates the CCACAT Model 204 file.</p></li> | |||
<li>Ttrw | |||
<p class="figure">[[File:CStar_3-3_TTRW.jpg]] </p> | <p class="figure">[[File:CStar_3-3_TTRW.jpg]] </p> | ||
<p>Ttrw lets you select an ODBC data source and runs the SQL or RCL request you enter or provide in an input file. Output is written to dbg.txt in the ODBC > Unsupported folder.</p> | |||
<p class="figure">[[File:CStar_3-4_TTRW_OUT.jpg]] </p></li> | |||
</ul> | |||
</ul> | </ul> | ||
==Defining an ODBC data source== | ==Defining an ODBC data source== | ||
<p> | <p> | ||
Before executing an SQL statement, check with your Connect<span class="superstar">★</span> | Before executing an SQL statement, check with your Connect<span class="superstar">★</span> administrator to make sure that either the demonstration database is installed and has been defined to the SQL catalog file, CCACAT, or you have other available tables defined in CCACAT. (See [[Connect* to Model 204 connection#SQL catalog population|SQL catalog population]].)</p> | ||
<p> | <p> | ||
Selecting an ODBC data source is required to establish an ODBC connection to the Model 204 Online. </p> | Selecting an ODBC data source is required to establish an ODBC connection to the Model 204 Online. </p> | ||
<p> | <p> | ||
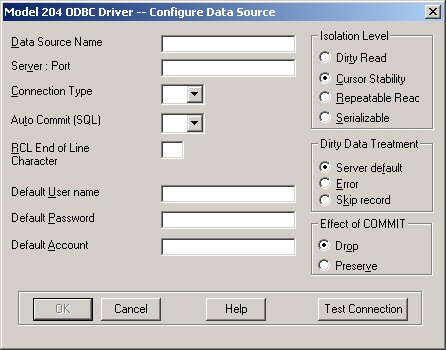
Use the Model 204 ODBC Driver -- Configure Data Source dialog box to create data sources that can be accessed by ODBC or by other applications such as Microsoft Access, Visual Basic, or PowerBuilder.</p> | Use the Model 204 ODBC Driver -- Configure Data Source dialog box to create data sources that can be accessed by ODBC or by other applications such as Microsoft Access, Visual Basic, or PowerBuilder.</p> | ||
<p> | <p> | ||
You can define more than one data source, each identified by its data source name, with different settings in each one, to the same Model 204 Online. </p> | You can define more than one data source, each identified by its data source name, with different settings in each one, to the same Model 204 Online. </p> | ||
<p> | <p> | ||
To give your workstation greater flexibility, you might want to configure the same Model 204 Online more than once, as SQL and RCL (see [[#Connection Type|Connection Type)]]. </p> | To give your workstation greater flexibility, you might want to configure the same Model 204 Online more than once, as SQL and RCL (see [[#Connection Type|Connection Type)]]. </p> | ||
===Creating a data source=== | ===Creating a data source=== | ||
To create a data source: | To create a data source: | ||
<ol> | <ol> | ||
| Line 194: | Line 201: | ||
<ul> | <ul> | ||
<li>On Windows 7, navigate to C:\Windows\SysWOW64 and double-click odbcad32.exe. <p class="note"><b>Note:</b> Do <I>not</I> use the executable specified by Windows/System32/odbcad32.exe. Although its name implies that it is 32-bit, it is actually 64-bit. (Since the correct SysWOW64 pathname is not intuitive, you might want to create a shortcut to the executable.)</p></li> | <li>On Windows 7, navigate to C:\Windows\SysWOW64 and double-click odbcad32.exe. <p class="note"><b>Note:</b> Do <I>not</I> use the executable specified by Windows/System32/odbcad32.exe. Although its name implies that it is 32-bit, it is actually 64-bit. (Since the correct SysWOW64 pathname is not intuitive, you might want to create a shortcut to the executable.)</p></li> | ||
<li>On Windows 8.1, from the Start menu, select All Programs > Administrative Tools, and click ODBC Data Sources (32-bit). </li> | <li>On Windows 8.1, from the Start menu, select All Programs > Administrative Tools, and click ODBC Data Sources (32-bit). </li> | ||
<li>On Windows 10, from the Start menu, select Windows Administrative Tools and click ODBC Data Sources (32-bit). </li> | <li>On Windows 10, from the Start menu, select Windows Administrative Tools and click ODBC Data Sources (32-bit). </li> | ||
</ul> | </ul> | ||
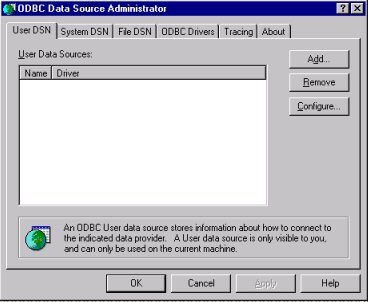
<p>The ODBC Data Source Administrator dialog box appears.</p> | <p> | ||
The ODBC Data Source Administrator dialog box appears.</p> | |||
<p class="figure">[[File:CStar_3-5_CREATE_DS.jpg]] </p> | <p class="figure">[[File:CStar_3-5_CREATE_DS.jpg]] </p></li> | ||
</li> | |||
<li>Create a user or system data source by clicking on the Add button in the User DSN or System DSN tab. </li> | <li>Create a user or system data source by clicking on the Add button in the User DSN or System DSN tab. </li> | ||
<li>Select the M204_32 driver in the Create New Data Source dialog box. | <li>Select the M204_32 driver in the Create New Data Source dialog box. | ||
| Line 219: | Line 229: | ||
<ol> | <ol> | ||
<li>Open the 32-bit ODBC Data Source Administrator to display the ODBC Data Source Administrator dialog box.</li> | <li>Open the 32-bit ODBC Data Source Administrator to display the ODBC Data Source Administrator dialog box.</li> | ||
<li>Select a data source in the Data Source list box.</li> | <li>Select a data source in the Data Source list box.</li> | ||
<li>Click Configure to display the Model 204 ODBC Driver -- Configure Data Source dialog box.</li> | <li>Click Configure to display the Model 204 ODBC Driver -- Configure Data Source dialog box.</li> | ||
<li>Change the information in the text boxes and click OK.</li> | <li>Change the information in the text boxes and click OK.</li> | ||
</ol> | </ol> | ||
===Model 204 ODBC driver data source text boxes=== | ===Model 204 ODBC driver data source text boxes=== | ||
This section describes the individual text boxes in the Model 204 ODBC Driver -- Configure Data Source dialog box. | This section describes the individual text boxes in the Model 204 ODBC Driver -- Configure Data Source dialog box. | ||
====Data Source Name==== | ====Data Source Name==== | ||
| Line 239: | Line 252: | ||
====Server ID/ Address==== | ====Server ID/ Address==== | ||
The Server ID value specifies the IP address and the port number used by the Model 204 32-bit ODBC driver to establish a connection to a Model 204 server. The IP address and port number are typically assigned by the local systems programmer. Follow these guidelines: | |||
The Server ID value specifies the IP address and the port number used by the Model 204 32-bit ODBC driver to establish a connection to a Model 204 server. The IP address and port number are typically assigned by the local systems programmer. Follow these guidelines: | |||
<ul> | <ul> | ||
<li>The IP address must be the IP address of the IBM z/OS or z/VM mainframe system as entered in the Model 204 Online to which you are connecting. The address is defined in the Define Link LOCALID=<var class="term">xxxx</var>.</li> | <li>The IP address must be the IP address of the IBM z/OS or z/VM mainframe system as entered in the Model 204 Online to which you are connecting. The address is defined in the Define Link LOCALID=<var class="term">xxxx</var>.</li> | ||
<li>The port number must be the number specified in the Model 204 TCP/IP link defined in the Online: | |||
<li>The port number must be the number specified in the Model 204 TCP/IP link defined in the Online: | |||
<p class="syntax">Define Link SERVPORT=<span class="term">xxxx</span></p> | <p class="syntax">Define Link SERVPORT=<span class="term">xxxx</span></p> | ||
</li><li>The IP address and port number are separated by a colon.</li> | </li> | ||
<li>The IP address and port number are separated by a colon.</li> | |||
<li>Two IP address formats are possible: either the domain name or the numeric IP address. For example: </li> | <li>Two IP address formats are possible: either the domain name or the numeric IP address. For example: </li> | ||
</ul> | </ul> | ||
| Line 253: | Line 269: | ||
====Connection Type==== | ====Connection Type==== | ||
Use the Connection Type text box to specify the use of SQL or RCL to establish a connection (IODEV) to the mainframe: | Use the Connection Type text box to specify the use of SQL or RCL to establish a connection (IODEV) to the mainframe: | ||
<ul> | <ul> | ||
<li>With SQL, you can use SQL statements as described in [[SQL Server overview]] and other [[:Category:Model 204 SQL processing|Model 204 SQL processing]] topics. </li> | <li>With SQL, you can use SQL statements as described in [[SQL Server overview]] and other [[:Category:Model 204 SQL processing|Model 204 SQL processing]] topics. </li> | ||
<li>With RCL, you can use SOUL requests and Model 204 commands and procedures. </li> | <li>With RCL, you can use SOUL requests and Model 204 commands and procedures. </li> | ||
</ul> | </ul> | ||
| Line 269: | Line 285: | ||
====RCL End of Line Character==== | ====RCL End of Line Character==== | ||
If you are establishing an RCL connection, accept the end-of-line character, the semicolon (;) character in the text box. | If you are establishing an RCL connection, accept the end-of-line character, the semicolon (;) character in the text box. | ||
====Default User Name==== | ====Default User Name==== | ||
The Default User Name value is used by the Model 204 32-bit ODBC driver to log on to a Model 204 server. The Default User Name must be a valid Model 204 logon name for the requested Model 204 server. | |||
The Default User Name value is used by the Model 204 32-bit ODBC driver to log on to a Model 204 server. The Default User Name must be a valid Model 204 logon name for the requested Model 204 server. | |||
If you do not enter a Default User Name, the application prompts the user for a valid name at connection time. The Default User Name corresponds to the UID keyword in either the SQLConnect or SQLDriverConnect call. | If you do not enter a Default User Name, the application prompts the user for a valid name at connection time. The Default User Name corresponds to the UID keyword in either the SQLConnect or SQLDriverConnect call. | ||
====Default Password==== | ====Default Password==== | ||
The Default Password value must be the valid Model 204 password for the name entered as the Default User Name in the same data source. | |||
The Default Password value must be the valid Model 204 password for the name entered as the Default User Name in the same data source. | |||
If no Default Password is entered here, the application prompts the user for a valid password at connection time. The Default Password corresponds to the PWD keyword in either the SQLConnect or SQLDriverConnect call. | If no Default Password is entered here, the application prompts the user for a valid password at connection time. The Default Password corresponds to the PWD keyword in either the SQLConnect or SQLDriverConnect call. | ||
====Default Account==== | ====Default Account==== | ||
The Default Account value sets the default account character string used by the Model 204 32-bit ODBC driver when establishing a connection to a Model 204 server. The Default Account value can be any account string acceptable to the requested server. | |||
This value is optional. You can assign it to a project, for example, to record the tasks and the number of hours spent. If you omit it, the driver does not pass an Account string to the Model 204 server. | |||
This value is optional. You can assign it to a project, for example, to record the tasks and the number of hours spent. If you omit it, the driver does not pass an Account string to the Model 204 server. | |||
The Default Account corresponds to the ACCOUNT keyword in the SQLDriverConnect call. | The Default Account corresponds to the ACCOUNT keyword in the SQLDriverConnect call. | ||
| Line 296: | Line 308: | ||
Technical Support recommends that non-programmers do not change the following default settings provided with the installed Connect<span class="superstar">★</span> software:</p> | Technical Support recommends that non-programmers do not change the following default settings provided with the installed Connect<span class="superstar">★</span> software:</p> | ||
<ul> | <ul> | ||
<li> | <li>Isolation Level</li> | ||
Isolation Level</li> | |||
<li> | <li>Dirty Data Treatment</li> | ||
Dirty Data Treatment</li> | |||
<li> | <li>Effect of COMMIT</li> | ||
Effect of COMMIT</li> | |||
</ul> | </ul> | ||
| Line 308: | Line 319: | ||
Before executing an SQL statement, check with your Connect<span class="superstar">★</span> administrator to make sure that either the demonstration database is installed and has been defined to the SQL catalog file, CCACAT, or you have other available tables defined in CCACAT. (See [[Connect* to Model 204 connection#SQL catalog population|SQL catalog population.]]) | Before executing an SQL statement, check with your Connect<span class="superstar">★</span> administrator to make sure that either the demonstration database is installed and has been defined to the SQL catalog file, CCACAT, or you have other available tables defined in CCACAT. (See [[Connect* to Model 204 connection#SQL catalog population|SQL catalog population.]]) | ||
When the Model 204 ODBC driver installation is complete, use Catalog2, an ODBC data source schema browser, to verify that the connection to Model 204 works successfully: | When the Model 204 ODBC driver installation is complete, use Catalog2, an ODBC data source schema browser, to verify that the connection to Model 204 works successfully: | ||
<ol> | <ol> | ||
<li>Define an ODBC user or system data source before attempting to send a query to Model 204 (see [[#Defining an ODBC data source|Defining an ODBC data source]]). </li> | <li>Define an ODBC user or system data source before attempting to send a query to Model 204 (see [[#Defining an ODBC data source|Defining an ODBC data source]]). </li> | ||
<li>In the Connect Star For Model 204 program group under ODBC, click Catalog2.</li> | |||
<li>Use File > Open to display the Select Data Source dialog box. Select a defined data source to display all the tables or views in the Model 204 SQL catalog (CCACAT). You can determine the types of tables and information included in the display by selecting Setting in the View menu. </li> | <li>In the Connect Star For Model 204 program group under ODBC, click Catalog2.</li> | ||
<li>Use File > Open to display the Select Data Source dialog box. Select a defined data source to display all the tables or views in the Model 204 SQL catalog (CCACAT). You can determine the types of tables and information included in the display by selecting Setting in the View menu. </li> | |||
<li>Double-click a table or view to display all the columns that are included in the table and information about the columns.</li> | <li>Double-click a table or view to display all the columns that are included in the table and information about the columns.</li> | ||
</ol> | </ol> | ||
==ODBC third-party software== | ==ODBC third-party software== | ||
The Model 204 32-bit ODBC driver works with nearly all ODBC 32-bit applications. | The Model 204 32-bit ODBC driver works with nearly all ODBC 32-bit applications. | ||
==Application development using ODBC== | ==Application development using ODBC== | ||
If your application requires an ODBC connection, you must register your Model 204 as a data source with the Microsoft ODBC administrator on your workstation. | If your application requires an ODBC connection, you must register your Model 204 as a data source with the Microsoft ODBC administrator on your workstation. | ||
Use the Microsoft 32-bit ODBC administrator to define a data source after the Model 204 ODBC driver has been installed. | Use the Microsoft 32-bit ODBC administrator to define a data source after the Model 204 ODBC driver has been installed. | ||
For information on: | For information on: | ||
<ul> | <ul> | ||
<li>Installing the driver, see [[#Installing the product for ODBC|Installing the product for ODBC]]</li> | <li>Installing the driver, see [[#Installing the product for ODBC|Installing the product for ODBC]]</li> | ||
<li>Defining a data source, see [[#Defining an ODBC data source|Defining an ODBC data source]]</li> | <li>Defining a data source, see [[#Defining an ODBC data source|Defining an ODBC data source]]</li> | ||
</ul> | </ul> | ||
Connect<span class="superstar">★</span> for ODBC is multi threaded capable. Connect<span class="superstar">★</span> provides a common memory stack that will be shared during access of a multi threaded environment or application. | Connect<span class="superstar">★</span> for ODBC is multi threaded capable. Connect<span class="superstar">★</span> provides a common memory stack that will be shared during access of a multi threaded environment or application. | ||
Connect<span class="superstar">★</span> is not multithreading. | Connect<span class="superstar">★</span> is not multithreading. | ||
| Line 339: | Line 352: | ||
==Overriding data source settings== | ==Overriding data source settings== | ||
An ODBC application can override the isolation level by calling the SQLSetConnectOption function with the SQL_TXN_ISOLATION option and setting it explicitly. | An ODBC application can override the isolation level by calling the SQLSetConnectOption function with the SQL_TXN_ISOLATION option and setting it explicitly. | ||
| Line 345: | Line 357: | ||
<ul> | <ul> | ||
<li>The ODBC driver can direct SQLDriverConnect to display the SQLDriverConnect dialog box, where the user can enter a password.</li> | <li>The ODBC driver can direct SQLDriverConnect to display the SQLDriverConnect dialog box, where the user can enter a password.</li> | ||
<li>If an ODBC application calls SQLConnect, it can pass an explicit password in the third string argument to SQLConnect. (The three string arguments to SQLConnect are interpreted as DSN, UID, and PWD, respectively.) When SQLConnect is called, the driver looks in the registry to find the Default User Name and Default Password for the specified Data Source Name.</li> | <li>If an ODBC application calls SQLConnect, it can pass an explicit password in the third string argument to SQLConnect. (The three string arguments to SQLConnect are interpreted as DSN, UID, and PWD, respectively.) When SQLConnect is called, the driver looks in the registry to find the Default User Name and Default Password for the specified Data Source Name.</li> | ||
</ul> | </ul> | ||
| Line 353: | Line 366: | ||
===Data source default parameters=== | ===Data source default parameters=== | ||
SQL programmers who are knowledgeable about these settings might want to change the defaults described here (to affect all queries using the defined data source) or change the settings for individual queries. | SQL programmers who are knowledgeable about these settings might want to change the defaults described here (to affect all queries using the defined data source) or change the settings for individual queries. | ||
| Line 362: | Line 374: | ||
====Isolation Level==== | ====Isolation Level==== | ||
The Isolation Level parameter sets the default transaction isolation level used by the Model 204 32-bit ODBC driver to establish a connection to a Model 204 server. Isolation Level corresponds to the ISOLATION keyword. | The Isolation Level parameter sets the default transaction isolation level used by the Model 204 32-bit ODBC driver to establish a connection to a Model 204 server. Isolation Level corresponds to the ISOLATION keyword. | ||
<table> | <table> | ||
| Line 411: | Line 423: | ||
<th>If you want SQL_COMMIT to... </th> | <th>If you want SQL_COMMIT to... </th> | ||
</tr> | </tr> | ||
<tr> | <tr> | ||
<td>Drop (default)</td> | <td>Drop (default)</td> | ||
<td>Close cursors and drop statements.</td> | <td>Close cursors and drop statements.</td> | ||
</tr> | </tr> | ||
<tr><td>Preserve</td> | <tr><td>Preserve</td> | ||
<td>Preserve open cursors and prepared statements.</td> | <td>Preserve open cursors and prepared statements.</td> | ||
| Line 480: | Line 494: | ||
<th>Writes the...</th> | <th>Writes the...</th> | ||
</tr> | </tr> | ||
<tr> | <tr> | ||
<td>~ALOGMSG ~B*It</td> | <td>~ALOGMSG ~B*It</td> | ||
| Line 485: | Line 500: | ||
ODBC trace information. Use both the ~A and ~B options.</td> | ODBC trace information. Use both the ~A and ~B options.</td> | ||
</tr> | </tr> | ||
<tr> | <tr> | ||
<td>~ALANGUSER ~BIBM1047, or ~BJAPAN, or ~BTURKISH, or ~BUS</td> | <td>~ALANGUSER ~BIBM1047, or ~BJAPAN, or ~BTURKISH, or ~BUS</td> | ||
| Line 494: | Line 510: | ||
<li>US: ASCII characters 0-128</li> | <li>US: ASCII characters 0-128</li> | ||
</ul></td></tr> | </ul></td></tr> | ||
<tr><td>~ATRANSTIME ~B*</td> | <tr><td>~ATRANSTIME ~B*</td> | ||
<td>M204OD32.LOG with the connection time out value. Zero is the default.</td> | <td>M204OD32.LOG with the connection time out value. Zero is the default.</td> | ||
</tr> | </tr> | ||
<tr><td>~CLOGRX</td> | <tr><td>~CLOGRX</td> | ||
<td>M204RX32.LOG with communications information.</td> | <td>M204RX32.LOG with communications information.</td> | ||
</tr> | </tr> | ||
<tr><td>~DLOGTCP</td> | <tr><td>~DLOGTCP</td> | ||
<td>M204TC32.LOG with socket level information.</td></tr> | <td>M204TC32.LOG with socket level information.</td></tr> | ||
| Line 512: | Line 531: | ||
<td>Entry and exit from CLI or ODBC functions</td> | <td>Entry and exit from CLI or ODBC functions</td> | ||
</tr> | </tr> | ||
<tr><td>x =</td> | <tr><td>x =</td> | ||
<td>Diagnostic information</td> | <td>Diagnostic information</td> | ||
</tr> | </tr> | ||
<tr><td>p =</td> | <tr><td>p =</td> | ||
<td>Parameter values</td> | <td>Parameter values</td> | ||
</tr> | </tr> | ||
<tr><td>b =</td> | <tr><td>b =</td> | ||
<td>Bound buffer values</td> | <td>Bound buffer values</td> | ||
</tr> | </tr> | ||
<tr><td>f =</td> | <tr><td>f =</td> | ||
<td>Fetched values</td> | <td>Fetched values</td> | ||
</tr> | </tr> | ||
<tr><td>t =</td> | <tr><td>t =</td> | ||
<td>Internal trace</td> | <td>Internal trace</td> | ||
</tr> | </tr> | ||
<tr><td>s =</td> | <tr><td>s =</td> | ||
<td>SCFE (communications layer) request block</td> | <td>SCFE (communications layer) request block</td> | ||
</tr> | </tr> | ||
<tr><td>i = </td> | <tr><td>i = </td> | ||
<td>Time intervals at entry and exit to every CLI/ODBC function and SCFE call</td> | <td>Time intervals at entry and exit to every CLI/ODBC function and SCFE call</td> | ||
| Line 542: | Line 568: | ||
<th>Logs...</th> | <th>Logs...</th> | ||
</tr> | </tr> | ||
<tr><td>* </td> | <tr><td>* </td> | ||
<td>All message types</td> | <td>All message types</td> | ||
</tr> | </tr> | ||
<tr><td>ext</td> | <tr><td>ext</td> | ||
<td>Types e, x, and t</td> | <td>Types e, x, and t</td> | ||
</tr> | </tr> | ||
<tr><td>*ipf</td> | <tr><td>*ipf</td> | ||
<td>All message types except i, p, and f</td> | <td>All message types except i, p, and f</td> | ||
Revision as of 19:26, 26 October 2017
Overview
Connect★ for ODBC is multithreading capable. Connect★ provides a common memory stack that will be shared during access of a multithreaded environment or application.
Connect★ is not multithreading.
The 32-bit Connect★ for ODBC driver offers you the flexibility to use generic code with multiple ODBC-compliant database interfaces on the Windows Platform.
To develop applications, use a Windows application such as:
- Microsoft Office (Excel, Access, Word)
- Microsoft Visual Studio (Visual Basic, or any ODBC compatible language)
Connect★ for ODBC provides support for TCP/IP (Winsock) protocol.
Setting up the Connect★ for ODBC environment
ODBC conformance
The Model 204 32-bit ODBC driver supports conformance to:
- ODBC version 1.1.
The driver runs with ODBC 2.0 and ODBC 3.0 applications. An informational message is returned for ODBC 2.0 and ODBC 3.0 requests that are not supported.
- ODBC Administrator, 32-bit, version 3.0 with SP2 or higher.
Platforms tested
The following platforms have been tested successfully for connectivity with Connect★ ODBC:
- Windows® 7, Windows 8.1, or Windows 10
- Windows Server® 2008 or Windows Server 2012
- Horizion TCP/IP 7.4.0 or higher
- Model 204 Online, version 7.4.0 or higher
These platforms are supported by Rocket Software.
ODBC Installation steps
Complete these steps when installing Connect★ for ODBC:
| Step | Action |
|---|---|
| 1 | Uninstall any earlier version of Connect★ for ODBC. |
| 2 | Install Connect★ for ODBC. |
| 3 | Confirm the workstation-to-mainframe communication. |
| 4 | Define an ODBC data source. |
| 5 | Populate or load the SQL catalog and verify the Connect★ connection. |
Uninstalling a previous version of Connect★ for ODBC
Running the Connect★ uninstaller removes the files, program groups, program folders, and registry entries created during Connect★ installation. It does not remove work files that you add to a Connect★ workstation.
Run the uninstaller for Connect★ using the Windows Control Panel to select the Add/Remove Programs icon.
In the Add/Remove Programs Properties dialog box, select the Connect★ software. Click the Add/Remove button.
The uninstaller does not remove the following:
- any files added to the directory after the installation completed
- any items added to the program folder after the installation completed
- existing ODBC data sources
Installing the product for ODBC
- Ensure that you have fulfilled the preinstallation requirements as described in Preparing to install.
- With your Rocket M204 user ID and password handy, go to the Rocket M204 Customer Care page.
- Click the Download client (workstation) files link to go to the Client files for Rocket Software page.
- The Connect★ drivers are available in zip format. Click the Download ZIP file link for the Connect★ drivers.
- Click Save as to save the cstar.zip file in your preferred directory. (You will later be prompted for the directory where you want to actually install Connect★.)
- Expand the file in an unzip application, such as WinZip, and double-click the setup file: setup_odbc32.exe.
- The Connect Star Setup Wizard appears. Click Next and select an installation folder, or use the default folder (C:\Program Files (x86)\CCA\Connect Star for Model 204\). Click Next.
- Click Install to begin the installation.
- Click Finish to complete the installation.
DLL files installed
In addition to the files installed in your installation destination folder, Connect★ installs the following files in Program Files (x86) under Common Files\CCA:
| Installed for TCP/IP |
|---|
| M204IN32.DLL |
| M204OD32.DLL |
| M204RX32.DLL |
| M204SC32.DLL |
| M204TC32.DLL |
| M204UT32.DLL |
Installation complete
When the installation is complete, open Connect★ for ODBC from the Start menu to access the following files.
Note that Windows 10 does not use the Audit and Unsupported folder structure.
- Help File
- Audit
- Turn Logging Off
- Turn Logging On
- Unsupported
- Catalog2
- Connect to data source, for a display of all tables
- CLIIVP32
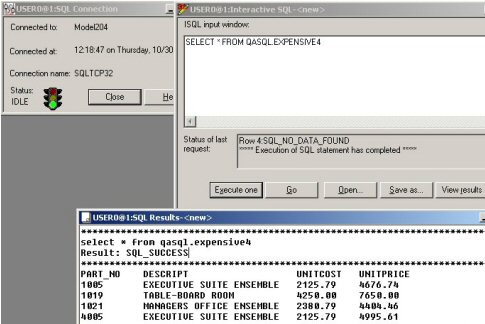
CLIIVP32 uses either an SQL or an RCL ODBC data source to connect to Model 204. It accepts a file or a command-at-a-time as input. Output is returned in a results window. You can edit and save both input and output.
- DDLWin32
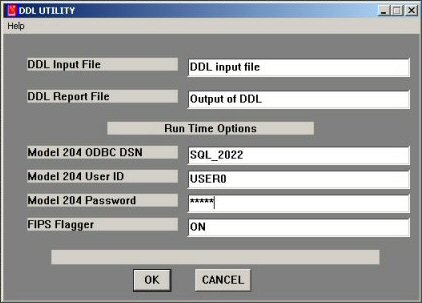
DDLWin32 runs the DDL UTILITY which accepts a file of DDL statements and updates the CCACAT Model 204 file.
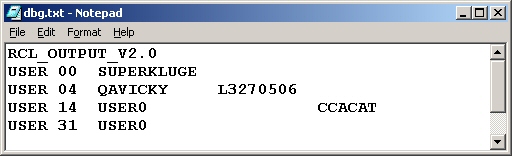
- Ttrw
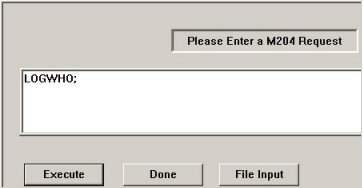
Ttrw lets you select an ODBC data source and runs the SQL or RCL request you enter or provide in an input file. Output is written to dbg.txt in the ODBC > Unsupported folder.


Defining an ODBC data source
Before executing an SQL statement, check with your Connect★ administrator to make sure that either the demonstration database is installed and has been defined to the SQL catalog file, CCACAT, or you have other available tables defined in CCACAT. (See SQL catalog population.)
Selecting an ODBC data source is required to establish an ODBC connection to the Model 204 Online.
Use the Model 204 ODBC Driver -- Configure Data Source dialog box to create data sources that can be accessed by ODBC or by other applications such as Microsoft Access, Visual Basic, or PowerBuilder.
You can define more than one data source, each identified by its data source name, with different settings in each one, to the same Model 204 Online.
To give your workstation greater flexibility, you might want to configure the same Model 204 Online more than once, as SQL and RCL (see Connection Type).
Creating a data source
To create a data source:
- Open the 32-bit ODBC Data Source Administrator:
- On Windows 7, navigate to C:\Windows\SysWOW64 and double-click odbcad32.exe.
Note: Do not use the executable specified by Windows/System32/odbcad32.exe. Although its name implies that it is 32-bit, it is actually 64-bit. (Since the correct SysWOW64 pathname is not intuitive, you might want to create a shortcut to the executable.)
- On Windows 8.1, from the Start menu, select All Programs > Administrative Tools, and click ODBC Data Sources (32-bit).
- On Windows 10, from the Start menu, select Windows Administrative Tools and click ODBC Data Sources (32-bit).
The ODBC Data Source Administrator dialog box appears.
- On Windows 7, navigate to C:\Windows\SysWOW64 and double-click odbcad32.exe.
- Create a user or system data source by clicking on the Add button in the User DSN or System DSN tab.
- Select the M204_32 driver in the Create New Data Source dialog box.
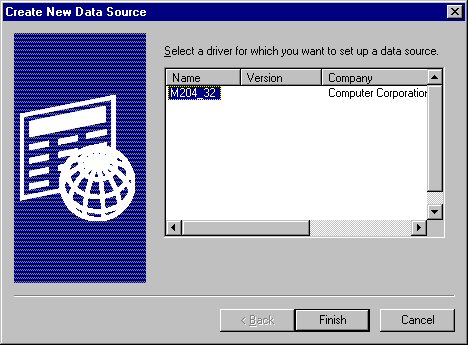
- Click Finish to display the Model 204 ODBC Driver -- Configure Data Source dialog box.
- Define the data source by filling in the text boxes (see Model 204 ODBC driver data source text boxes) and click the Test Connection button.


Changing a data source
To change an existing data source definition:
- Open the 32-bit ODBC Data Source Administrator to display the ODBC Data Source Administrator dialog box.
- Select a data source in the Data Source list box.
- Click Configure to display the Model 204 ODBC Driver -- Configure Data Source dialog box.
- Change the information in the text boxes and click OK.
Model 204 ODBC driver data source text boxes
This section describes the individual text boxes in the Model 204 ODBC Driver -- Configure Data Source dialog box.
Data Source Name
Each data source must have a unique name.
The name you enter is the name applications use to access the set of configuration information in the data source. This is the name that applications pass to the SQLDriverConnect function or the SQLConnect function. It corresponds to the DSN keyword.
You can enter any alphanumeric characters up to a maximum of 30 characters. Do not use blank spaces in the Data Source Name.
You can give the data source a name that is more meaningful to you than the (default) Model 204 name in the Server ID/Address field. The Data Source Name value resides on your workstation and is accessible only from your workstation. The specification for the data source name is in the ODBC.INI section of the registry.
The ODBC standard lets you create multiple data sources. If you want a default data source, you must explicitly identify the Data Source Name as "Default." You are not required to create a default data source.
Server ID/ Address
The Server ID value specifies the IP address and the port number used by the Model 204 32-bit ODBC driver to establish a connection to a Model 204 server. The IP address and port number are typically assigned by the local systems programmer. Follow these guidelines:
- The IP address must be the IP address of the IBM z/OS or z/VM mainframe system as entered in the Model 204 Online to which you are connecting. The address is defined in the Define Link LOCALID=xxxx.
- The port number must be the number specified in the Model 204 TCP/IP link defined in the Online:
Define Link SERVPORT=xxxx
- The IP address and port number are separated by a colon.
- Two IP address formats are possible: either the domain name or the numeric IP address. For example:
M204MVS1:3001 192.207.28.129:3001
Connection Type
Use the Connection Type text box to specify the use of SQL or RCL to establish a connection (IODEV) to the mainframe:
- With SQL, you can use SQL statements as described in SQL Server overview and other Model 204 SQL processing topics.
- With RCL, you can use SOUL requests and Model 204 commands and procedures.
Auto Commit (SQL)
The default SQL_AUTOCOMMIT setting for the M204_32 Driver is ON. This default setting implies that all inserts, updates, and deletes are committed to the database immediately after the transaction is applied, without the need to issue an SQLTransact call with SQL_COMMIT.
The AUTOCOMMIT default (ON) returns SQL_SUCCESS for update or delete transactions that find no rows to update or delete in the table.
To turn the SQL_AUTOCOMMIT option OFF, select the OFF option in the text box.
RCL End of Line Character
If you are establishing an RCL connection, accept the end-of-line character, the semicolon (;) character in the text box.
Default User Name
The Default User Name value is used by the Model 204 32-bit ODBC driver to log on to a Model 204 server. The Default User Name must be a valid Model 204 logon name for the requested Model 204 server.
If you do not enter a Default User Name, the application prompts the user for a valid name at connection time. The Default User Name corresponds to the UID keyword in either the SQLConnect or SQLDriverConnect call.
Default Password
The Default Password value must be the valid Model 204 password for the name entered as the Default User Name in the same data source.
If no Default Password is entered here, the application prompts the user for a valid password at connection time. The Default Password corresponds to the PWD keyword in either the SQLConnect or SQLDriverConnect call.
Default Account
The Default Account value sets the default account character string used by the Model 204 32-bit ODBC driver when establishing a connection to a Model 204 server. The Default Account value can be any account string acceptable to the requested server.
This value is optional. You can assign it to a project, for example, to record the tasks and the number of hours spent. If you omit it, the driver does not pass an Account string to the Model 204 server.
The Default Account corresponds to the ACCOUNT keyword in the SQLDriverConnect call.
Default settings installed with Connect★ software
Technical Support recommends that non-programmers do not change the following default settings provided with the installed Connect★ software:
- Isolation Level
- Dirty Data Treatment
- Effect of COMMIT
Getting Model 204 data
Before executing an SQL statement, check with your Connect★ administrator to make sure that either the demonstration database is installed and has been defined to the SQL catalog file, CCACAT, or you have other available tables defined in CCACAT. (See SQL catalog population.)
When the Model 204 ODBC driver installation is complete, use Catalog2, an ODBC data source schema browser, to verify that the connection to Model 204 works successfully:
- Define an ODBC user or system data source before attempting to send a query to Model 204 (see Defining an ODBC data source).
- In the Connect Star For Model 204 program group under ODBC, click Catalog2.
- Use File > Open to display the Select Data Source dialog box. Select a defined data source to display all the tables or views in the Model 204 SQL catalog (CCACAT). You can determine the types of tables and information included in the display by selecting Setting in the View menu.
- Double-click a table or view to display all the columns that are included in the table and information about the columns.
ODBC third-party software
The Model 204 32-bit ODBC driver works with nearly all ODBC 32-bit applications.
Application development using ODBC
If your application requires an ODBC connection, you must register your Model 204 as a data source with the Microsoft ODBC administrator on your workstation.
Use the Microsoft 32-bit ODBC administrator to define a data source after the Model 204 ODBC driver has been installed.
For information on:
- Installing the driver, see Installing the product for ODBC
- Defining a data source, see Defining an ODBC data source
Connect★ for ODBC is multi threaded capable. Connect★ provides a common memory stack that will be shared during access of a multi threaded environment or application.
Connect★ is not multithreading.
If you are a knowledgeable programmer, you can override the default data source settings as described in this topic.
Overriding data source settings
An ODBC application can override the isolation level by calling the SQLSetConnectOption function with the SQL_TXN_ISOLATION option and setting it explicitly.
You can also override the settings for Isolation Level, Dirty Data Treatment, and Effect of COMMIT fields by passing explicit keyword values to SQLDriverConnect at connect time.
- The ODBC driver can direct SQLDriverConnect to display the SQLDriverConnect dialog box, where the user can enter a password.
- If an ODBC application calls SQLConnect, it can pass an explicit password in the third string argument to SQLConnect. (The three string arguments to SQLConnect are interpreted as DSN, UID, and PWD, respectively.) When SQLConnect is called, the driver looks in the registry to find the Default User Name and Default Password for the specified Data Source Name.
Note: Take care in selecting Isolation Level, Dirty Data Treatment, and Effect of COMMIT. Some ODBC applications are written to expect certain server behavior that is determined by these three settings. Such applications might behave unpredictably if these expectations are not met.
Robust applications, however, usually adjust their expectations to the settings you specify in the data source, because ODBC provides a way for applications to query these settings.
Data source default parameters
SQL programmers who are knowledgeable about these settings might want to change the defaults described here (to affect all queries using the defined data source) or change the settings for individual queries.
Use the Model 204 ODBC Driver -- Configure Data Source dialog box to change data source default parameters that can be accessed by ODBC or by other applications such as Visual Basic or Visual C++.
The specifications for data source parameters are stored in your system's registry under HKEY_LOCAL_MACHINE\SOFTWARE\ODBC\OCBC.INI.
Isolation Level
The Isolation Level parameter sets the default transaction isolation level used by the Model 204 32-bit ODBC driver to establish a connection to a Model 204 server. Isolation Level corresponds to the ISOLATION keyword.
| Choose... | If you want to... |
|---|---|
| Dirty Read | See another user's uncommitted updates. In this case, Model 204 does not lock the selected records. |
| Cursor Stability (default) | Ensure that you only see updates that have already been committed. In this case, Model 204 locks selected records when a cursor is opened. |
| Repeatable Read | Guarantee that you see only one version of a record during a transaction, even if you re-access the record within the same transaction. |
| Serializable | Have complete control over a table by enforcing strict serializability. This option locks any table that you use during an SQL transaction and prevents other users from accessing those SQL tables. Rocket Software suggests that you use this option rarely, if at all. |
Dirty Data Treatment
The Dirty Data Treatment parameter controls the default behavior of SQLFetch when the data contained in a Model 204 record cannot be converted to the SQL data types mapped onto it (this is known as "dirty data"). Dirty Data Treatment corresponds to the DIRTYREC keyword.
| Choose... | If you want to... |
|---|---|
| Server default (default) | Use the behavior specified in the SQLCNVER parameter of the CCAIN stream as the default for the Model 204 SQL Server being accessed. |
| Error | Make SQLFetch return an error whenever it encounters dirty data. |
| Skip record | Skip any Model 204 record containing dirty data and try the next. If one or more records are skipped, issue a warning message. |
Effect of COMMIT
The Effect of COMMIT parameter controls the behavior of the SQL_COMMIT option of the SQLTransact function.
| Choose... | If you want SQL_COMMIT to... |
|---|---|
| Drop (default) | Close cursors and drop statements. |
| Preserve | Preserve open cursors and prepared statements. |
Note: SQL_ROLLBACK always closes cursors and drops statements.
Debug tracing for ODBC
You can generate a debugging trace log that provides detailed information about your program run. Turn logging on if Technical Support requests it to research a problem. Turn logging off unless you are trying to document a problem. Do not activate logging during volume testing or production runs, because it slows Connect★ significantly.
Warning: The ODBC trace log file is cumulative and can grow to be very large. The log is best used for debugging specific programs with a small sample of data. If you use the log file, periodically erase it or edit out portions that are no longer needed.
Turning logging on and off
To turn logging on and off, do one of the following:
- use the CCACHECK program
- in the Connect Star for Model 204 program group, ODBC folder, Audit subfolder, select one of the following shortcuts:
- Turn Logging Off
- Turn Logging On
Note: Each connection writes its own set of log files with a date/time stamp as part of the file name into the Windows or WINNT folder.
CCACHECK program
The CCACHECK utility logs the following information to the file named LOGFILE.LOG in the same directory where you execute CCACHECK:
- Start and stop date for the program's execution
- Windows operating-system version
- Selected system information
- File and version information for files critical to 32-bit Connect★ ODBC
- Registry keys critical to 32-bit Connect★ ODBC
- Status of logging options
Creating your own shortcuts or overriding the defaults
Turn logging off by executing CCACHECK with the following parameters:
CCACHECK ~ALOGALL ~BOFF
Turn all the logs on by executing CCACHECK with the following parameters:
CCACHECK ~ALOGMSG ~B*IT ~CLOGRX ~DLOGTCP
You can turn on any combination of options, as required. Three logs are written to your Windows or WINNT folder:
- M204OD32.LOG
- M204RX32.LOG
- M204TC32.LOG
When you use the CCACHECK utility with the options listed in the following table, the results are written to the specified logs.
| CCACHECK Option | Writes the... |
|---|---|
| ~ALOGMSG ~B*It | M204OD32.LOG with Connect★ ODBC trace information. Use both the ~A and ~B options. |
| ~ALANGUSER ~BIBM1047, or ~BJAPAN, or ~BTURKISH, or ~BUS | M204OD32.LOG with the code for the character set you want to use:
|
| ~ATRANSTIME ~B* | M204OD32.LOG with the connection time out value. Zero is the default. |
| ~CLOGRX | M204RX32.LOG with communications information. |
| ~DLOGTCP | M204TC32.LOG with socket level information. |
LOGMSG message types
The LOGMSG message types are described in the following table.
| e = | Entry and exit from CLI or ODBC functions |
| x = | Diagnostic information |
| p = | Parameter values |
| b = | Bound buffer values |
| f = | Fetched values |
| t = | Internal trace |
| s = | SCFE (communications layer) request block |
| i = | Time intervals at entry and exit to every CLI/ODBC function and SCFE call |
You can also use asterisks to indicate either "log all" or "log all except" as shown in the following table.
| LOGMSG= | Logs... |
|---|---|
| * | All message types |
| ext | Types e, x, and t |
| *ipf | All message types except i, p, and f |