SirMon custom screens: Difference between revisions
m reduce size of graphic |
m misc formatting |
||
| Line 3: | Line 3: | ||
You've been warned. .. (Page built by JAL at the SIRIUS VM; file: FUNPGNEW SYSUT2) --> | You've been warned. .. (Page built by JAL at the SIRIUS VM; file: FUNPGNEW SYSUT2) --> | ||
<!-- Page name: SirMon custom screens--> | <!-- Page name: SirMon custom screens--> | ||
Option U on each of the system, user, file, subsystem, and task monitor menus | Option U on each of the [[SirMon System Monitor menu|system]], [[SirMon User Monitor menu|user]], [[SirMon File Monitor menu|file]], [[SirMon Subsystem Monitor menu|subsystem]], and [[SirMon Task Monitor menu|task]] monitor menus lets a <var class="product">SirMon</var> administrator define and maintain custom monitor screens. | ||
Once defined, custom screens appear on the appropriate menu exactly as | Once defined, custom screens appear on the appropriate menu exactly as | ||
the | the predefined screens supplied with <var class="product">SirMon</var>, and they support the same prefix and command-line commands. | ||
Option A allows each user to create their own private "adhoc" screen | Option A allows each user to create their own private "adhoc" screen | ||
within each category | within each category. Such a screen is saved between <var class="product">SirMon</var> sessions. | ||
When | ==Updating a monitoring menu== | ||
or Task menu, a | When option <b>U</b> is selected on the System, User, File, Subsystem, | ||
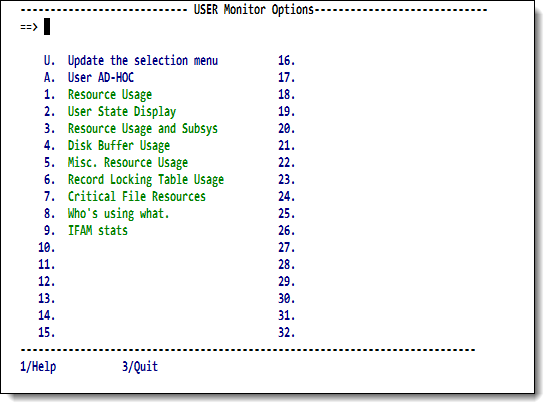
currently available from | or Task Monitor menu, a screen is displayed that contains all the statistic displays currently available from that menu. For example, <code>SIRMON 3.U</code> entered from an RKTools command prompt produces: | ||
For example, <code>SIRMON 3.U</code> produces: | |||
<p class="caption" style="width:475px">Menu Customization screen</p> | <p class="caption" style="width:475px">Menu Customization screen</p> | ||
<p class="figure">[[File:SmonCustom.png|475px]]</p> | <p class="figure">[[File:SmonCustom.png|475px]]</p> | ||
Each display line has two input areas. | ==The updating commands== | ||
The two-character input area to the left of each menu selection number | Each non-protected display line on a customizing screen has two input areas. The two-character input area to the left of each menu selection number is what you use to indicate an action to be taken. The input area to the right of the menu selection number lets you maintain a descriptive name for the custom screen. | ||
is | |||
The input area to the right of the menu selection number | The input areas associated with the predefined screens provided with | ||
a descriptive name for the custom screen. | |||
The input areas associated with the | |||
<var class="product">SirMon</var> are protected, preventing modifications. | <var class="product">SirMon</var> are protected, preventing modifications. | ||
Only one administrator at a time may modify a particular menu. | Only one administrator at a time may modify a particular menu. | ||
The following action commands can be placed | The following action commands can be placed to the left of an item number: | ||
<table class="thJustBold"> | <table class="thJustBold"> | ||
<tr><th>A</th> | <tr><th>A</th> | ||
<td>Add a new entry to the menu. You must provide a name for the entry in the input area to the right of the item number. You may only enter an <code>A</code> on a line that does not have an existing menu definition. If you press the Enter key, you advance to the parameter selection screen.</td></tr> | <td>Add a new entry to the menu. You must provide a name for the entry in the input area to the right of the item number. You may only enter an <code>A</code> on a line that does not have an existing menu definition. If you press the Enter key, you advance to the parameter selection screen.For more information, see [[#Adding a new item to the monitoring menu|Adding a new item to the monitoring menu]], below.</td></tr> | ||
<tr><th>C</th> | <tr><th>C</th> | ||
| Line 48: | Line 44: | ||
<td>Move the indicated menu entry to a different location on the menu. The number you enter is the desired new location for the current menu entry. | <td>Move the indicated menu entry to a different location on the menu. The number you enter is the desired new location for the current menu entry. | ||
<p> | <p> | ||
If you | If you move an entry "up," all entries from the target value (<i>nn</i>) to just before the current entry are moved down one. | ||
If you | </p> | ||
<p> | |||
If you move an entry "down," all entries starting one past the current entry and ending at the target value (<i>nn</i>) are moved up one. </p> | |||
<p> | <p> | ||
You may update only one line at a time, and you cannot change the position of any predefined <var class="product">SirMon</var> screens.</p></td></tr> | You may update only one line at a time, and you cannot change the position of any predefined <var class="product">SirMon</var> screens.</p></td></tr> | ||
| Line 58: | Line 56: | ||
move up one position. | move up one position. | ||
== | ==Adding a new item to the monitoring menu== | ||
As described in the table above, you | As described in the table above, you add an item to monitor by using the <var>A</var> command and entering the name of the item: | ||
<p class="caption" style="width:400px">Adding an entry</p> | <p class="caption" style="width:400px">Adding an entry</p> | ||
| Line 70: | Line 68: | ||
<p class="figure">[[File:SmonCustomSelectStat.png|475px]]</p> | <p class="figure">[[File:SmonCustomSelectStat.png|475px]]</p> | ||
You select statistics by typing their names into the labeled input | |||
areas in the upper portion of the screen. | areas in the upper portion of the screen. The PF11 key toggles the display of selectable statistics between a simple list of statistic names and a list of statistics with associated descriptions. | ||
The PF11 key toggles the display of selectable statistics between a simple list | |||
of statistic names and a list of statistics with associated descriptions. | |||
<p class="caption" style="width:400px">Viewing statistic descriptions</p> | |||
<p class="caption" style="width:400px"> | |||
<p class="figure">[[File:SmonCustomSelectStat2crop.png|400px]]</p> | <p class="figure">[[File:SmonCustomSelectStat2crop.png|400px]]</p> | ||
| Line 82: | Line 77: | ||
The custom screen definition can be saved with the PF12 key. | The custom screen definition can be saved with the PF12 key. | ||
The screen allows up to 16 statistics to be added to any screen definition. | The screen allows up to 16 statistics to be added to any screen definition. When the screen is invoked, <var class="product">SirMon</var> examines the type of the current user's terminal to see how many of the statistics fit on the physical screen, and it limits the display accordingly. Model 5 3270 displays, for instance, can display as many as 132 characters across the screen. | ||
When the screen is invoked, <var class="product">SirMon</var> examines the type of the current user's terminal to see how many of the statistics | |||
physical screen, and limits the display accordingly. | |||
Model 5 3270 displays, for instance, can display as many as 132 characters | |||
across the screen. | |||
If the last statistic defined for a screen is procedure name (PNAME), | If the last statistic defined for a screen is procedure name (PNAME), | ||
<var class="product">SirMon</var> will fit as many of the names as it can on the screen, truncating the name if necessary. | <var class="product">SirMon</var> will fit as many of the names as it can on the screen, truncating the name if necessary. | ||
The <var class="product">SirMon</var> | The <var class="product">SirMon</var> Help facility is automatically generated for a custom screen, including descriptions of each displayed statistic. | ||
==Statistics as rates or totals== | |||
With a few exceptions, viewable statistics fall into five categories: | With a few exceptions, viewable statistics fall into five categories: | ||
literal values (like procedure and file names), | literal values (like procedure and file names), percentages (such as BFULLP), rates, totals, or differences. | ||
percentages (such as BFULLP), rates, totals, or differences. | |||
Most statistics viewable as rates can also be viewed as totals. | Most statistics viewable as rates can also be viewed as totals. | ||
Statistics that can be viewed as either a rate or a total default in | Statistics that can be viewed as either a rate or a total default in | ||
| Line 101: | Line 92: | ||
To specify that a statistic should be presented as a total in a custom | To specify that a statistic should be presented as a total in a custom | ||
screen, you append a number sign (<tt>#</tt>) to the statistic name | screen, you append a number sign (<tt>#</tt>) to the statistic name | ||
(for example, <code>DKIO#</code>). | (for example, <code>DKIO#</code>). <var class="product">SirMon</var> warns you if the statistic cannot be displayed as a total, and it does not allow the screen to be previewed or saved. | ||
<var class="product">SirMon</var> | |||
displayed as a total, and it | |||
A statistic may be specified as both a rate and a total on the same screen. | A statistic may be specified as both a rate and a total on the same screen. For example, a file statistics screen could be defined that presents <var>[[MSTRADD parameter|MSTRADD]]</var> (records added to table B master areas) as both a rate and a total. | ||
For example, a file statistics screen could be defined that presents | Users of the screen would see both the <var>MSTRADD</var> total value as well as the rate of change for <var>MSTRADD</var> in all displayed files at each interval refresh. | ||
MSTRADD (records added to table B master areas) as both a rate and a total. | |||
Users of the screen would see both total | |||
of change for MSTRADD in all displayed files at each interval refresh. | |||
==See also== | ==See also== | ||
Revision as of 23:31, 2 November 2015
Option U on each of the system, user, file, subsystem, and task monitor menus lets a SirMon administrator define and maintain custom monitor screens. Once defined, custom screens appear on the appropriate menu exactly as the predefined screens supplied with SirMon, and they support the same prefix and command-line commands.
Option A allows each user to create their own private "adhoc" screen within each category. Such a screen is saved between SirMon sessions.
When option U is selected on the System, User, File, Subsystem,
or Task Monitor menu, a screen is displayed that contains all the statistic displays currently available from that menu. For example, SIRMON 3.U entered from an RKTools command prompt produces:
Menu Customization screen
The updating commands
Each non-protected display line on a customizing screen has two input areas. The two-character input area to the left of each menu selection number is what you use to indicate an action to be taken. The input area to the right of the menu selection number lets you maintain a descriptive name for the custom screen.
The input areas associated with the predefined screens provided with SirMon are protected, preventing modifications.
Only one administrator at a time may modify a particular menu.
The following action commands can be placed to the left of an item number:
| A | Add a new entry to the menu. You must provide a name for the entry in the input area to the right of the item number. You may only enter an A on a line that does not have an existing menu definition. If you press the Enter key, you advance to the parameter selection screen.For more information, see Adding a new item to the monitoring menu, below. |
|---|---|
| C | Change an existing menu entry. You may only enter a C on a line that already contains a menu entry. C indicates that you intend to update the list of selected parameters. If you press the Enter key, you advance to the parameter selection screen. |
| D | Delete an existing menu entry.
You may only enter D on a line that has an existing menu entry defined. If you press the Enter key, the menu entry is deleted from the menu, and its parameters are discarded. |
| U | Change the descriptive text of the indicated menu entry, without changing the contents of its displayed screen. Enter U in the input area, type over the existing descriptive text, and press the Enter key. The new name is then available. |
| nn | Move the indicated menu entry to a different location on the menu. The number you enter is the desired new location for the current menu entry.
If you move an entry "up," all entries from the target value (nn) to just before the current entry are moved down one. If you move an entry "down," all entries starting one past the current entry and ending at the target value (nn) are moved up one. You may update only one line at a time, and you cannot change the position of any predefined SirMon screens. |
The customized menu will not contain any embedded blank entries. If an entry is deleted from the middle of the menu, subsequent entries move up one position.
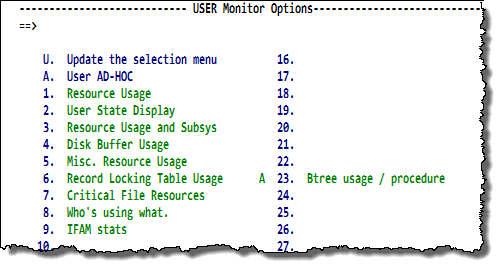
As described in the table above, you add an item to monitor by using the A command and entering the name of the item:
Adding an entry
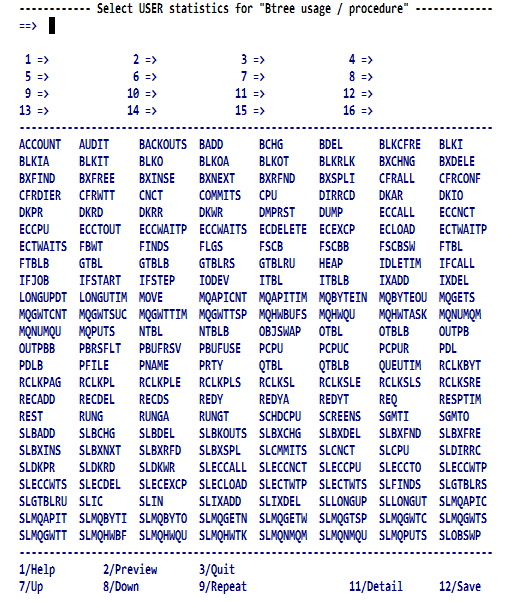
The parameter selection screen provides the list of statistics available for that selected view (system, user, file, subsystem, or task):
Custom parameter selection screen
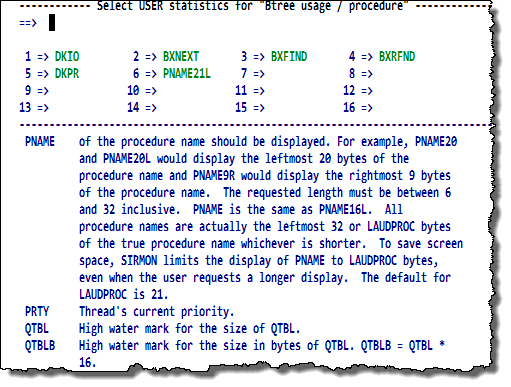
You select statistics by typing their names into the labeled input areas in the upper portion of the screen. The PF11 key toggles the display of selectable statistics between a simple list of statistic names and a list of statistics with associated descriptions.
Viewing statistic descriptions
The custom screen can be previewed at any time with the PF2 key. The custom screen definition can be saved with the PF12 key.
The screen allows up to 16 statistics to be added to any screen definition. When the screen is invoked, SirMon examines the type of the current user's terminal to see how many of the statistics fit on the physical screen, and it limits the display accordingly. Model 5 3270 displays, for instance, can display as many as 132 characters across the screen. If the last statistic defined for a screen is procedure name (PNAME), SirMon will fit as many of the names as it can on the screen, truncating the name if necessary.
The SirMon Help facility is automatically generated for a custom screen, including descriptions of each displayed statistic.
Statistics as rates or totals
With a few exceptions, viewable statistics fall into five categories: literal values (like procedure and file names), percentages (such as BFULLP), rates, totals, or differences. Most statistics viewable as rates can also be viewed as totals. Statistics that can be viewed as either a rate or a total default in SirMon to rate displays.
To specify that a statistic should be presented as a total in a custom
screen, you append a number sign (#) to the statistic name
(for example, DKIO#). SirMon warns you if the statistic cannot be displayed as a total, and it does not allow the screen to be previewed or saved.
A statistic may be specified as both a rate and a total on the same screen. For example, a file statistics screen could be defined that presents MSTRADD (records added to table B master areas) as both a rate and a total. Users of the screen would see both the MSTRADD total value as well as the rate of change for MSTRADD in all displayed files at each interval refresh.
See also
- SirMon
- SirMon application structure
- SirMon main menu
- SirMon System Overview screen
- SirMon threshold setting
- SirMon background monitor
- SirMon System Monitor menu
- SirMon User Monitor menu
- SirMon File Monitor menu
- SirMon Subsystem Monitor menu
- SirMon Task Monitor menu
- SirMon Janus Monitor menu
- SirMon custom screens
- SirMon critical-file-resource monitoring
- SirMon user-initiated capturing of statistics
- System statistics displayed in SirMon
- User statistics displayed in SirMon
- File statistics displayed in SirMon
- Subsystem statistics displayed in SirMon
- Task statistics displayed in SirMon
- Critical File Resource statistics displayed in SirMon
- SirMon date processing


