SirMon application structure: Difference between revisions
m RKTools replaces UL/SPF |
m mention RKWeb (no link yet) |
||
| Line 1: | Line 1: | ||
<var class="product">SirMon</var> organizes <var class="product">Model 204</var> information by system, user, file, subsystem, | |||
and task statistics, and it allows presentation of any combination of | |||
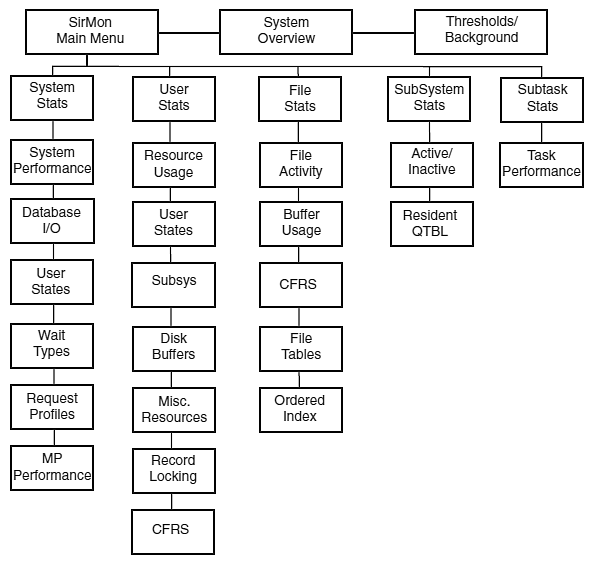
statistics within each of these five categories. This organization is shown in the figure below for the 3270 interface, and it is largely mirrored in RKWeb. | |||
The hierarchy shown below is also extensible in both interfaces via user-defined views ([[SirMon custom screens]]). | |||
<var class="product">SirMon</var> organizes <var class="product">Model 204</var> information by system, user, file, subsystem | |||
and task statistics | |||
and it allows presentation of any combination of | |||
statistics within each | |||
The hierarchy shown below is also extensible via user-defined views ([[SirMon custom screens]]). | |||
<p class="caption" style="width:500px">SirMon application hierarchy</p> | <p class="caption" style="width:500px">SirMon application hierarchy</p> | ||
<p class="figure">[[File:SmonAppHierarchy.png|500px]]</p> | <p class="figure">[[File:SmonAppHierarchy.png|500px]]</p> | ||
In the 3270 interface, navigation of the <var class="product">SirMon</var> system is not limited to the hierarchical menu structure. | |||
You can use the "fast path" method, bypassing the menu structure by | You can use the "fast path" method, bypassing the menu structure by | ||
entering transit commands in the command area of any <var class="product">SirMon</var> window, | entering transit commands in the command area of any <var class="product">SirMon</var> window, | ||
| Line 19: | Line 14: | ||
==PF keys in SirMon== | ==PF keys in SirMon== | ||
The tables in this section describe the standard and variable PF keys in the <var class="product">SirMon</var> PF keys in the 3270 interface. Typical browser controls provide comparable functionality in RKWeb. | |||
The standard <var class="product">SirMon</var> PF keys are: | The standard <var class="product">SirMon</var> PF keys are: | ||
<table class="thJustBold"> | <table class="thJustBold"> | ||
<tr><th>PF1</th> | <tr><th>PF1</th> | ||
<td>Display | <td>Display Help information for the current screen.</td> </tr> | ||
<tr><th>PF3</th> | <tr><th>PF3</th> | ||
| Line 40: | Line 37: | ||
<tr><th>PF5</th> | <tr><th>PF5</th> | ||
<td>Sort by userid, file name, or subsystem name. | <td>Sort by userid, file name, or subsystem name. | ||
This PF key is only available when viewing user, file, or subsystem | This PF key is only available when viewing user, file, or subsystem data in a scrollable display.</td></tr> | ||
data in a scrollable display.</td></tr> | |||
<tr><th>PF6</th> | <tr><th>PF6</th> | ||
| Line 72: | Line 68: | ||
<tr><th>PF12</th> | <tr><th>PF12</th> | ||
<td>Refreshes the data displayed in scrollable screens. Having a specific refresh key allows users in scrollable screens to collect statistics for a group of users or files, and then to scroll through the snapshot without updating the displayed data. In the customization selection screens, the PF12 key saves the | <td>Refreshes the data displayed in scrollable screens. Having a specific refresh key allows users in scrollable screens to collect statistics for a group of users or files, and then to scroll through the snapshot without updating the displayed data. In the customization selection screens, the PF12 key saves the selected parameter entries.</td></tr> | ||
selected parameter entries.</td></tr> | |||
</table> | </table> | ||
Revision as of 22:26, 5 May 2017
SirMon organizes Model 204 information by system, user, file, subsystem, and task statistics, and it allows presentation of any combination of statistics within each of these five categories. This organization is shown in the figure below for the 3270 interface, and it is largely mirrored in RKWeb. The hierarchy shown below is also extensible in both interfaces via user-defined views (SirMon custom screens).
SirMon application hierarchy
In the 3270 interface, navigation of the SirMon system is not limited to the hierarchical menu structure.
You can use the "fast path" method, bypassing the menu structure by
entering transit commands in the command area of any SirMon window,
as described in SirMon screens fast path.
Using a fast path also works from the Model 204 command line outside of SirMon,
if you precede the transit command by the APSY name, as in: SIRMON 3.7.
PF keys in SirMon
The tables in this section describe the standard and variable PF keys in the SirMon PF keys in the 3270 interface. Typical browser controls provide comparable functionality in RKWeb.
The standard SirMon PF keys are:
| PF1 | Display Help information for the current screen. |
|---|---|
| PF3 | Exit the current screen and return to the previous screen or menu. |
The variable set of PF keys have functions specific to the type of screen displayed or the content of the screen itself. The variable PF keys are described below:
| PF2 | Sort by user, file, subsystem, or task number. This PF key is only available when viewing a scrollable display screen. |
|---|---|
| PF5 | Sort by userid, file name, or subsystem name. This PF key is only available when viewing user, file, or subsystem data in a scrollable display. |
| PF6 | Zoom on a selected user, file, subsystem, or task.
Place the cursor on the line for the user, file, subsystem, or task to be monitored and press the PF6 key. The screen will switch to a non-scrollable screen for the selected entity. |
| PF7 | Scroll back to the previous page.
If you enter |
| PF8 | Scroll forward to the next page.
If you enter |
| PF9 | Repeat the last valid command entered in the command window. |
| PF10 | Display detail about the selected user, file, or subsystem, or about the entire system. On a scrollable screen place the cursor on the line for the user, file, or subsystem to be viewed in detail, and press the PF10 key. The detail screen will display all critical performance and state data for the selected user, file, or subsystem, or about the entire system. |
| PF11 | For system display, toggles the display between per-second rate display and per-screen rate displays. In the custom menu definition screen the PF11 key toggles the display of selectable statistics between a list of statistic names and a list of names with associated help text. |
| PF12 | Refreshes the data displayed in scrollable screens. Having a specific refresh key allows users in scrollable screens to collect statistics for a group of users or files, and then to scroll through the snapshot without updating the displayed data. In the customization selection screens, the PF12 key saves the selected parameter entries. |
SirMon commands
The commands available in SirMon include commands for scrolling, searching, sorting and limiting the display data, bumping users, and timing screen displays. Certain commands are not always available. For instance, scrolling commands only work on screens with scrollable lists of display data. SirMon commands are described below:
| L n | The L command positions the data display at line number n when you press enter. If n is greater than the total number of items in the display list you will be positioned at the last item. |
|---|---|
| F | Find will search from the current line (top line) to the top of the display list for your search string. For example -F xxx will search for the string xxx. A variant of this command is the -/ instead of -F. |
| nn | Moves the display forward nn lines. To move backward nn lines enter a negative number. -9 will move the display back 9 lines. |
| ALL | The ALL command removes any restrictions on the display of entities. That is, it turns off the effects the the USER, FILE, or SUBSYS commands. |
| BUMP n | Bumps a specific user based on user number. Only a single user may be bumped with the BUMP command. |
| T x y | Invokes an automatic refresh mode of operation. This command automatically refreshes the screen x times, every y seconds: T 10 2 for example, refreshes the screen 10 times at intervals of 2 seconds. The commands TIME, TIM and TI are valid synonyms. Automatic refresh operation may be interrupted using any attention generating key. |
| FILE | When monitoring users, files or subsystems, the list of displayed entities may be limited to those with a particular file open. The format of the command is:
FILE filename where filename is any valid Model 204 file name.
Typing either |
| USER | When monitoring files or users, the list of displayed entities can be
limited to those held open by a particular user, or in a user display, those users matching a particular pattern. Only one user may be specified, and the format of the command is: USERuserno where userno is the User number of an active user. Typing eitherUSER with no user number, or typing ALL, returns the display to the complete list of files. |
| SUBSYS | When monitoring users or files, the displayed list can be restricted to users who are running in a particular subsystem or files open by a particular subsystem. The format of the command is:
SUBSYSsubsysname where subsysname is the name of any active subsystem.
Typing |
| CHKP | When monitoring users, the displayed list can be restricted to users
who are currently preventing checkpoints with an active updating transaction. The format of the command is:CHKP TypingCHKP OFF or ALL returns the display to all users. |
| SORT | Scrollable screens may be sorted by any displayed statistic or parameter by typing
SORTfield1 t [field2 t] ... where fieldN is the screen title of any displayed information in the scrollable portion of the screen, and t is either |
Prefix commands are only available on Scrollable screens (described in next section). Prefix commands are entered in the input area immediately prior to a User, File, or Subsystem name to invoke some action against them. Valid Prefix commands are:
| STOP | In the Active/Inactive Subsystem monitor screen, users may issue the STOP command in the prefix area before the subsystem name. If the user has STOP privileges for the subsystem, it will be stopped and the running status will be updated on the monitoring screen when the screen refresh key is pressed. If the user does not have permission to stop the subsystem, a warning message will be issued and the subsystem status will not change. |
|---|---|
| START | In the Active/Inactive Subsystem monitor screen, users may issue the START command in the prefix area before the subsystem name. System action is similar to the STOP command (above). |
| B | When entered into the prefix area of a User statistics display, BUMPs the displayed user from the system. |
| 0/L/S/H | Entering any of these codes in the prefix command area on a User Monitoring screen alters the PRIORITY of the specified user. Specifying H changes the user's priority to high (minimum priority 80 and maximum 127), S to standard (minimum 32, maximum 79), L to low (minimum 0, maximum 47), and 0 changes the user's priority range to a low of 0 and a high of 16.
These priority settings remain in effect for the remainder of the user's session or until they are changed again by the system administrator. (As with the PRIORITY command, the user's priority in CCASTAT is not changed). |
Screen format overview
Non-scrollable screen format
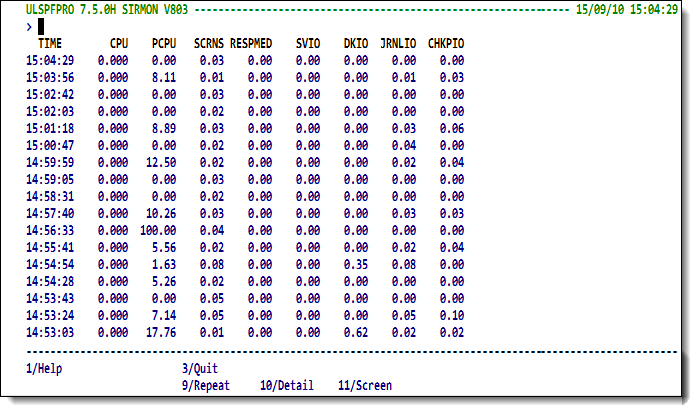
Non-scrollable screens present a single line of performance data each time the screen is refreshed (the the ENTER key acts as the refresh key). The most recent line of performance data is always presented at the top and highlighted. Each previously displayed line is pushed down one until it disappears off the bottom of the screen. This screen is used to present system views, and to zoom in on selected individual users or files.
Non-scrollable screen showing system activity
The title line of the non-scrollable screen displays, from left to right:
- The category of measurement (System, User, File, Subsystem, or Task)
- The current online region name, the release of Model 204, and the system ID (each separated by a slash)
- The total elapsed time (INTERVAL) for the online run when the screen is first displayed (or the elapsed time since the last screen refresh)
The top line is always the latest information, with previous snapshots being pushed down the screen.
There is no prefix command area on this screen. Commands are entered from the command line. There are no search or paging commands in this screen structure.
Scrollable screen format
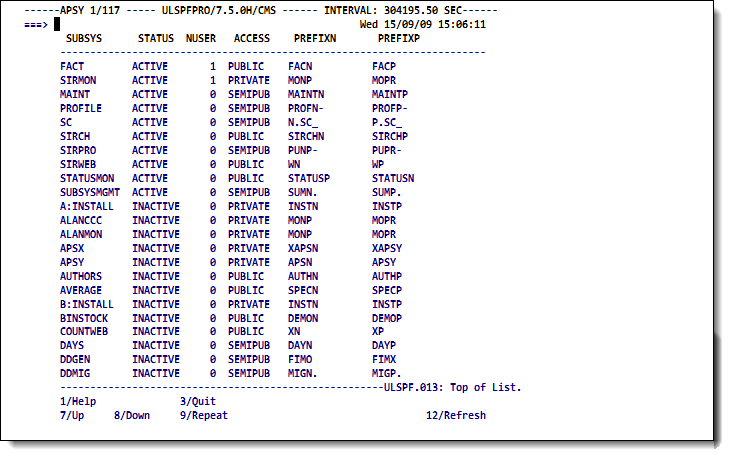
Scrollable screens present lists of information that can be paged through using the PF7 key and the PF8 key. Displayed data is refreshed by pressing the PF12 key. This type of screen is used to present user, file, subsystem or task performance data.
Scrollable screen showing APSY activity
The title line of scrollable screens displays the category of measurement in the upper left corner of the screen. In addition, the title line identifies the current online region name, the release of Model 204, the JES job id, and the system id. Each piece of this identification data is separated by a slash. The initial INTERVAL displayed when a user first enters any screen, is the user's connect time. Thereafter the interval is elapsed time since the last screen refresh.
You may enter command strings for rapid transit through the application
structure, as well as search and scroll commands in the command window.
Scroll commands allow you to move to a selected line by entering the
line number, or you may move to the top by entering TOP, or
you may move to the bottom by entering BOT.
To search from the current line (the top line of the display area) to
the bottom of the list of users, files or subsystems, enter
/ or F followed by the search string, for
example: /BIGFILE to find the string BIGFILE.
Searching backwards is accomplished by entering -/
or -F.
The prefix command area allows bumping of users, starting or stopping of subsystems, and all other prefix commands described in the previous section.
Where wildcards are permitted in command line commands, the following wildcard conventions hold:
| * | Matches any group of characters. |
|---|---|
| ? | Matches any individual character. |
| " | Indicates that the following character should be matched literally, even if it is asterisk (*), question mark (?) or double quote ("). |
For example:
*matches anything.*A*matches anything with the letterAin it.????matches anything with four characters in it.*X?matches anything whose second-to-last character isX.*ABmatches only the string*AB.
Menu processing
SirMon menus provide access to monitoring screens by number. Choosing a valid number advances the user session to the selected screen.
The command X has the same effect as the PF3 key in every
menu: the user is returned to the previous menu in the application
hierarchy.
If the user is at the SirMon Main Menu, the PF3 key will
return to the RKTools main menu if the RKTOOLS subsystem is active,
while X will return to the Model 204 command line.
SirMon screens fast path
Since SirMon is such an important tool for monitoring performance and troubleshooting, it is useful to be able to move quickly from
one screen to another.
You can do so using the "fast path" features built in
to the RKTools products: you enter an equal sign (=) followed
by the "screen number" in the command area of a SirMon screen, and SirMon jumps to that screen.
For example, to jump to the User Monitor/Resource Usage screen, you
enter =3.1 in the command area of a SirMon screen.
The SirMon screen numbers are shown below (except, of course, any custom screens you may have created):
1. System Overview Screen 2. System Monitor U. Update the selection menu A. User AD-HOC 1. System Performance 2. Database I/O Performance 3. User State Distribution 4. User Wait Type Dist 5. Request Profile 6. MP Performance 3. User Monitor U. Update the selection menu A. User AD-HOC 1. Resource Usage 2. User State Display 3. Resource Usage and Subsys 4. Disk Buffer Usage 5. Misc. Resource Usage 6. Record Locking Table Usage 7. Critical File Resources 4. File Monitor U. Update the selection menu A. User AD-HOC 1. File Activity 2. Buffer Usage 3. Critical File Resource 4. File Table Usage 5. Ordered Index Usage 5. Subsystem Monitor U. Update the selection menu A. User AD-HOC 1. Active/Inactive Subsystems 2. Resident QTBL Usage 6. MP Task Monitor U. Update the selection menu A. User AD-HOC 1. Task Performance X. Quit
See also
- SirMon
- SirMon application structure
- SirMon main menu
- SirMon System Overview screen
- SirMon threshold setting
- SirMon background monitor
- SirMon System Monitor menu
- SirMon User Monitor menu
- SirMon File Monitor menu
- SirMon Subsystem Monitor menu
- SirMon Task Monitor menu
- SirMon Janus Monitor menu
- SirMon custom screens
- SirMon critical-file-resource monitoring
- SirMon user-initiated capturing of statistics
- System statistics displayed in SirMon
- User statistics displayed in SirMon
- File statistics displayed in SirMon
- Subsystem statistics displayed in SirMon
- Task statistics displayed in SirMon
- Critical File Resource statistics displayed in SirMon
- SirMon date processing


